
 Sign In
Have you ever looked at vintage table linens, pillowcases, or lingerie and noticed the beautiful, subtle effect of hemstitching near the edges? The tiny holes and subtle tone-on-tone embroidery look incredibly intricate and time consuming. Indeed, in many cases, they were.
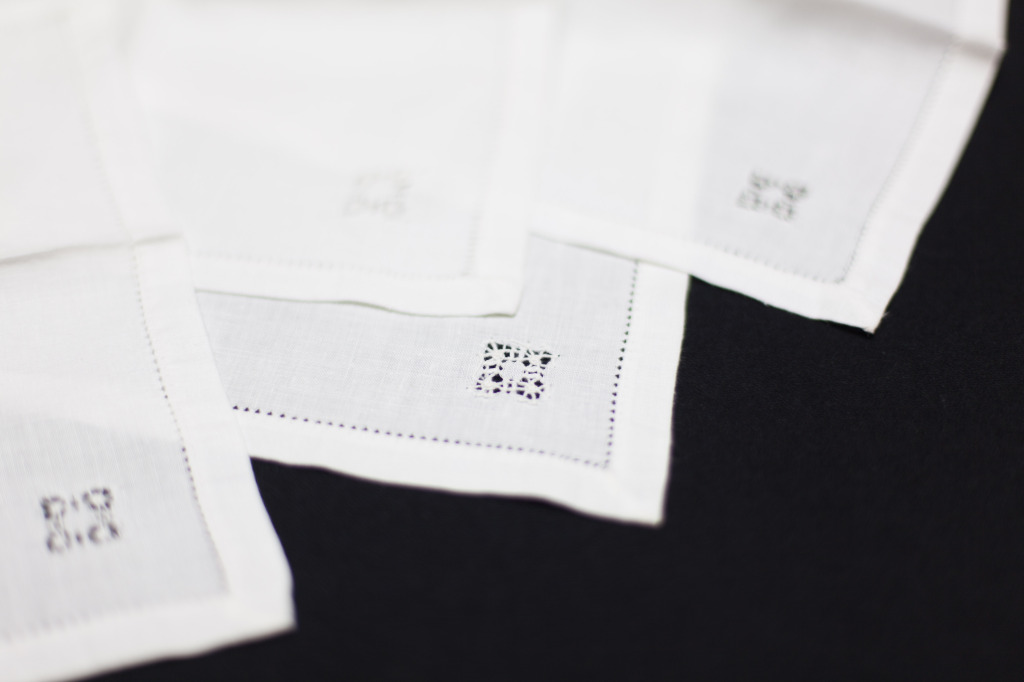
Hemstitching was done by hand along with other drawn threadwork to create these vintage napkins.
Hemstitching was also often combined with whitework embroidery on vintage linens.
Much of this vintage hemstitching was done painstakingly by hand. But today, you can get a similar effect using your home sewing machine. In fact, even if your machine doesn't include a wide variety of fancy stitches, you can still create beautiful effects with just a few inexpensive notions and simple techniques. What's more, it doesn't need to be relegated to the hem; you can use hemstitching nearly anywhere to create a vintage touch.
A brief history of hemstitching
Hemstitching is a form of needlework traditionally used to create decorative hems. To create the look, individual threads were pulled out from the fabric along the warp or the weft, leaving small gaps in the fabric. The remaining threads that transversed these gaps were then embroidered by hand with needle and thread to create a wide variety of decorative patterns. Because hemstitching involves removing threads from fabric, it falls under a category of needlework known as drawn threadwork.
Because creating the gaps requires pulling threads in this way, hand hemstitching can only be done along the grainlines of a fabric. This is why you'll see it most commonly adorning rectangular items such as napkins or pillowcases, or along straight hems such as the bottom of a vintage slip.
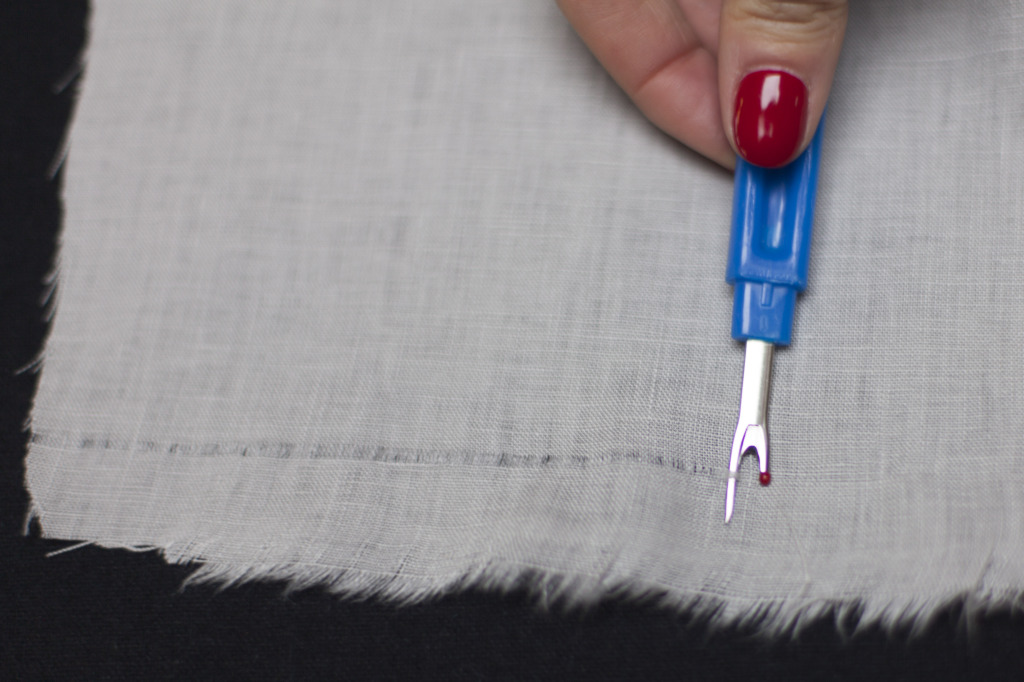
To create hand hemstitching, individual threads are pulled from the fabric.
Like other forms of hand needlework, this type of hemstitching was labor intensive to produce. In the late 19th century, the first hemstitching machine was produced, allowing manufacturers to create a hemstitched look quickly and efficiently. These single-use machines looked similar to a traditional straight stitch sewing machine, but their only function was to create a hemstitch. Today, dedicated hemstitching machines are still produced and used in factories, usually to create household linens.
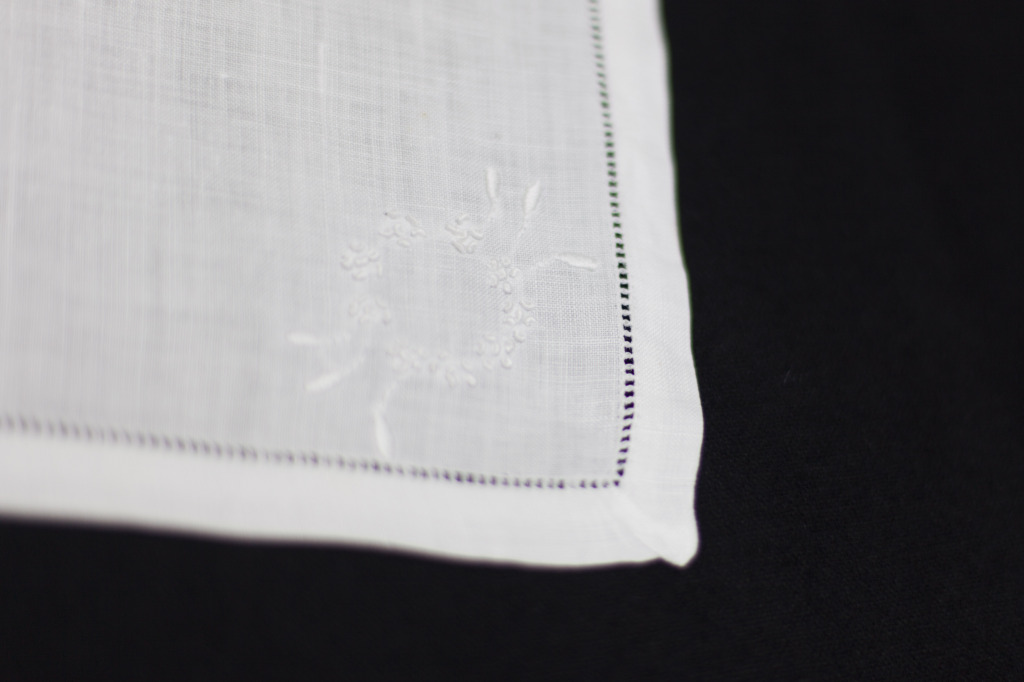
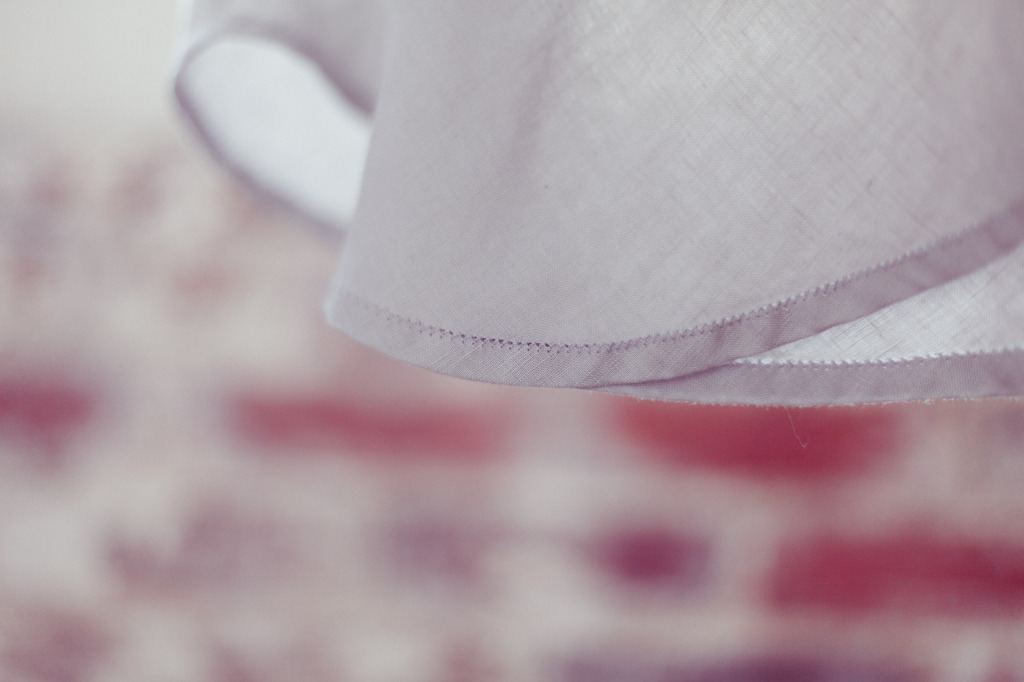
In addition to vintage linens, hemstitching was
often used in fine lingerie. Here it's used
to hold a narrow facing in place on a silk slip.
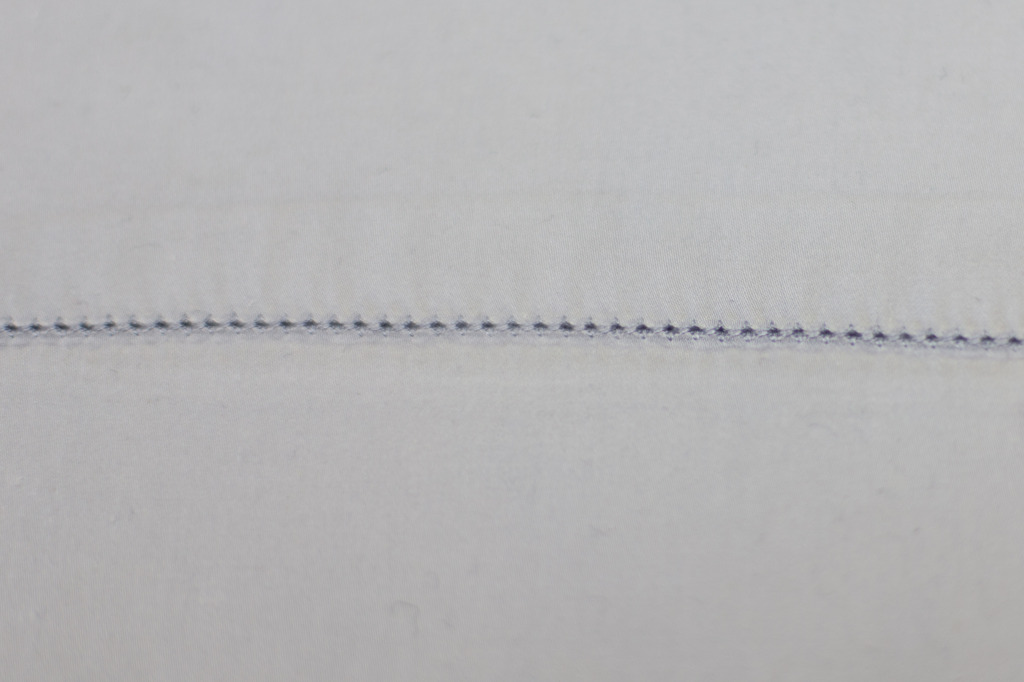
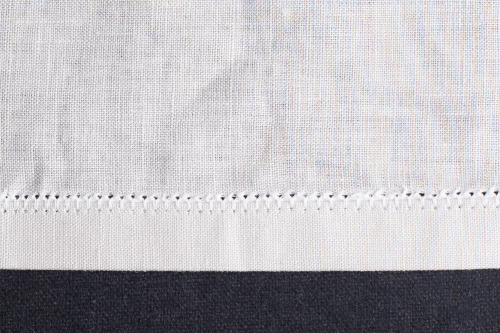
This modern bed sheet displays hemstitching along
the top, created in a factory with specialized
hemstitching equipment.
01 Section
Hemstitching basics
The good news is that you don't need a special machine to produce the look of hemstitching on your own projects quickly and easily. While lovers of hand needlework can certainly create the same gorgeous effects and intricate patterns of years gone by at home, you can also get some lovely effects without doing a bit of hand sewing.
Hemstitching can be used to secure hems, facings, bindings, and more.
Where to use hemstitching
Hemstitching is most commonly used to sew down or decorate hems, but it can actually be used in a wide variety of situations. Whenever you need to sew an edge down on your fabric, hemstitching gives you a decorative alternative to simple edgestitching or stitching in the ditch.
Use hemstitching to stitch down the edges of cuffs, plackets, binding, or facings, using the methods shown in section 4. Or, you can use it simply to add a detail to any otherwise plain edge. It looks beautiful stitched along the edges of collars or the top of a shirt or patch pocket.

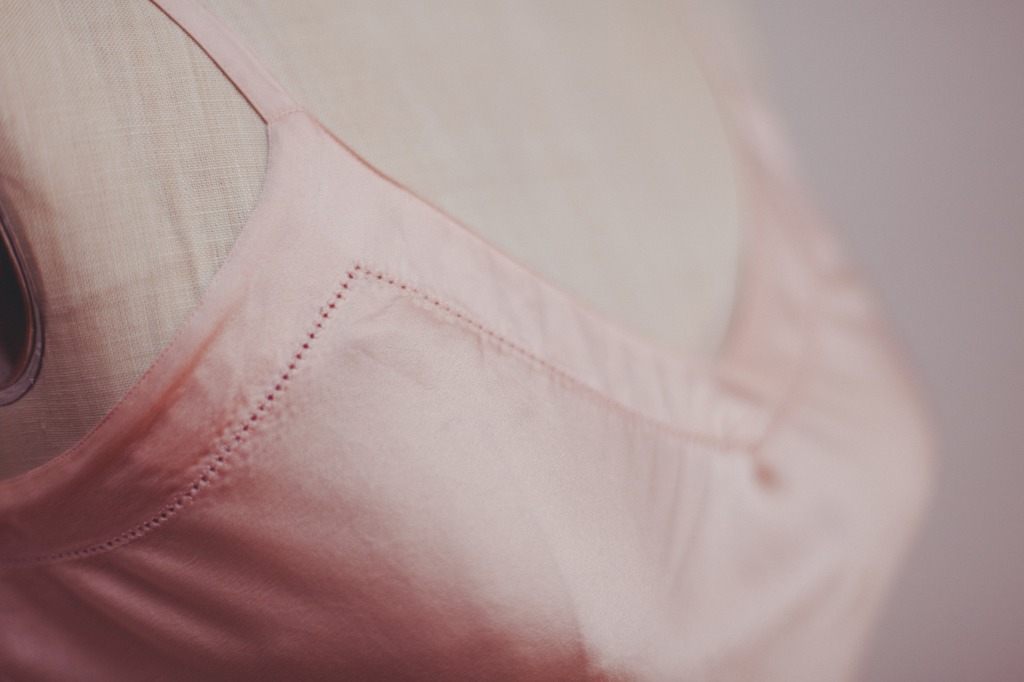
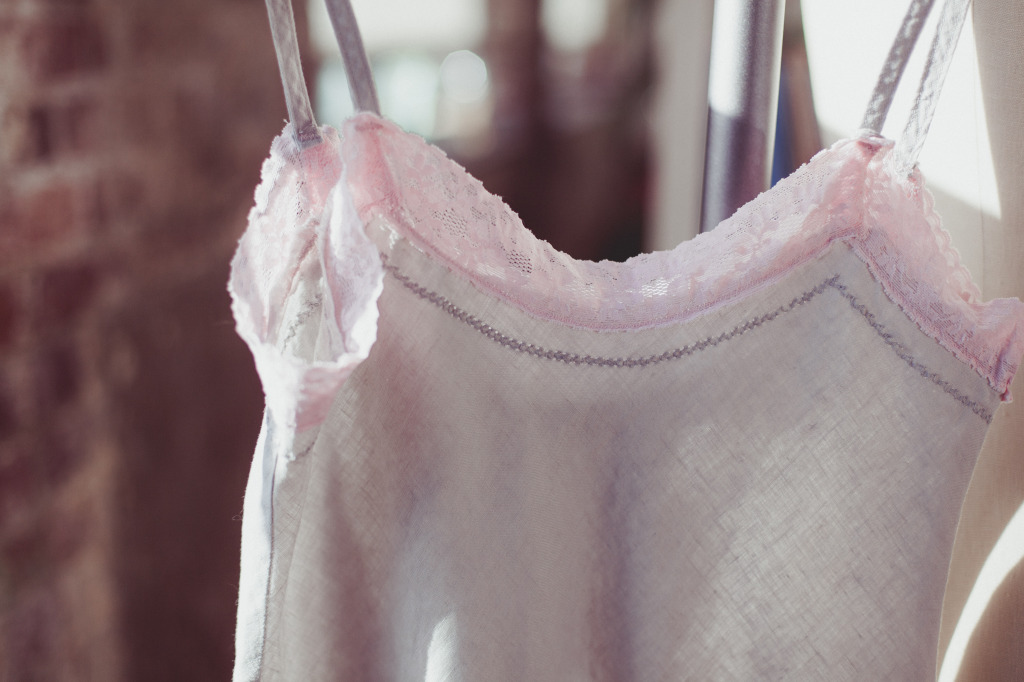
Hemstitching looks great on linen, cotton, and silk fabrics with an even weave. This Savannah camisole was made in a plain linen.
Fabrics
Hemstitching can work on a wide variety of fabrics, but it's a natural fit for linen, cotton, and silk. When you apply hemstitching along the grainline of fabrics with larger threads and an even weave, you can emphasize the openness of the stitches by removing individual threads before you stitch, just like you would in hand hemstitching.
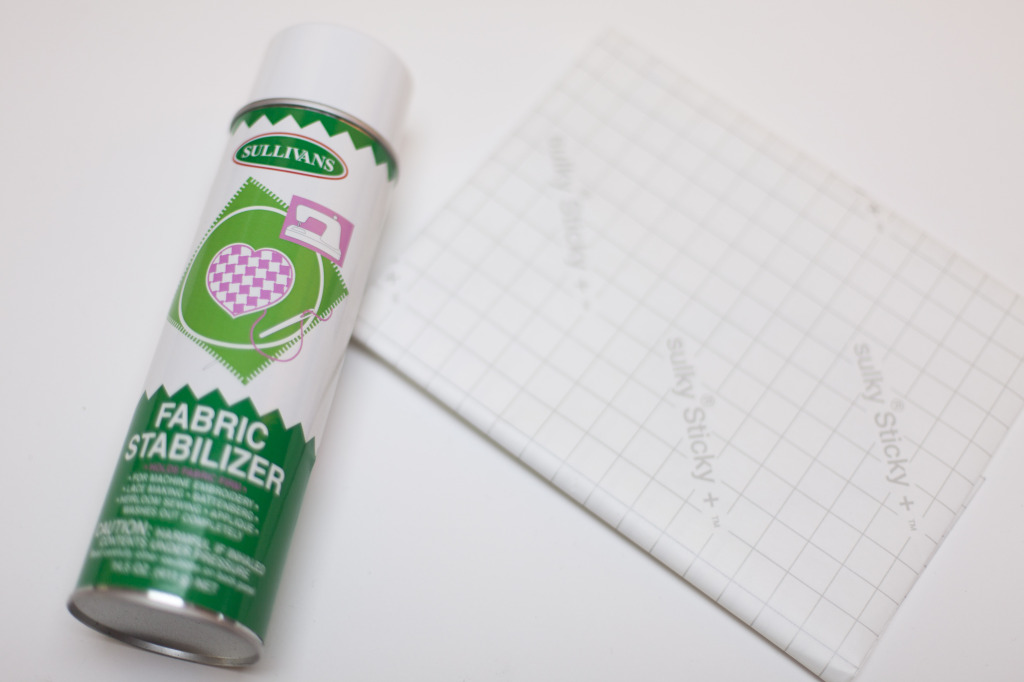
Spray starch, spray stabilizer, or tear-away interfacing can be used to make even stitching easier.
Stabilizers
Most fabrics will benefit from extra stabilization before you begin hemstitching. This is because hemstitching uses large needles, which can potentially push the fabric down below the throat plate or cause puckers. The finer your fabric, the more necessary it is to add extra stability to keep your stitches neat.
Apply spray starch or spray fabric stabilizer to your fabric before stitching. This will add a papery stiffness to light fabrics, and can be washed away when you are finished. If your fabric needs even more stability, apply a wash-away or tear-away stabilizer to the back of your fabric.
Needles and thread
To create these effects, you may use either a double wing needle or a single wing needle. If you don't have access to a wing needle, you can even use a large size universal needle, such as a 100/16 for very light fabrics such as silk, or 120/19 for heavier fabrics such as thick linen.
For thread, try a 60 weight cotton embroidery thread, or rayon or silk decorative thread. Different thread weights will produce different looks, with heavier thread creating a more hand-embroidered look and lightweight threads creating a fine and subtle stitch.
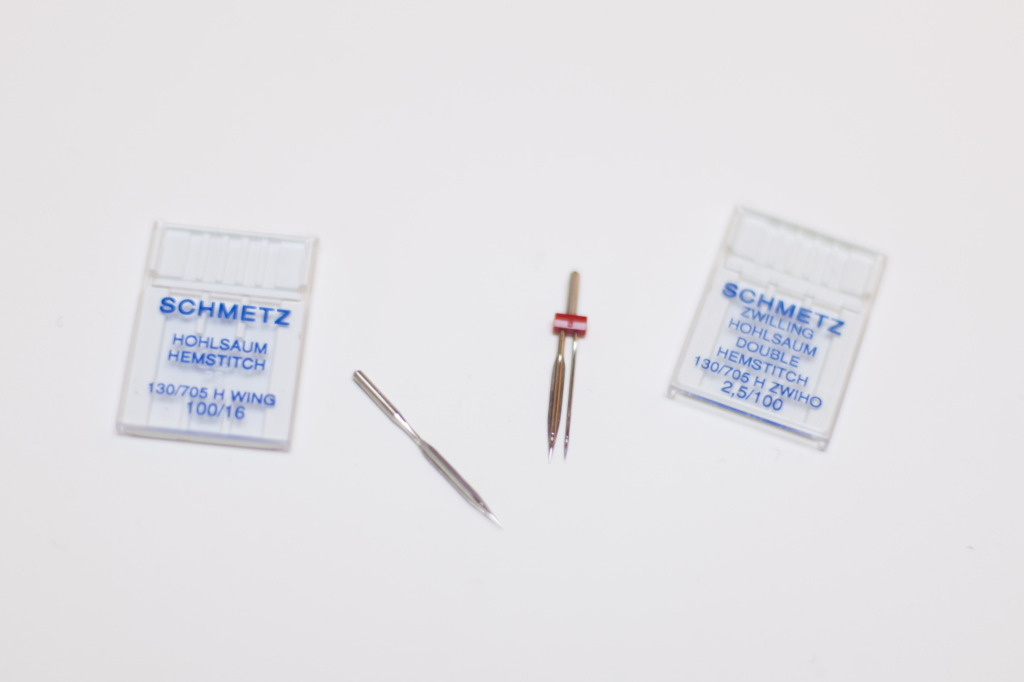
Different techniques will call for either a double or single wing needle.
Stitching
If you have one, use a clear embroidery presser foot or an open embroidery foot to give visibility into your stitches. Before you begin stitching your garment, try a test run on a scrap of the same fabric to check the stitch formation. If you've stabilized your fabric and still notice puckers, try holding the fabric slightly taut as you stitch. Loosen the tension of your needle to see if that helps. Finally, try shortening the stitch in both length and width.
02 Section
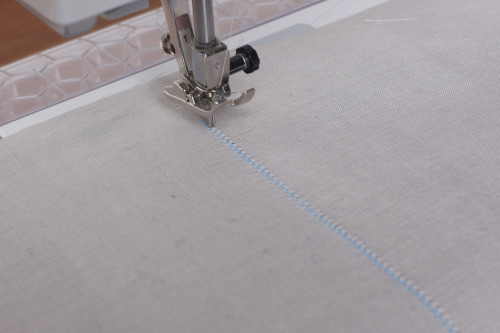
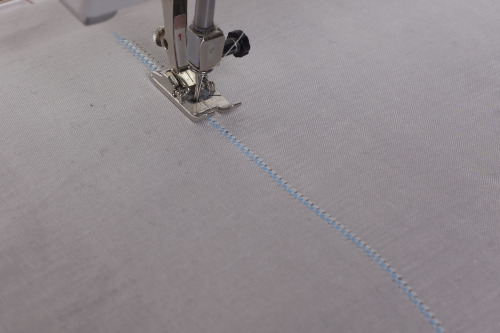
Hemstitching with a Single Wing Needle
Using a single wing needle allows you to create a wide variety of hemstitched looks by changing up the stitches.
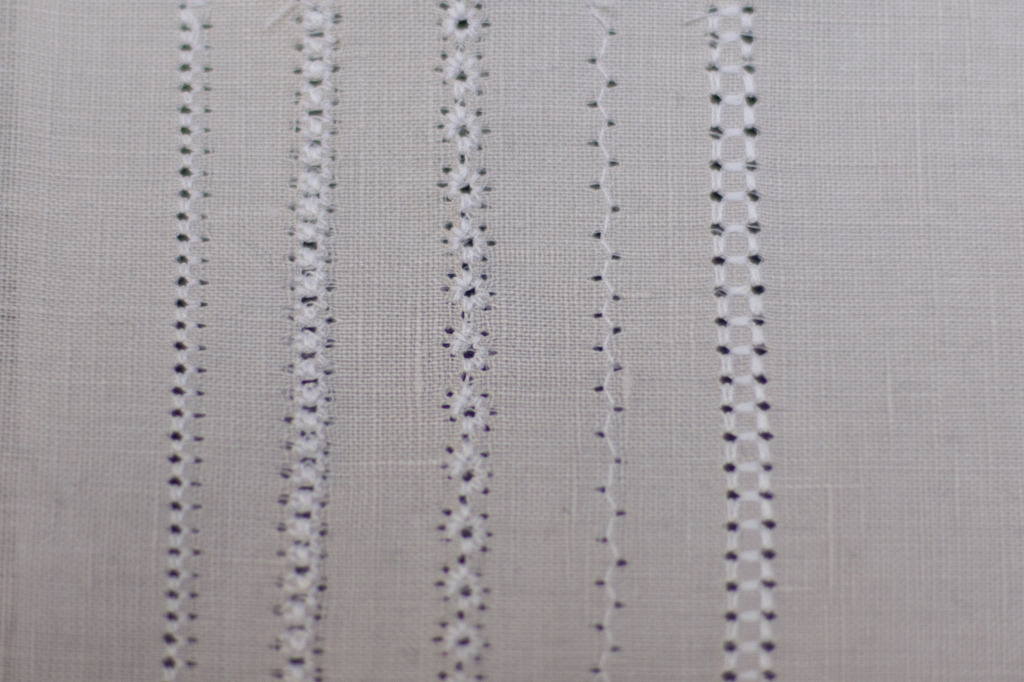
These designs were created with a single needle technique.
You'll need:
- Marking pen, pencil, or chalk
- Ruler
- A single wing needle, size 100 or 110.
- Cotton, rayon, or silk machine embroidery thread
- Spray starch or tear-away stabilizer
Stitches to try
Sewing hemstitching with a single wing needle gives you the freedom to use any number of decorative stitches. Experiment with the stitches that come with your own machine, or try these beautiful options:
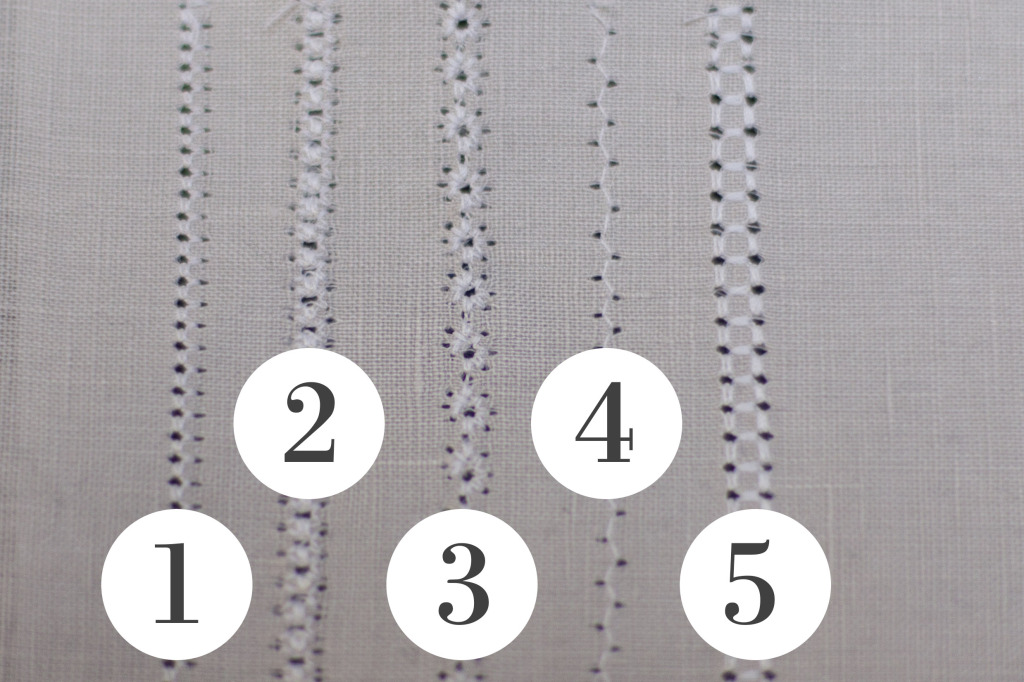
1. Pin stitch: This is the most traditional option, and works well for sewing down hems or other edges. Use a length and width of 2mm. A picot stitch will give a similar look.
2. Venetian stitch: Another traditional stitch, similar to an entredeaux stitch. Use a width of 3.5mm and a length of 2.5mm.
3. Daisy stitch: A simple star-shaped stitch.
4. Zigzag stitch: The simplest option, and one that's available on most machines. Use a length of 3mm and a width of 2mm.
5. Ladder stitch: This stitch looks beautiful if you remove threads before stitching, but also works with fabric intact.
6. Other decorative stitches: There are numerous decorative stitches that come with modern sewing machine, many of which will work to create gorgeous hemstitching. Play around with scraps before deciding, adjusting the width and height until it's just right.
How to:
Step | 01
Stabilize your fabric with spray starch or a wash-away or tear-away stabilizer. You may use multiple coats of starch to achieve more crispness. Here, we applied an adhesive tear-away stabilizer to the back of the fabric.

Step | 02
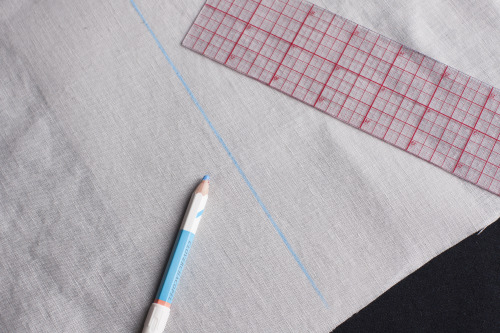
If you are not following an existing edge such as a hem, use your ruler and marking pen to mark a line on your garment.
Step | 03
Stitch along the line using your preferred stitch.

Step | 04
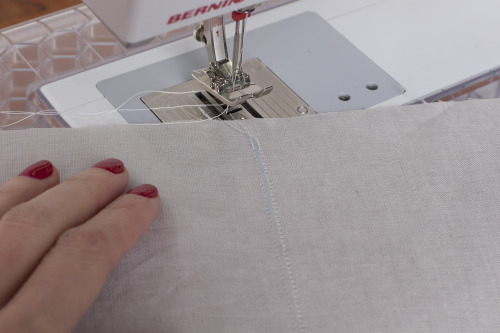
If your stitch is single sided, such as the pin stitch, you can create two mirrored rows to produce a more intricate effect. When you've finished your first row, leave the needle sunk into the fabric. Lift the presser foot and turn the fabric 180 degrees.
Step | 05
Sew another row next to the first, going in the opposite direction. Sew slowly, making sure the lefthand part of the stitch falls directly into the holes left by the lefthand part of the stitch from the first row.
03 Section
Hemstitching With a Double Wing Needle
The double wing needle has a universal needle on one side and a wing needle on the other. It creates an easy double row of hemstitching. This is a wonderful technique to use if your machine does not have fancy stitches.
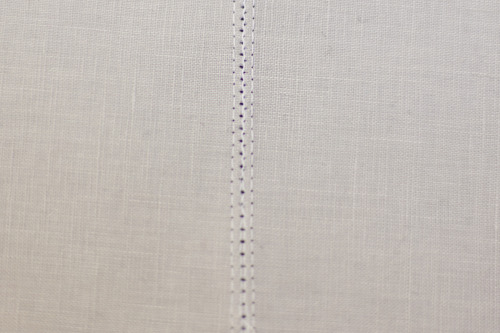
This stitching was created with a double wing needle.
You'll need:
- Marking pen, pencil, or chalk
- Ruler
- A double wing needle, size 100 or 110
- Cotton, rayon, or silk machine embroidery thread
- Spray starch or tear-away stabilizer
How to:
Step | 01
Stabilize your fabric with spray starch or a wash-away or tear-away stabilizer. You may use multiple coats of starch to achieve more crispness.

Step | 02
If you are not following an existing edge such as a hem, use your ruler and marking pen to mark a straight line on your garment.
Step | 03
Stitch along the line using a straight stitch with a length of 2mm.
Step | 04
When you've finished your first row, raise the needles and lift the presser foot. Remove the fabric and turn it 180 degrees.
Step | 05
Sew another row next to the first, going in the opposite direction. Sew slowly, making sure the wing needle part of the stitch falls directly into the holes left by the wing needle part of the stitch from the first row.

04 Section
Sewing Hems
You can use hemstitching to stitch down a variety of edges, including hems and the edges of facings.
Hemstitching can be purely decorative, or it can be used to create hems.
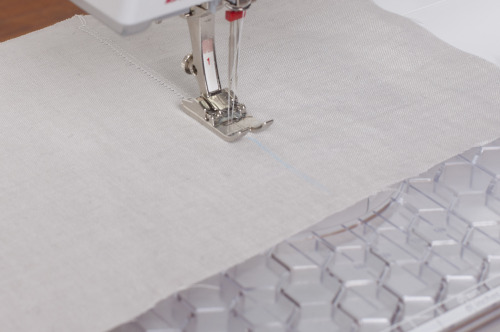
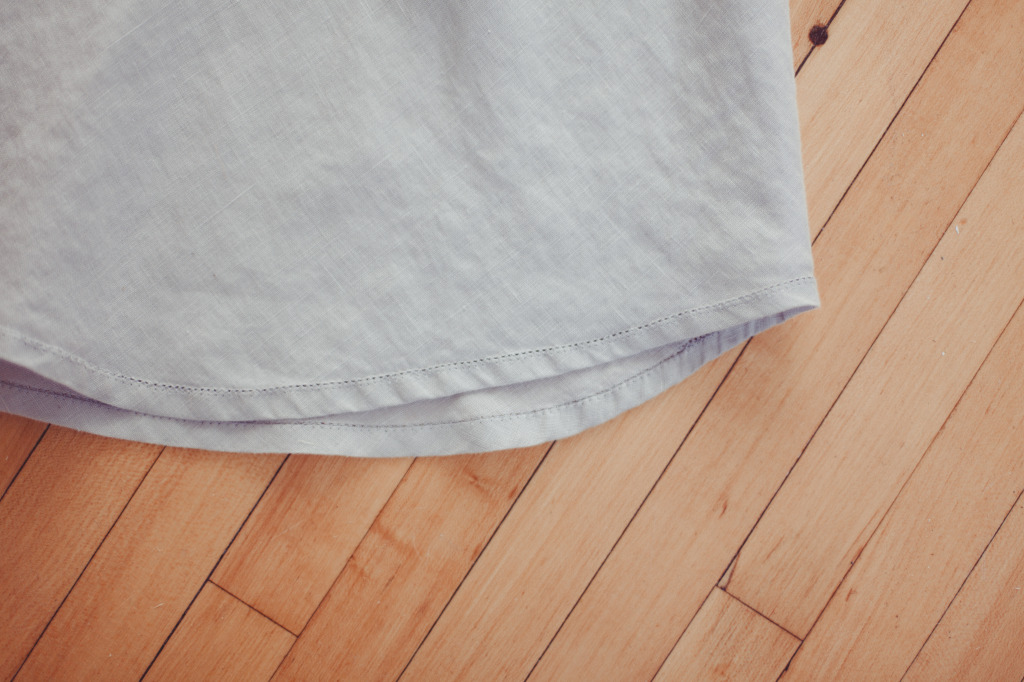
Single fold hem
If your hem is folded only once and has a raw edge on the inside, use hemstitching to finish it. Press the hem into place, then sew hemstitching using any of the two techniques outlined above. Sew the hemstitching from the right side of the fabric.
Once sewn, use small shears to carefully trim away the excess raw edge on the underside of the hem. The hemstitching will simultaneously finish your edge and attach the hem in place. Give it a final press.
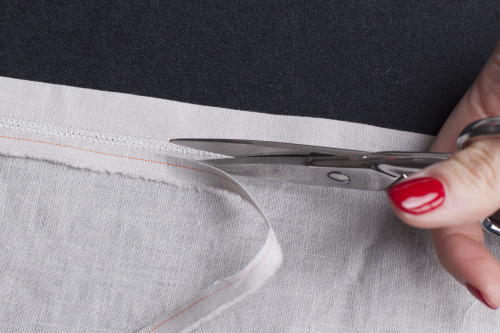
For a single fold hem, stitch in place and then trim away excess from the back.
For a double fold hem, use a blind hem foot and a pin stitch or picot stitch.
Double fold hem
In sewing a double fold hem, you will secure a folded edge to your fabric. To do this, the stitching must be much more precise than with a single hem, since you cannot simply cut away the excess fabric.
Use a blind hem foot to guide your stitching, and set your machine to the pin stitch or picot stitch. Use a single wing needle. Stitch along the folded edge from the wrong side of the fabric so that the straight portion of the stitch goes through only the outer layer of fabric, and the horizontal part of the stitch stitches into the fold of the hem.
Further Resources
-
Fine Machine Sewing by Carol Ahles -
Encyclopedia of Sewing Machine Techniques by Nancy Bednar and JoAnn Pugh-Gannon -
The Anchor Manual of Needlework, for further information on hand needlework.

