Sign In

Breton
The iconic Breton stripe, traditionally a navy blue or red stripe on a white background, is named for the region of France called Bretagne (Brittany), where it was originally worn by local fisherman and sailors.
Nothing gives a professional, finished look to a Breton striped tee or pair of plaid pants like a perfect pattern match. Artists have long been aware that any disruption in pattern draws the eye. While sewists can use this phenomenon in a pleasing way to produce visual interest, most often we avoid it by continuing the pattern of stripes, plaids, or large prints across visible seams in as unbroken a manner as possible, aiming for a balanced, harmonious effect. Whether you are new to pattern matching or haven’t done it in a while, a few key points can help you attain the perfect match on your garment.
Helpful Terms
Before we begin, here are a few helpful terms used when discussing patterned material.
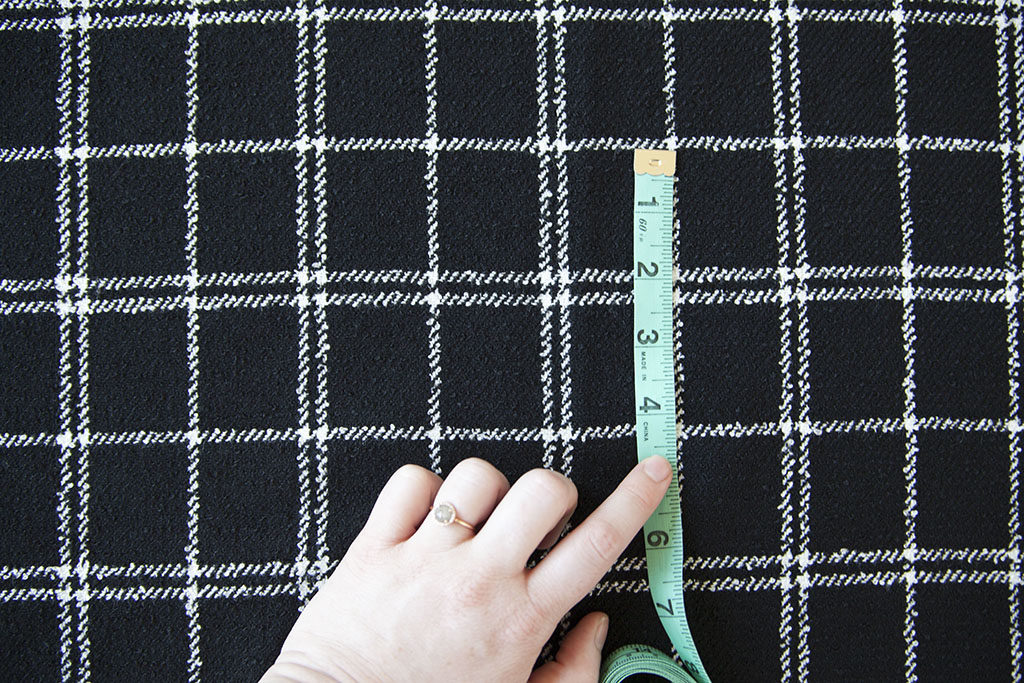
Repeats: A repeat refers to the number of inches or centimeters it takes until the pattern on the material starts over again. This might be as simple as measuring from the top of one stripe to the top of the next, or it could involve measuring from a focal point on an image across the pattern until you reach an exact reproduction of that same focal point again. The distance from a specific point on the pattern until you reach an identical point is called “one repeat.” Repeats on fabric can be measured both horizontally and vertically.
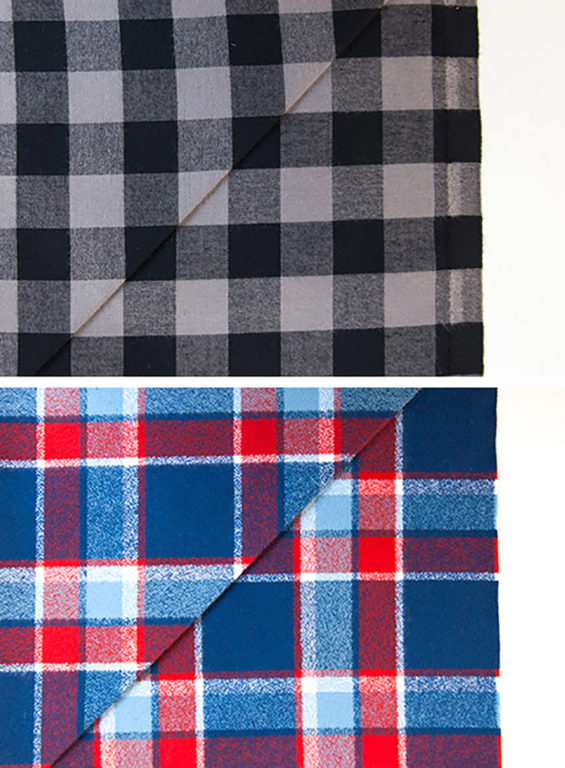
An even plaid will appear the same when using the right angle test,
but if the plaid appears broken it is uneven.
Even vs. Uneven Stripes and Plaids: A stripe or a plaid can be an even (balanced) pattern or an uneven (unbalanced) one. If the stripes on the pattern are of even width and placed an equal distance apart on the background, you are working with an even pattern. If the width of the stripes or distance between stripes is varied, the pattern is described as uneven. An easy way to tell if your pattern is balanced is to perform the right angle test. Here’s how: Fold your fabric in half like you would if you were pinning a pattern on it. Now turn back one corner on the end opposite the fold at a right angle. Do the stripes meet up and match exactly at right angles? Now fold your fabric in half the other way and check again. If your stripes meet and match, you have an even stripe or plaid. If not, your stripe or plaid is uneven. Even plaids have a checkered appearance to the pattern, like a gingham or houndstooth. Uneven plaids have stripes of different widths, like many tartan plaids. For a more in depth discussion of types of uneven plaids, a great resource is www.sewitall.com, episode 602.
Small Scale vs. Large Scale Prints: The overall size of an image or width of a stripe is referred to as its scale. Some materials have many tiny images scattered across them, usually measuring less than half an inch (1.27 cm.) These are referred to as small-scale prints. The larger the image that appears on a patterned fabric, the larger the scale. While small-scale prints are rarely pattern matched, a matched mid- or large-scale pattern is considered a sign of quality work.
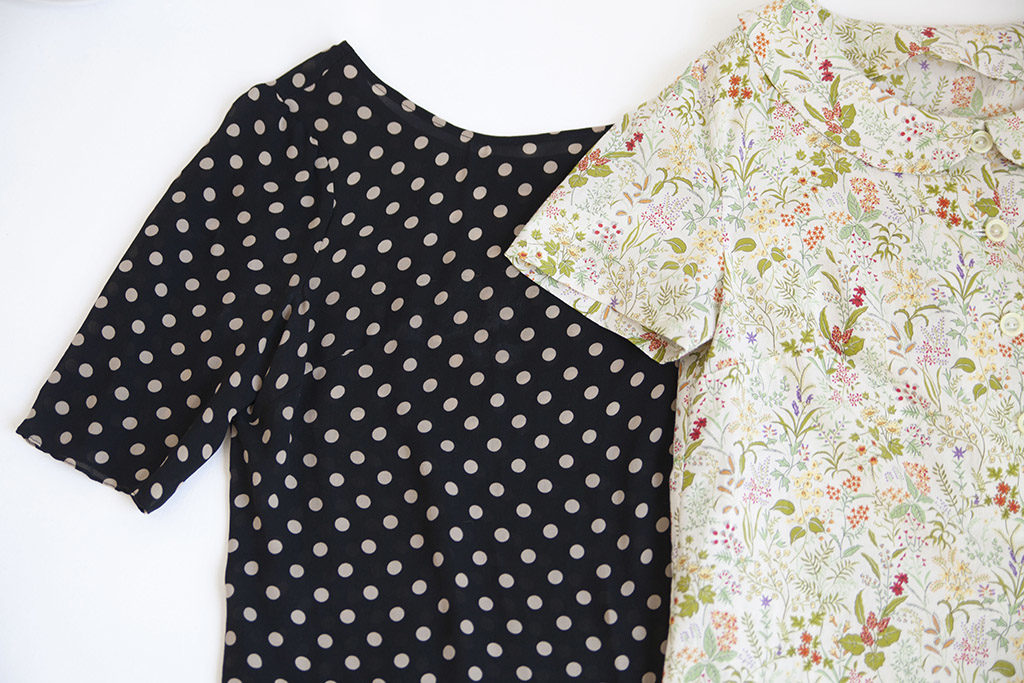
Polka dots are a classic example of a non-directional pattern. You will find that upon close inspection most floral prints are directional.
Polka Dots
Although fabric patterned with evenly spaced circular dots on a solid background has been around a long time, it first started being referred to as “polka” dotted in the mid-to-late nineteenth century when the dance of the same name swept across Western Europe and the US. Polka clubs were formed, and uniforms were developed for dance groups. The fabric for the women’s costumes often featured those spotty little darlings of the fabric world: polka dots.
Directional vs. Non-directional Prints: Take a good look at a piece of patterned material or a patterned garment you own. Now rotate it clockwise 180 degrees until it is upside down. Does the pattern look the same, or does the pattern now look upside down? A directional print is one in which all the images’ tops are pointing the same direction. A non-directional print is one in which the images are turned with their tops in a variety of directions. This kind of print is much more common than you might think, and patterns are often designed non-directionally, to make it easier for sewists to place pattern pieces when cutting. Directional prints require more careful pattern placement, whether or not you are attempting to pattern match. You will need to make sure that your pattern pieces all have the pattern running in the same direction when using a directional print.
Choose a conducive pattern
The first step in successful pattern matching is to choose a paper pattern or PDF that will work well with a patterned fabric. One easy way to be certain your garment pattern is suitable for stripes, plaids, or large-scale images is if the illustration provided shows the model wearing a finished garment cut from a similarly patterned fabric. Read the back of the pattern and look over the directions as well. The instructions for sewing many garments will indicate that they “are suitable for stripes and other patterns,” or “not appropriate for stripes or directional patterns.” Generally speaking, looser, simpler garment patterns with few pieces are the easiest to match. More shaping, darts, and detail means the garment will be more challenging to match.
Be aware of the bias
As you are choosing the style of the garment you would like to make in patterned fabric, be aware that any piece cut on the bias will cause the pattern to fall on a slant. Picture in your mind how a slanted pattern piece would look on your finished garment. Stripes cut on the bias can create an attractive chevron pattern if carefully laid out and matched. Plaids and medium or small-scale patterned fabric cut on the bias can form attractive detailing for yokes, plackets, pockets, and cuffs. Stripes can be placed running a different direction on detail pieces as well.
Buy extra fabric
In order to pattern match a stripe, plaid or large-scale print, you will need to buy more fabric than given on the yardage chart.
If you are working with a small scale, directional print, choose the “with nap” yardage if given. (Although nap actually refers to fabric texture, the principle of the fabric not being able to be turned upside down is the same.)
There really is no magic number for how much extra fabric you should buy when attempting to match large scale prints, plaids and stripes. The general recommendation is to buy an extra half yard (or half meter) for separates and an extra yard (meter) for dresses. However, the amount of additional fabric you will need to achieve a good pattern match will depend on a number of factors, including the complexity of the garment design and the scale of the pattern.
A simple stripe or small-scale check may not require much additional yardage. The more complex your garment, the more seams will need to be matched, and consequently, you will often need more yardage. The size of the scale of the pattern on your fabric will also affect how much you need; the larger the scale, the greater amount of extra fabric required. Uneven stripes and plaids also require more additional fabric than even patterns. If you are new to fabric matching, it is a good idea to choose a basic style with few pieces and few darts, or to buy plenty of extra fabric in case you need to cut a piece out more than once to get it right.
What if your fabric is expensive, or the amount available is limited, and you want to buy the least yardage possible? First, examine the cutting layout diagram carefully. Then, find out the length of the repeat on your chosen fabric. You can measure the repeat yourself, or request this information if you are ordering online. Count the number of pieces going in a row horizontally along the fabric based on the cutting layout diagram. Add the length of one repeat for each piece. (For example, three pattern pieces x a six inch repeat = eighteen additional inches.) It’s not a bad idea to add on one additional repeat just to be certain.
If all this is too much math for you, or if you come across a beautiful patterned fabric you love, but don’t know exactly what style garment you want to make from it, go back to the old standard: 1/2 yard–1 yard more than you think you will need.
How much fabric?
When deciding how much extra fabric to buy in order to pattern match keep in mind that you will need more fabric for all the following:
- Large-scale prints
- Uneven plaids or stripes
- Large repeats
- Patterns with shaping or detail
Match the most visible seams first
When planning how and where to pattern match, focus on matching the most visible seams first. In general, when others look at you they spend the most time looking at your face, so make the center front pattern pieces match as your first priority, as these are the ones closest to your face. For prints, think carefully about attractively placing the images. Put your favorite image front and center, so you can see it every time you look down, or alternatively, offset the images so that the focus is on you. Be careful of placing prints directly at the apex of the bust on women’s’ garments. When working with uneven plaids or vertical stripes, place a dominant stripe down the center front and make sure to keep it razor’s edge straight.
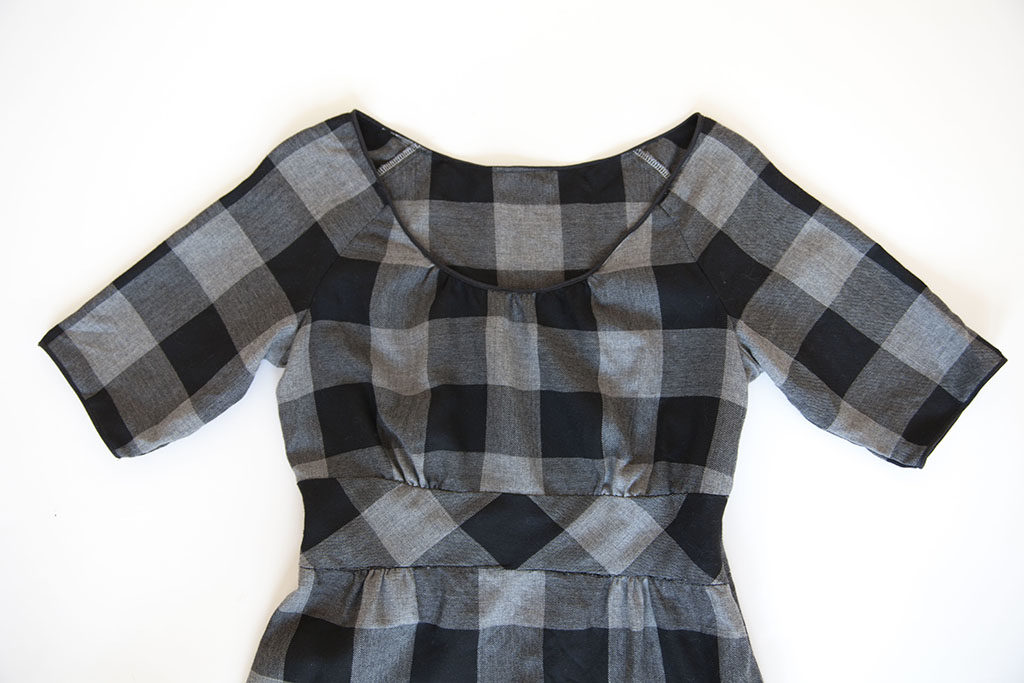
As you are thinking about your front view, if your pattern has sleeves, particularly mid- to long-length sleeves, consider pattern matching the front of your sleeves to the front of the shirt or bodice. If your pattern has a strong horizontal element to it, making the element run unbroken from the sleeves across the front will make your sewing look professional. This is not as hard as it sounds. When cutting, simply lay out these pattern pieces next to one another aligning the underarm sleeve point to the point of the armscye.
Your next priority is to match your center back, if you have a center back seam. Remember to match your pattern based on the placement of the seamline, rather than the edge of the garment piece. This will be true of all your garment pieces. Horizontal stripes are the easiest to match, followed by any geometric patterns. Large-scale patterns take more practice.
After matching your center front and center back, consider pattern matching the waistline of a dress or jumpsuit to the bodice, or making an attractive pattern offset.
Next, consider your side seams. Because they are less noticeable, side seams are less important to match if you have a limited amount of material. Patterns with a strong horizontal element can be matched perfectly. If your material has a vertical pattern and curved side seams, you will be unable to create an unbroken look, so just take a quick look and check to make sure nothing is visually off-putting. With a fitted bodice, go for a pattern match below the bust dart. If your garment has a strong vertical pattern and straight side seams, such as an unfitted shirt or tee, you can pattern match by keeping the space between the vertical elements consistent across the seam. One easy way to do this is to place one side seamline on the vertical element, and the other side seamline just past that element. Don’t forget to look at side seams on sleeves, as many patterns have a sleeve front and a sleeve back. For pants, match the outer side seam first and the inseam secondary.
Next, plan the placement of smaller detail pieces such as collars, cuffs, plackets, and pockets. If you are new to pattern matching, first try a pattern with just one of these elements. If you are a more advanced seamster, creating a garment with attractive placement of all these elements on a patterned fabric allows you to really show your mastery.
Prioritize your pattern matching
- Center front
- Center back
- Waistline
- Sleeves
- Side seams
- Details
Finally, facings, linings, and other pieces that don’t show can be cut from remaining fabric without pattern matching, although they should still be cut on the grain as indicated. If you have run short of fabric, you can even piece them together, or cut them from another fabric.
Three methods for cutting
The most important part of pattern matching is the layout of the paper pattern pieces on the fabric and then cutting out the garment pieces so that the pattern on the fabric matches when you sew up your make. Three common methods for cutting are cut one piece first, draw the pattern on the pattern, and cutting double.
Cut One Piece First
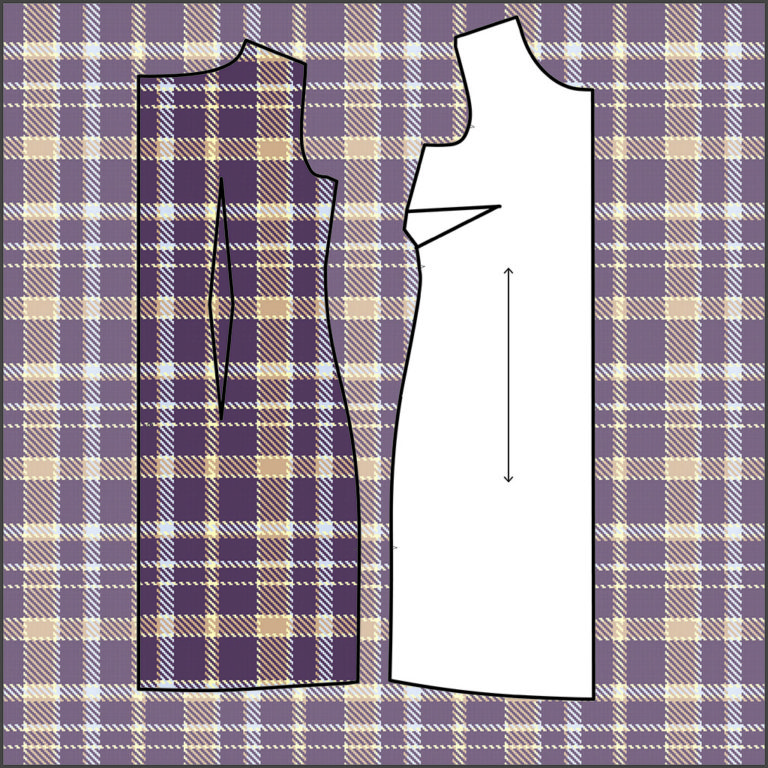
This is the most commonly used method for pattern matching. For this method, lay out your fabric in a single layer with the right side up. For each piece that requires cutting two, for example, center fronts, lay out one piece with the paper pattern right side up, correctly placing the grainline marking on the grainline of the fabric. Anchor a key place on your pattern, like the top right corner, on a stripe or other image. Cut out the single piece. Now take away the paper pattern and use the cut piece of fabric as your pattern for cutting the second piece. Lay the first piece face down on the uncut fabric, matching the pattern on the fabric the way you want it to look on the finished garment. Horizontal patterns like stripes are easy, just keep the stripe matched exactly. For patterns with vertical elements, like plaids, think about how you want the finished garment to look; centering a dominant stripe down the center front is traditional. Remember always lay the first piece face down, (right side to right side,) for any piece marked “cut 2” so that you are cutting a mirror image.
If you are matching two different pieces, like a front and back at the side seam, lay them out next to each other, keeping a straight line running across the bottom of the pattern pieces. Again, anchoring on a stripe or other element is helpful. Remember to disregard the seam allowance, and match seamline to seamline. Pin carefully and cut slowly. Lay out sleeve pieces in line with bodice pieces if possible. If not, cut the bodice piece first, then set the cut piece next to the sleeve as you pin the paper pattern, aligning the pattern of the fabric.
Draw the Pattern on the Pattern
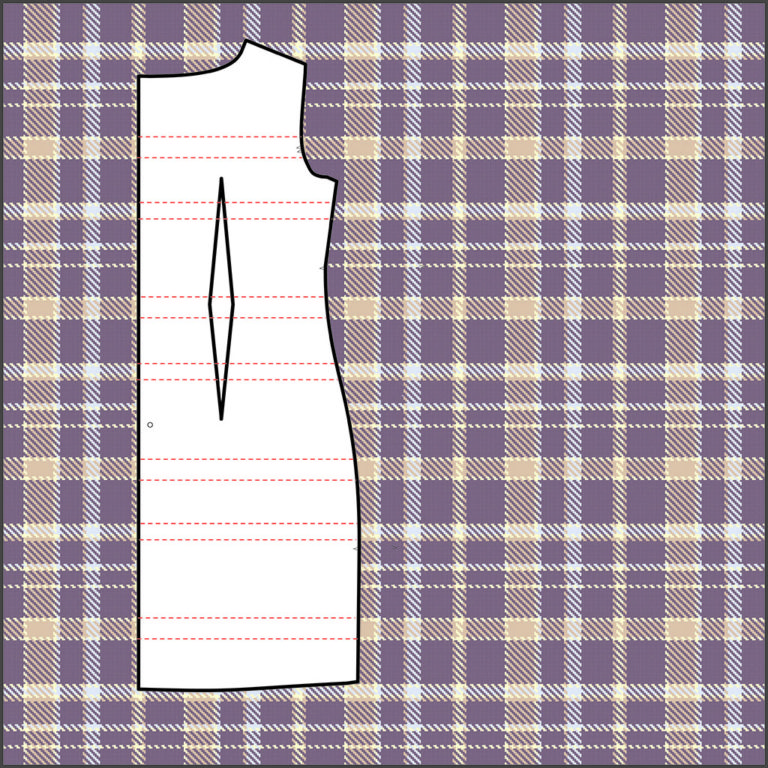
This method will work for any pattern matching, but is particularly helpful for large-scale patterns and fabric that has a printed pattern that doesn’t show through to the wrong side. For this method, you will need a pattern cut from pattern paper, and you will be marking on the pattern, so consider working with a copy of the pattern traced off onto pattern paper. Lay out your fabric in a single thickness, right side up. Place key pieces, such as center fronts, on the fabric. Cut out key pieces that you wish to match to other pieces and/or one piece of any that say “cut two.” Now, use a soft lead art pencil or ballpoint pen (avoid ink pens or markers that might leak through,) and draw on the pattern paper, tracing the images that are on the fabric onto the paper pattern.
Now remove the cut fabric pieces from your paper pattern. You now have marks on your paper pattern pieces that show how the pattern lays on your cut fabric pieces. Use these marks to match to the second pieces if you are cutting two, or to align the pattern attractively on other seams. As with the previous method, remember to turn pieces marked “cut two” face down when cutting the second piece so that you are cutting mirror images, and match seamline to seamline.
Cutting Double

Black Watch
The Black Watch plaid, a popular plaid pattern of blue, green, and black, is the official plaid of the 3rd Battalion, Royal Regiment of Scotland. The origin of the term “Black Watch” is unknown, although a “watch” generally refers to a militia sent out on patrol. “Black” may have referred to the dark shades of the plaid, or perhaps the treacherous nature of the patrol.
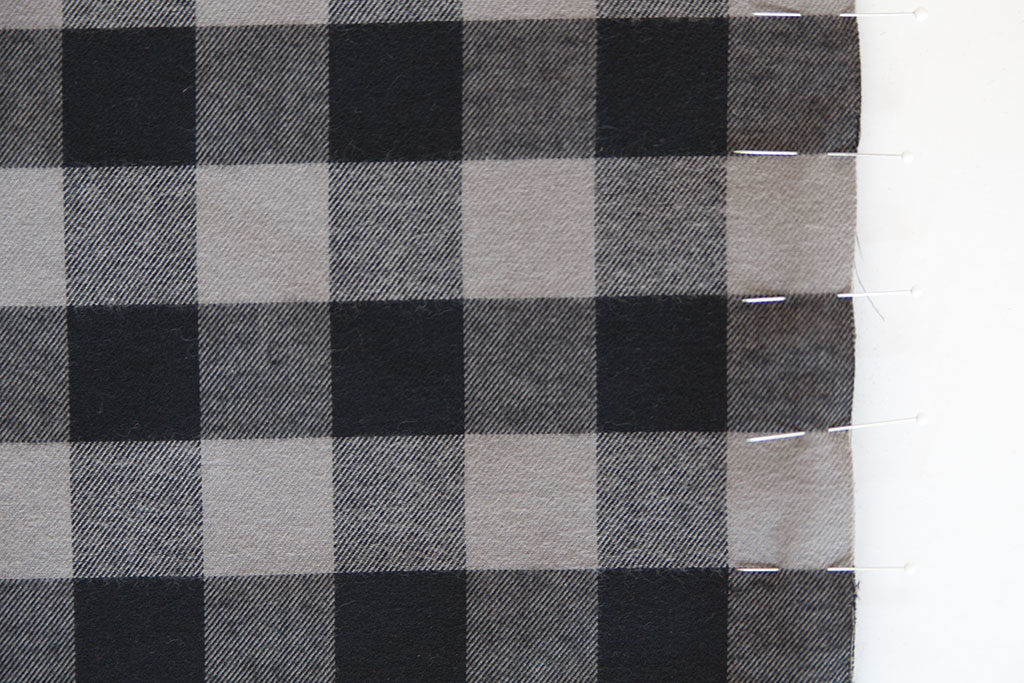
This method works well with medium- to large-scale and even patterns and allows you to cut your fabric as a double thickness. Lay your fabric out double thickness, right sides together. Align the selvedges, carefully matching the pattern between top and bottom layers. Fold back the top layer of the fabric about half way up. Check to make sure the pattern on the two layers is still aligned and matching. Adjust as necessary. Place a few pins just above where you folded to keep the layers in place. Fold the top layer back down and check the selvedges again, then pin the two layers together at the selvedge. Now lay out your pattern according to the diagram. Start cutting a piece out near an edge, so you can lift the edge of the fabric and double check for alignment first. Continue to check as you cut each piece. Sticking a pin vertically on key images in the fabric through all layers, then lifting the top layer to take a peek can help with checking alignment. A helpful download regarding this method is available at coletterie.com and called, “How to Match Plaids and Stripes.”
Sew it up
Once your fabric is perfectly cut, execute extra care while pinning and sewing.
When sewing seams on garments you are pattern matching, use more pins than usual, and pin more carefully, checking for pattern match. It is a good idea to baste and make corrections, if necessary, before sewing visible seams, especially when working with knits and other slippery fabrics. Hand baste those tricky seams that want to slip out of alignment. Sometimes you might have to move a piece up or down by an eighth of an inch or so to keep the pattern matched. Don’t worry, as this will often fall in the seam allowance and won’t affect the construction of the garment.
Be aware that darts and other shaping will interrupt the pattern. Even and geometric patterns will often naturally fall into a pleasing arrangement. Pinch darts before sewing and slightly adjust their shape and placement to make them more visually pleasing if necessary. Don’t forget to fit your garment as you go, especially if making adjustments like these.
Matching plaids, stripes, and large-scale prints is not as hard as it sounds, and many sewists figure out how to match through trial and error. Take your time and have fun. Pattern matching is a lot like building a puzzle and watching the pieces come together to make a beautiful finished image.