Sign In
Clothing can be a powerful tool that makes us feel comfortable, confident, and more like ourselves. Our wardrobe gives us the ability to explain what we are all about, without a word, and affirms who we are. We are at a new stage in society in which people can dress according to their conscience, rather than go by what the fashion industry has told them is appropriate. But for some, it is a struggle to find items that look great on the hanger and fit their bodies as well.

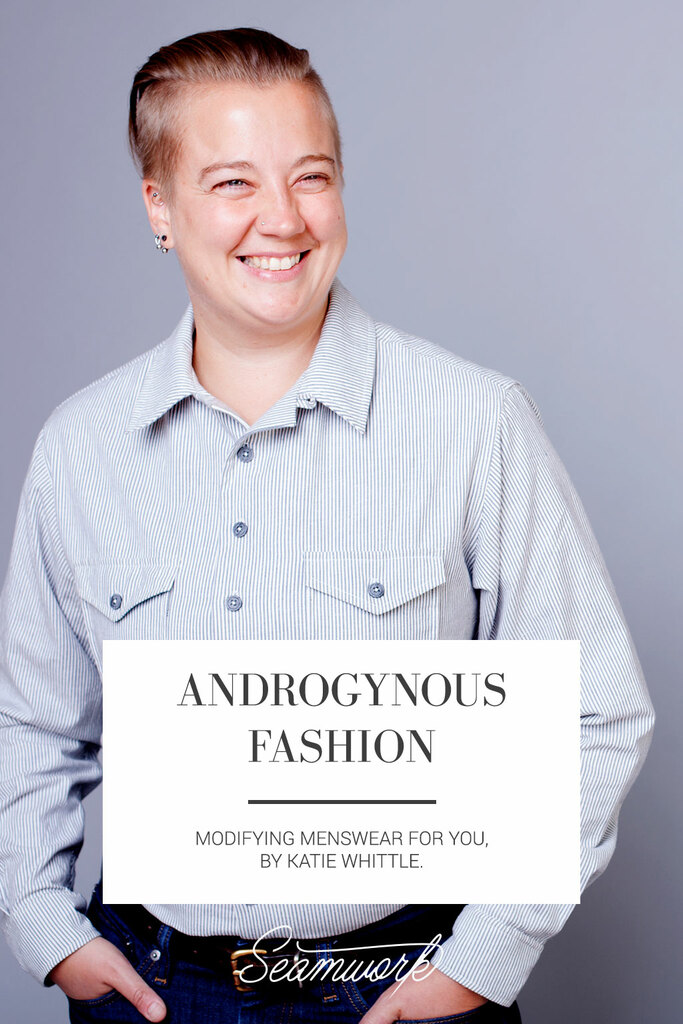
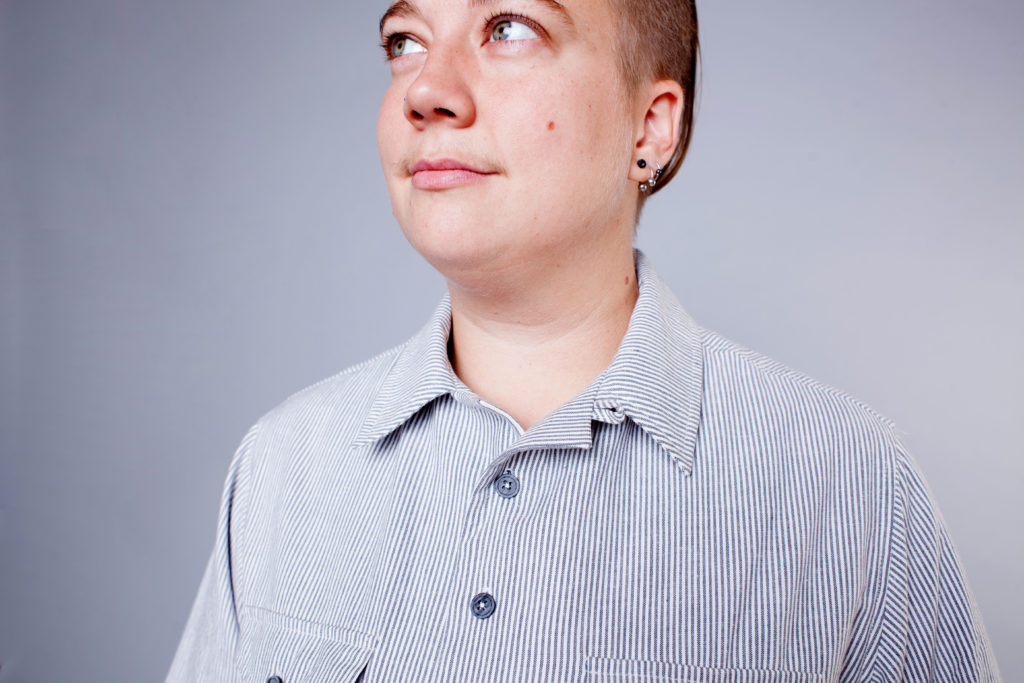
Meet Cee. They have had difficulty finding clothing that affirms who they are for the last 20 years. Cee identifies as genderqueer, which means that they do not identify within a binary gender system and prefer to use the pronoun they/them. For Cee, it has been difficult to find clothing that fits well and helps them feel more at home in their skin.
Cee started experimenting with wearing men’s clothing around the age of 14. “When I first started, I felt like ‘Oh, I’m transgressing!’ I’d go out and think that everyone noticed that I was wearing men’s clothing, but no one ever cared—ever. So, I got over that very quickly and then it became very comfortable. But it’s been a struggle, I go and I see a really cute shirt and I put it on and think ‘oh, it was so much cuter on the rack’.”
The frustration has progressively gotten worse in the last few years as Cee’s size has changed. “There are two parts to it—first, being socialized as female means you’re told that you have to be small and skinny, and that your value is based on your appearance, and second, wanting my body to be more gender neutral. I’m uncomfortable with the way my body is changing and it makes me feel more dysphoric.”
Our wardrobe gives us the ability to explain what we are all about, without a word, and affirms who we are.
The fashion industry has recently experienced a spurt of interest in androgynous style. Fashion Weeks all around the globe are reporting male models walking down the runway in fabulous flowy tunics and women sporting sleek suits. Companies like Kipper Clothiers offer menswear to all genders. Yet these trends come with a pretty high price tag. “I wish that there was more neutral clothing that was mass marketed, that was available to everybody,” says Cee.
Cee is a camp counselor at A-Camp and has hosted workshops that aim to help queers learn the formal rules of menswear in order to look sharp, find well-fitting clothing, and dress the way they want to. “The history of menswear is kind of fascinating. I like all the rules and if you follow them to a certain degree your outfit will look way more put together and make more sense ... I have a whole list, a flow chart.”
Rules of Fashion
Womenswear history tends to be centered around looking appealing, while menswear is all about function and independence.
Menswear is more neutral and the design details are not as exclusive. However, womenswear is a much larger category that always seems to have certain feminine design details. There is always a dart, a cap sleeve, or some sort of flare that pulls the plug on any attempt at gender neutrality. There are some reasons for this divide that make good sense, yet some of them are downright silly.
Fundamentally, womenswear and menswear are made for differently shaped bodies. Menswear proportions usually consist of more width in the shoulder, long legs, and a short torso. Womenswear is designed to accommodate someone who is the widest at the hip, and who has a shorter torso, a bust, and shorter arms.
Some of the more interesting points of division are in the design details rather than in the fitting needs. For instance, the sleeve cap of a womenswear blouse curls over the shoulder, making for a rounded shoulder. Menswear shirts are designed to have a tailored right-angled sleeve, where the shoulder seam ends directly at the shoulder and the sleeve falls with the arm. This creates a more structured, clean look versus the soft, curved effect of the woman's sleeve.

Left: Well-fitting menswear shoulder. Right: Well-fitting womenswear shoulder.
Of course, there is the age-old mystery of the front placket’s button placement and I am here to tell you that it has nothing to do with Napoleon, weapons, or baby holding. When buttons first came on the scene, they were mostly worn by the well-to-do and the women wearing these buttons were usually dressed by other people. In an attempt to help these fancy ladies' maids, the buttons were placed on the left placket for easier buttoning. Even in those days, men dressed themselves, therefore the buttons were attached on the right placket.
The other interesting difference between menswear and womenswear is the myriad of rules that must be followed in order to be regarded as a person of taste. From sizing your collar to your facial features, to coordinating your tie color with your complexion—books upon books have been written about the sharpest, most dapper ways of dressing oneself.
As sewists, we are likely to be most interested in the nuances of fit that differentiate menswear and womenswear. A menswear collar should fit just snuggly enough to slide two fingers between the collar and neck when closed. The sleeve should end directly at the first knuckle of the thumb and the body of a shirt should not land any further or higher than mid-rear. Of course, womenswear has rules for fitting as well, yet they are not nearly as associated with good taste as they are in menswear.
A perfect menswear sleeve length.
Is it necessary for us to differentiate and have gendered clothing? To create correctly fitted garments, certain changes must be made to accommodate different forms. Yet to consistently have your gender literally “on your sleeve” gets old. Most likely, clothing stores will never carry a singular type of clothing, but thankfully we can sew! A menswear shirt is the perfect place to start; these shirts do not have any specific design features that are exclusive to menswear. Because these shirts are designed for the male form, a few alterations may be necessary to get a perfect fit.
Getting the Right Fit
To start, you’ll need to take your chest measurement and pick a starting size on your pattern. I have found that the key is to fit the largest parts of your body first and take fabric in from there. Most of our readers are the fullest at the chest, and surprisingly most are near that same measurement at the full hip. Therefore, as long as those two measurements fit, everything else will fall into place and be simpler to alter.
After choosing a size, sew up a quick muslin and try it on. From there, you’ll be able to determine which of the following adjustments should be made.
Narrow Shoulder Adjustment
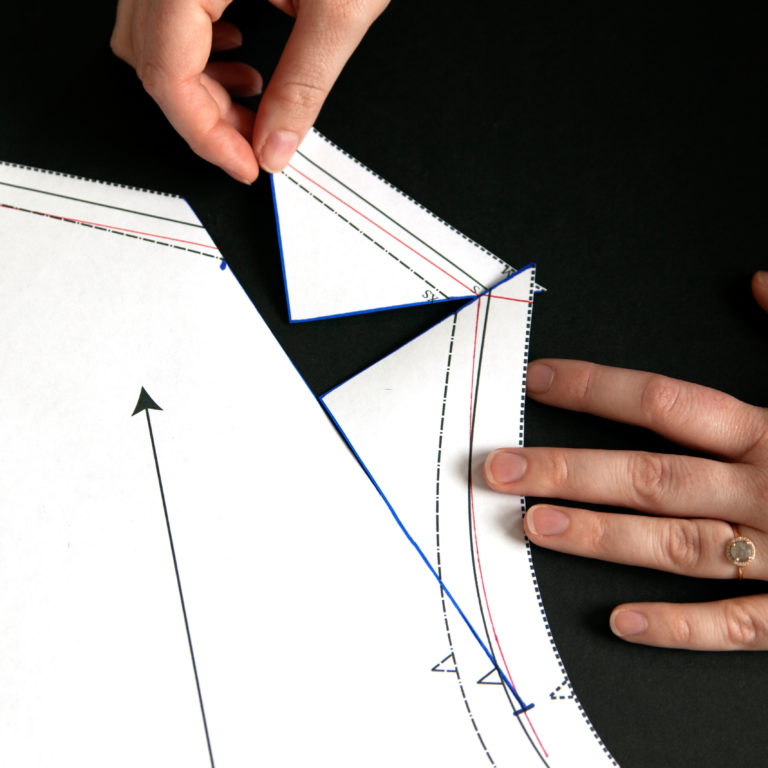
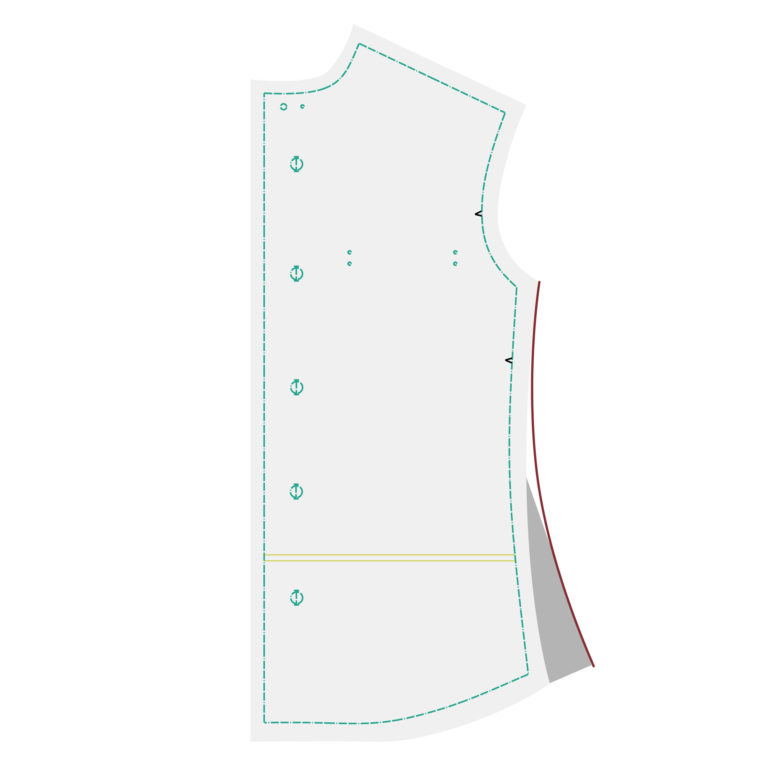
The sure sign of an ill-fitting menswear shirt is a misplaced shoulder seam. Typically, a male shoulder is much wider than a female shoulder and a menswear shirt reflects that. If the sleeve of a garment begins below the end of the shoulder, a narrow shoulder adjustment is necessary to achieve the classic right-angled shoulder found in menswear shirts.

Step | 01
Draw all seam lines of the armsyce, shoulder, and the start of the neckline.
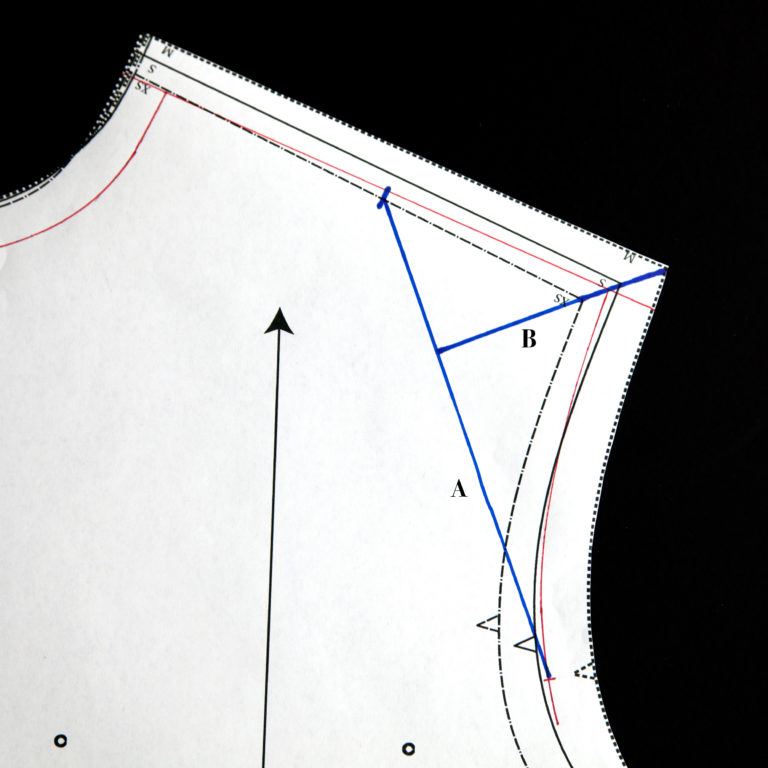
Step | 02
Find the center of your shoulder seam and use a ruler to draw a line from the shoulder center to the sleeve notch. This is line A. Draw a second line starting at the outer corner (cut edge) of the shoulder seam, through the corner of the seam line, to line A. This is line B.
(To clarify, the angle of this line is created by aligning the outer corner and the seam line corner with a ruler.)
Step | 03
Carefully cut through line A from the outer edge of the pattern piece to the seam line of the armscye, skipping over the seam line and continue cutting to the end the pattern piece. Cut line B from its meeting point with line A to the seam line, then skip over the seam line and cut to the end of the pattern. “Skipping” over the seam lines will create a small paper hinge.
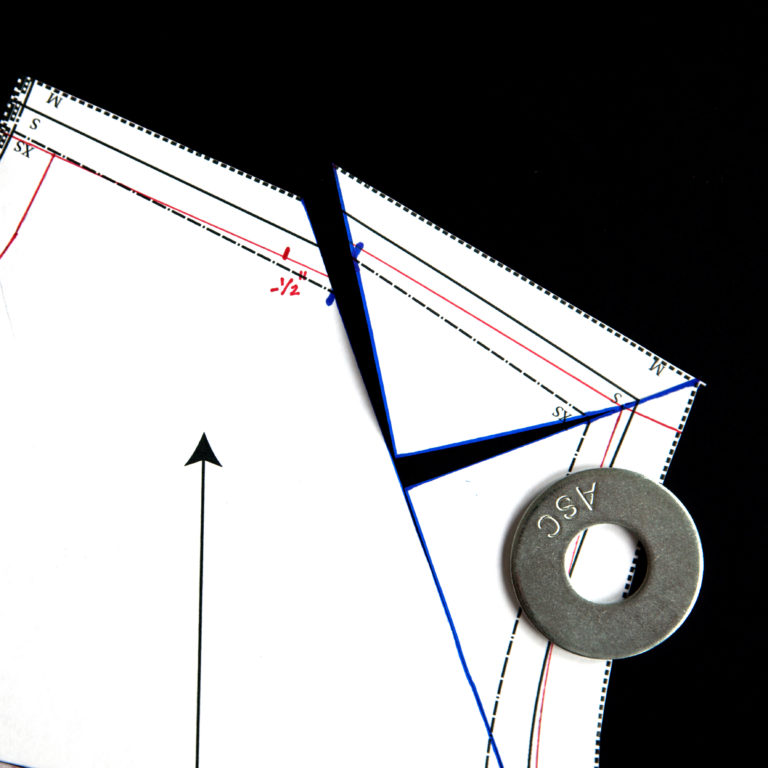
Step | 04
Where line A intersects with the seam line, measure the amount that needs to be taken from the shoulder and mark this on the seam line (I took 1/2” from the shoulder seam in the example).
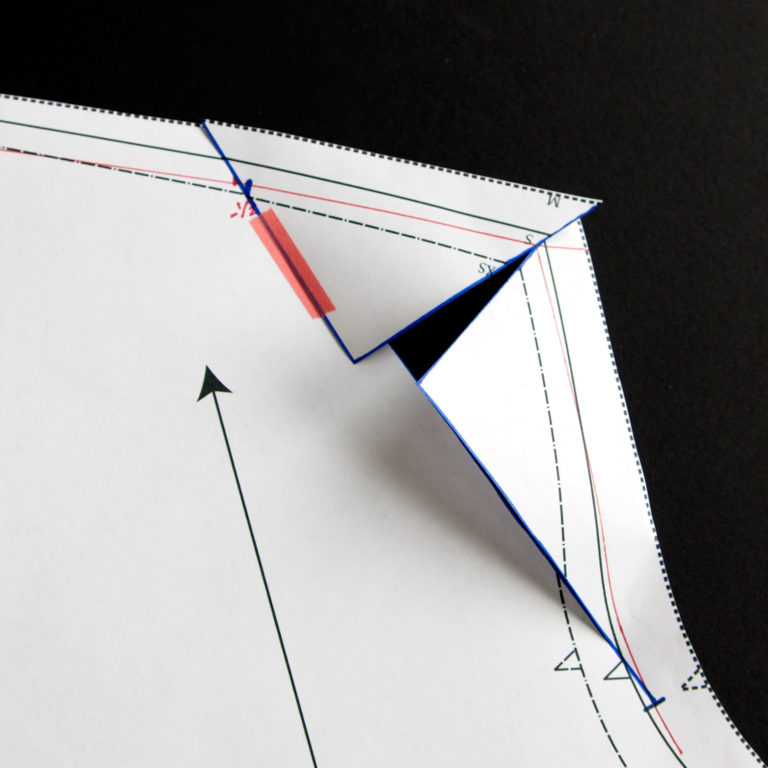
Step | 05
Bring the shoulder seam line to the marked line and tape into place. If the pattern paper billows like mine, clip from the outside into the endpoint of line A, creating another hinge.
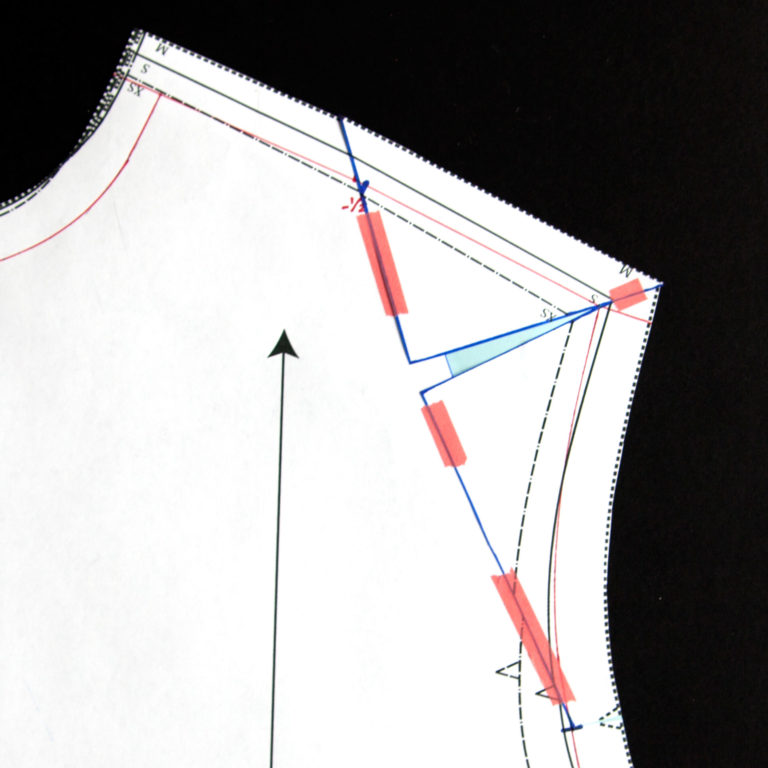
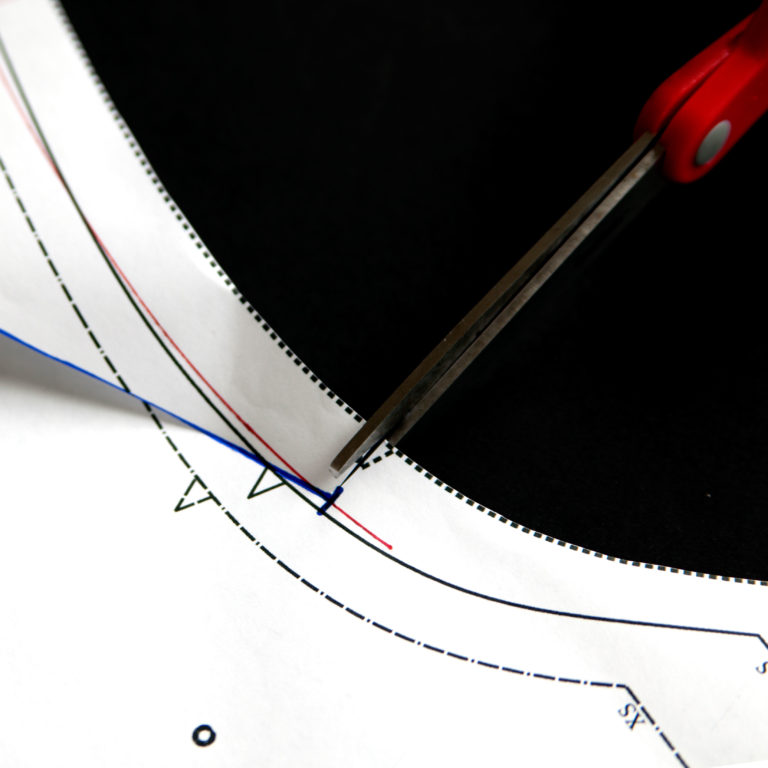
Step | 06
Add paper below the pattern, tape in place, and carefully trim any excess paper and redraw seam lines if necessary.
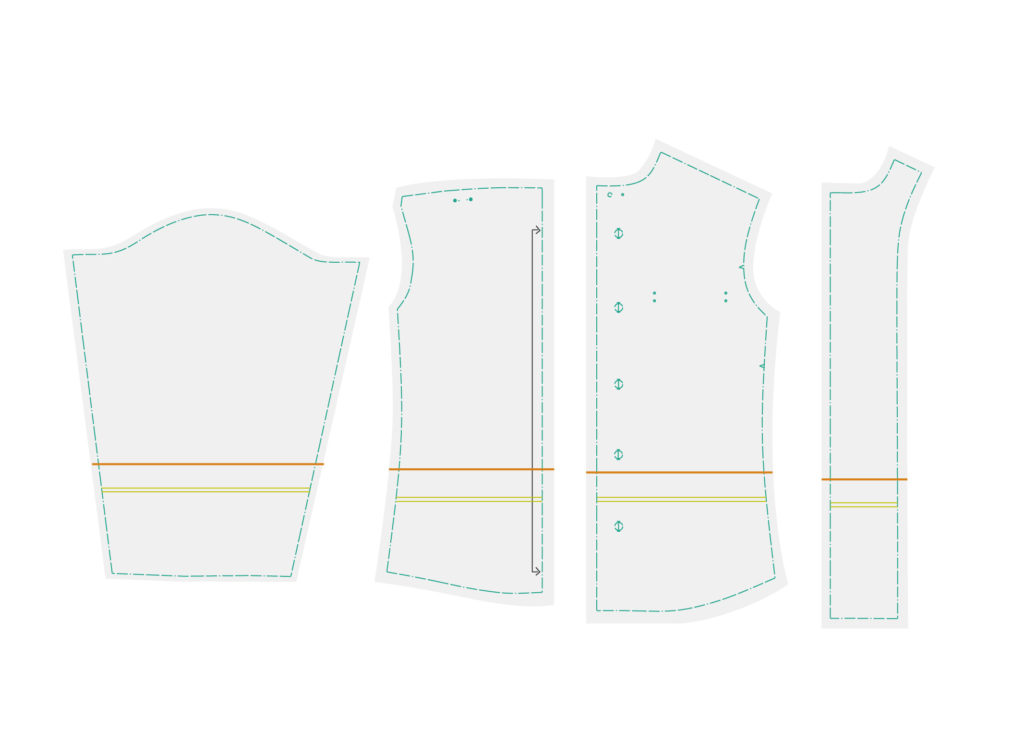
Decreasing Bicep Width
A menswear shirt is designed to have a bit more ease in the sleeve than a womenswear shirt. Around 1 ½” to 2” of ease in the sleeve will be comfortable without being too billowy. Decreasing the sleeve width will also make the sleeve slightly tighter around the elbow—be careful that you don't make it too tight. This adjustment raises the sleeve cap slightly, therefore, adjust the bicep width before shortening/lengthening the sleeve.
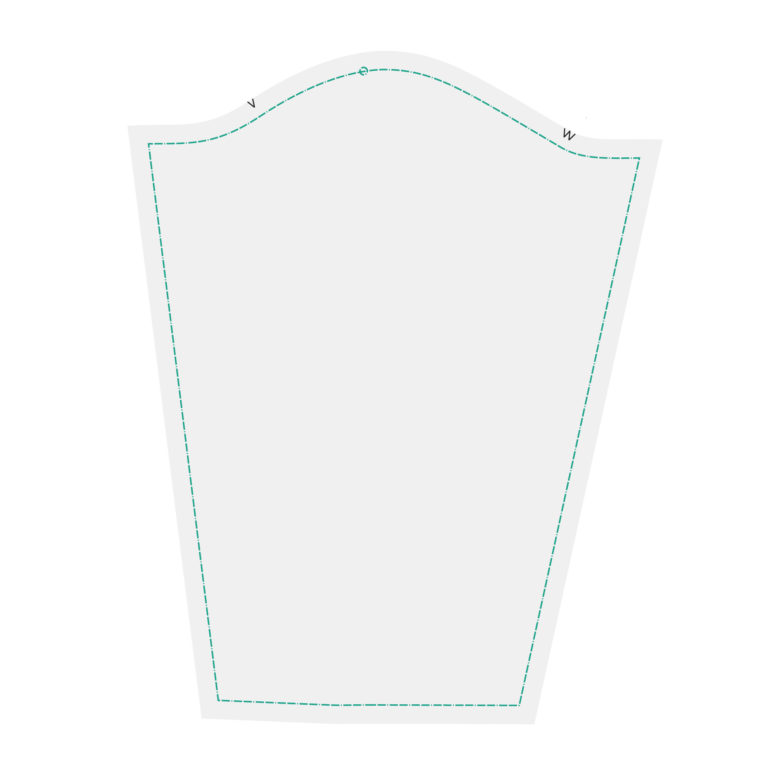
Step | 01
Draw all seam lines. Traditionally, seam lines are ⅝” away from the edge of your pattern; refer to your pattern instructions for the correct seam allowance.
Step | 02
Draw a horizontal line that is perpendicular to the grainline just at the bottom of the sleeve cap. Draw a vertical line, parallel to the grainline, from the topmost point on the sleeve head to the hem.
Carefully cut through these lines from seam line to seam line, skipping over the seam line and continue cutting to the end of your pattern piece. This will create a “hinge” just at the seam line.
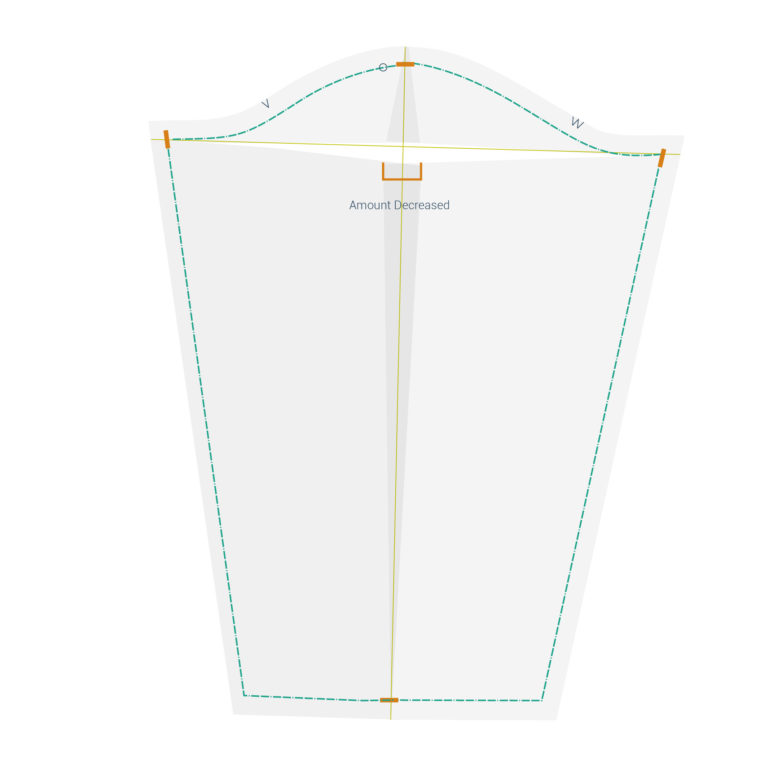
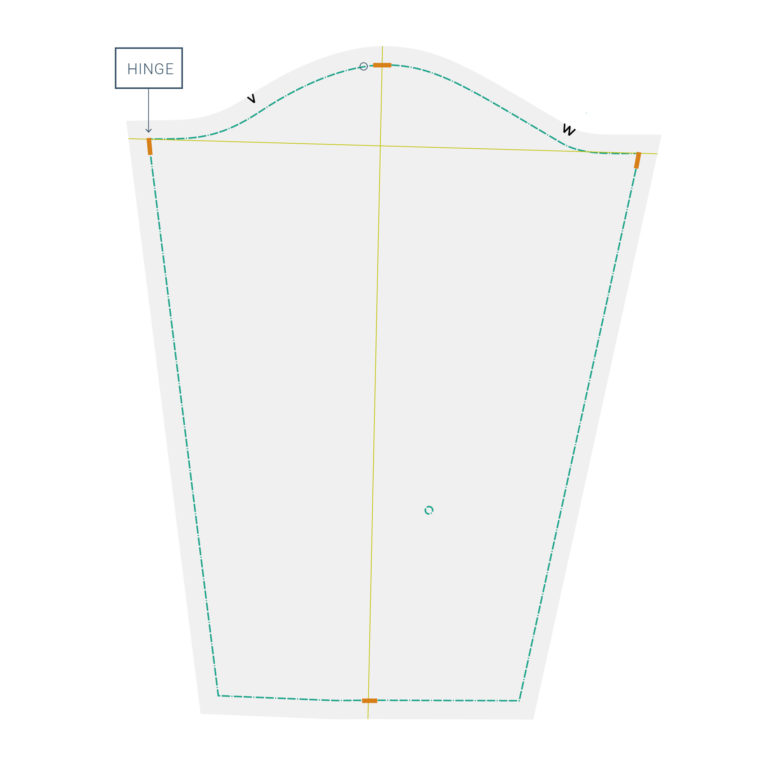
Step | 03
Overlap the center cut lines by the amount of bicep width you would like to remove from your sleeve. Place an extra piece of pattern paper under the section of the sleeve that is now open, and tape in place. By doing this, the sleeve cap height is increased and the seam lines remain the same! The most that can be taken out of the bicep width with this technique is approximately 1”. Blend the edges of the pattern piece with a ruler and/or french curve.
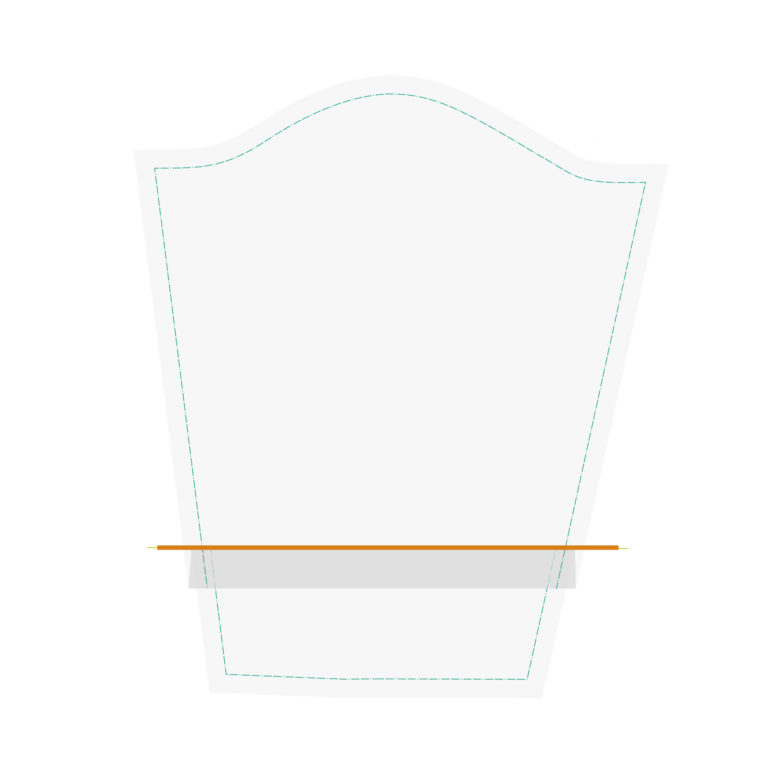
Shortening
Male torsos and arms are usually a bit longer and it’s likely that the body and sleeves of a shirt will need to be shortened in order to get that perfect sleeve length—ending at the first knuckle of the thumb. Thankfully, almost all patterns come with a lengthen and shorten line. If your pattern does not have a lengthen and shorten line, simply draw a line perpendicular to the grainline along the part of the pattern with the least amount of flare or taper. Make sure to be consistent when shortening all pattern pieces that will be sewn together. For instance, the back and front should both be shortened at the same measurement in order for the side seam measurements to match.
Step | 01
To start, simply draw a line above and parallel to the lengthen/shorten line, at the measurement you would like to decrease from the pattern piece.
Step | 02
Pinch and fold the lengthen and shorten line and bring this line to the self-drawn line above. Tape in place.
Step | 03
Blend edges of pattern piece with a ruler and/or french curve.
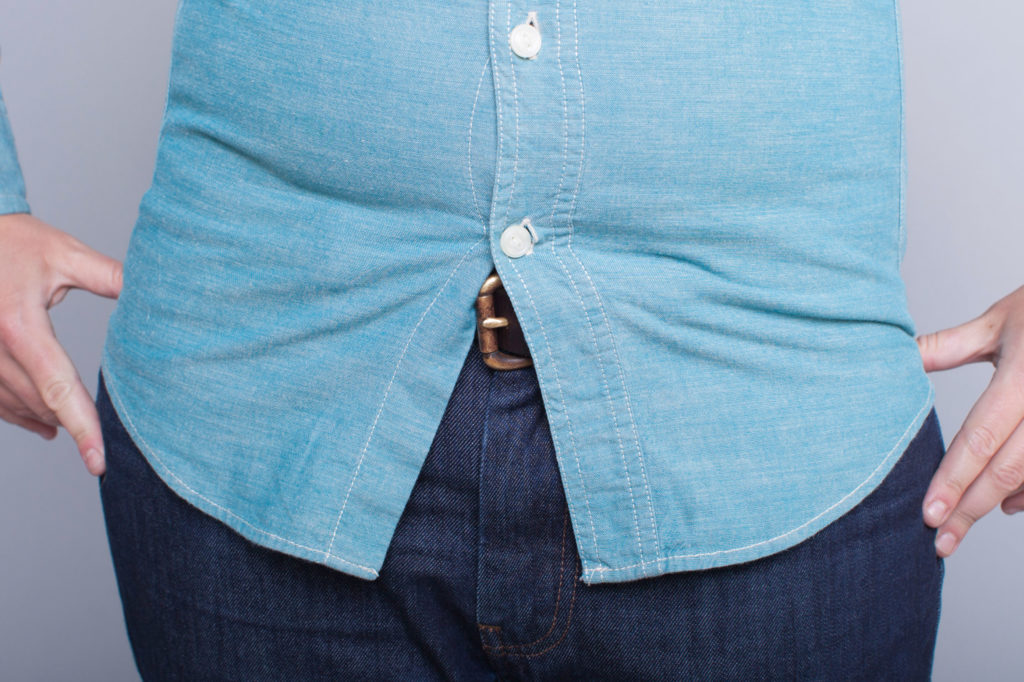
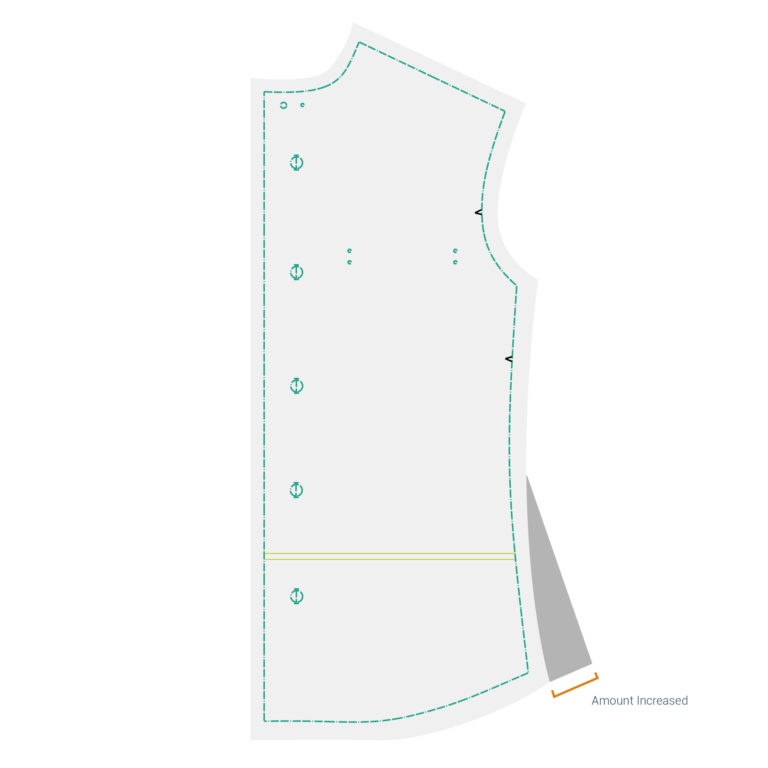
Adding Room for Hips
A garment may fit everywhere, but if the bottom portion of the torso creates a little “V” after the last button, a little bit more room for the hips is necessary. Again, this alteration should be done on both the front and back of the shirt. Don’t worry, just adding a small amount to the side seams won't affect the overall look.
Step | 01
Determine how much needs to be added at the full hip, then divide that number evenly by 4 to distribute it evenly throughout your side seams. For example, if you need to add a total of 1” to the hip, only ¼” needs to be added to to the pattern.
Tape a strip of paper to the side seam of your pattern. Measure out the amount that needs to be added at the full hip at the hem, and mark.
Step | 02
Redraw the side seam to the new full hip point. If your side seam is not straight to begin with, use a curved ruler to retain the side seam shaping.
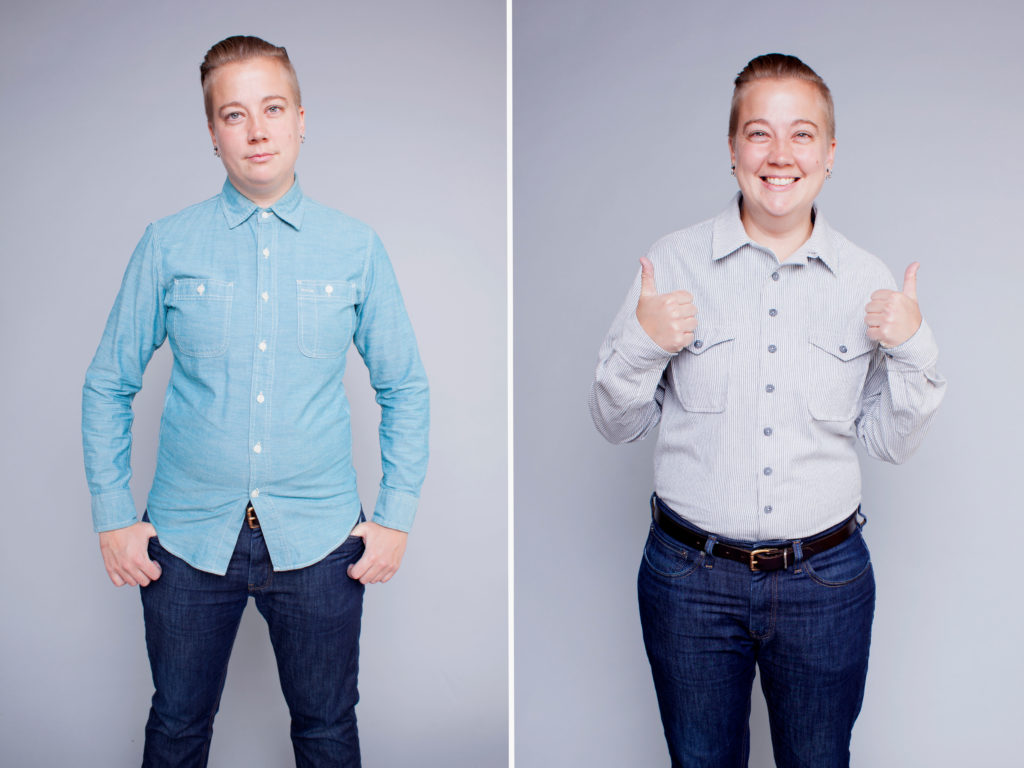
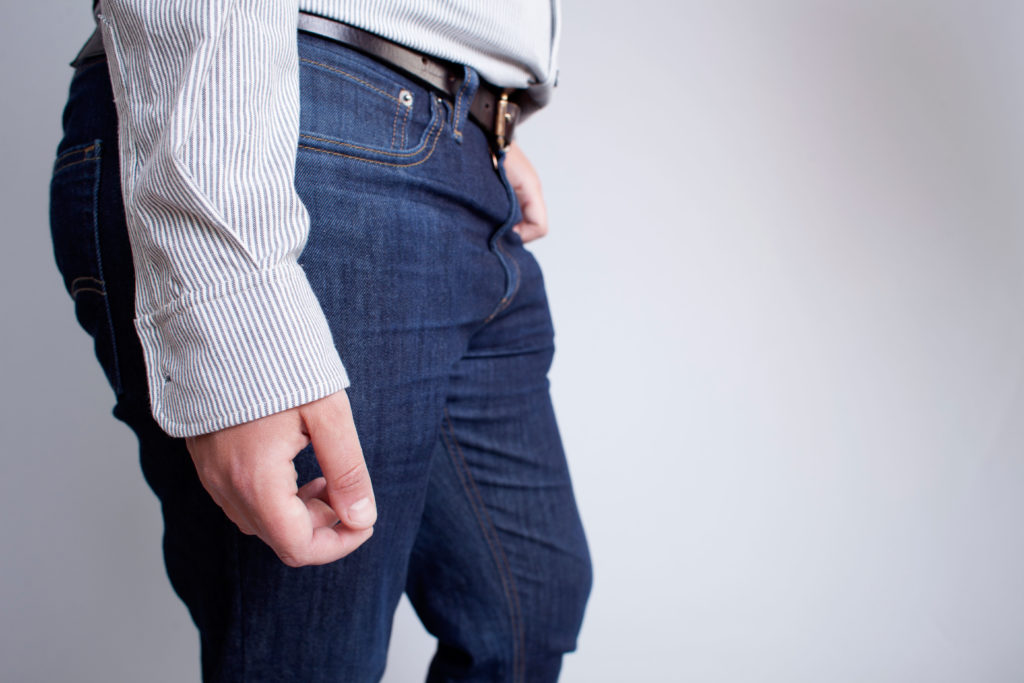
Left: Cee in a RTW menswear shirt. Right: Cee wearing a custom-fitted Negroni Shirt by Colette Patterns.
Modifying patterns and clothing for a better fit is the most remarkable aspect of sewing. The body positivity that comes from the sewing community is unlike that of any other group of hobbyists. After sewing for a bit we become accustomed to making these changes, and we don't view these adjustments with spite or self-consciousness, but rather with empowerment. Sewists accept each other's measurements without judgment, are fascinated by the differences in our bodies, and encourage each other to feel good in our clothing. For people like Cee, sewing allows them the freedom to wear whatever they like and still look damn good in it!

About the Author
Katie Whittle teaches new skills through in-depth tutorials, sewalongs, and articles for Seamwork Magazine and The Colette Blog. She loves inspiring and encouraging sewers try new techniques and create a personalized wardrobe that they’re proud of!