
 Sign In
Pants and confidence. Those two words aren’t typically seen a lot in the same sentence in a positive way when talking about sewing. I think one of the biggest reasons for me getting more and more into sewing was, like many of you, I wanted my clothes to fit me. Not the other way around.
In the last four to five years that I’ve been sewing, yes, I’ve sewn pants, but I’ve hardly taken the time to really understand what it means to make pants fit me. I’ve mostly just hoped things would work out. And, yes, they sometimes have, but other times, not so much. And that’s when the UFO pile begins, and the confidence and hope dwindles, then I go on to my next project that has fewer risks involved.
I’m lucky enough to work with very bright and smart women who know a lot about fitting, so I’ve leaned HARD on them in the past, but this time around, I had to figure it out on my own (to an extent, of course). I work from home now. Having access to these amazing people isn’t as easy these days, but I’ll show you how you can still use the experts in your life that you trust and are willing to help.
When I sew pants, they tend to end up in two different camps—either too big or baggy after wearing them twice, or a bit too tight and then I never end up wearing them unless it’s a special occasion where I’ll only be in them for a few hours. I don’t know why it ends up this way. I have a lot to learn still, and to be upfront, I think that sometimes, I’m not very honest with myself and my measurements or what my measurements may do throughout the day.
My waist measurement varies a lot throughout the day (Let’s be real, throughout the year it varies a lot, too!), and I don’t always accommodate for that. This means that I never wear my cool me-made jeans or fitted wide-leg pants because I’m making these pants for when my waist is its smallest.
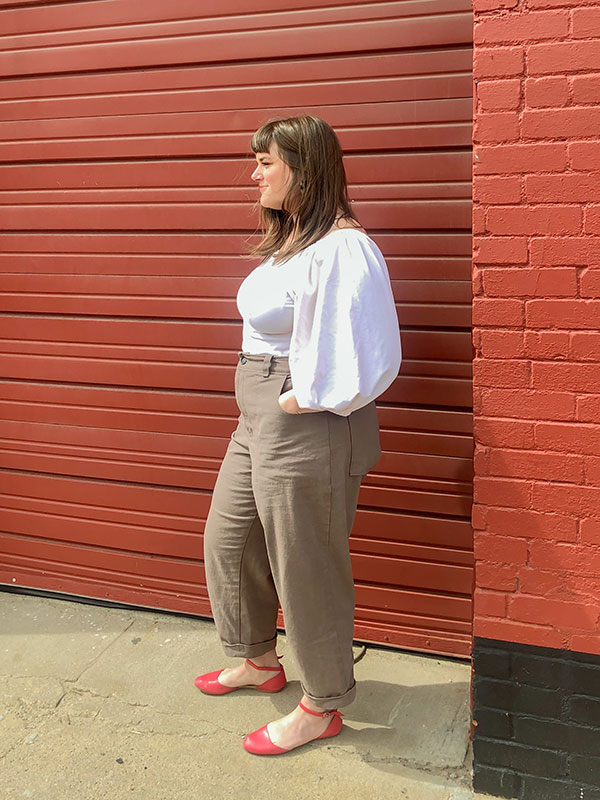
I wanted this project to be different. My goal while sewing these pants was making 100% sure that I’d want to wear them a lot and often. I wanted something I could throw on that wasn’t leggings or elastic-waist pants and still feel comfortable, but put-together.

Picking a Size
When I saw the design concept of these pants, I got so excited. I’ve been swooning over all the cool ready-to-wear carpenter-inspired pants the last few years and have had my own thrifting journey to find a pair, but alas, I have yet to find some I want. I thought Nolan would be a great base for me to start with. The slight peg-leg, high waist, and large utility pockets in the front and back had me convinced, and I was ready to get going. I started looking for my size. I took my measurements and found out that I fit between the two size ranges, per usual. This adds an element of guesswork, and to be honest, I was a bit stumped at where to start.
After analyzing the fit intention, ease, and my current measurements, I decided to start with the curvy size range, size 18. I figured the most important measurement here is the hips, as it’s a looser fitting pant. I told myself that this project is probably going to need adjustments and that it’d be okay, and I have the experience to figure it out!
My First Attempt
I sewed up a straight size 18, with no adjustments. They were interesting. I think they were sort of close, but I had a bit to go to get to where I wanted. I could tell right away that the waist was too large for my measurements, which I knew would happen. I also questioned the hip ease. I’ve taken in the waist and hips in the past with no problem, so I just pinned them where I thought they needed to be pinned. Once I did this, I recognized that the front rise was way too long for me. The back rise was really nice, though! So, this made me feel really good that I chose the size 18.
I was on to something, and it was fun to experiment with what to do next. I think in the past, I would have either given up and tossed them into the UFO pile, or just sewed them up as-is and not worn them as much. Even though I was a bit lost, I knew I needed to keep going and figure out how to make these work. So, like I had told myself previously, I CAN FREAKING DO THIS.
How to Fit When You’re Home Alone
Like I said before, I work from home and don’t have many friends around me who sew. So, I was inspired by Rachael—@minimalmachinest on Instagram—to take photos and videos to help diagnose my fitting issue. She recently went through an entire journey of trying to fit a pair of pants for herself. She documented the process so deeply and wonderfully. It was inspiring and made me rethink my abilities and confidence around figuring pants out. So, I sent some pictures and videos to a few friends—one being Haley, the designer of the pants. She was a great resource because she saw all the same fit issues I had seen, and it gave me even more confidence in figuring out what I should do next.
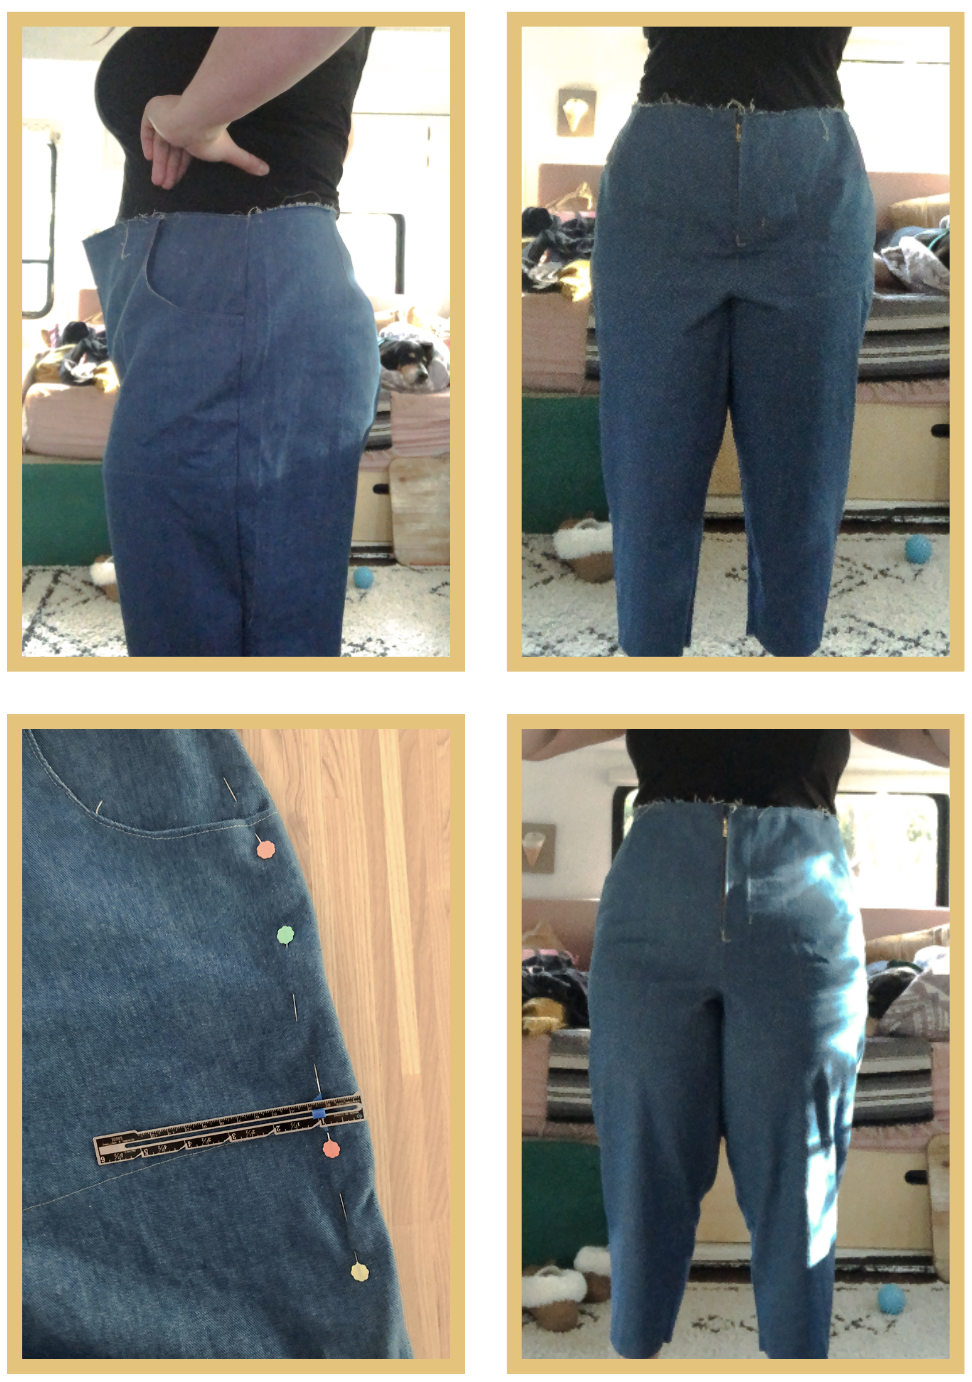
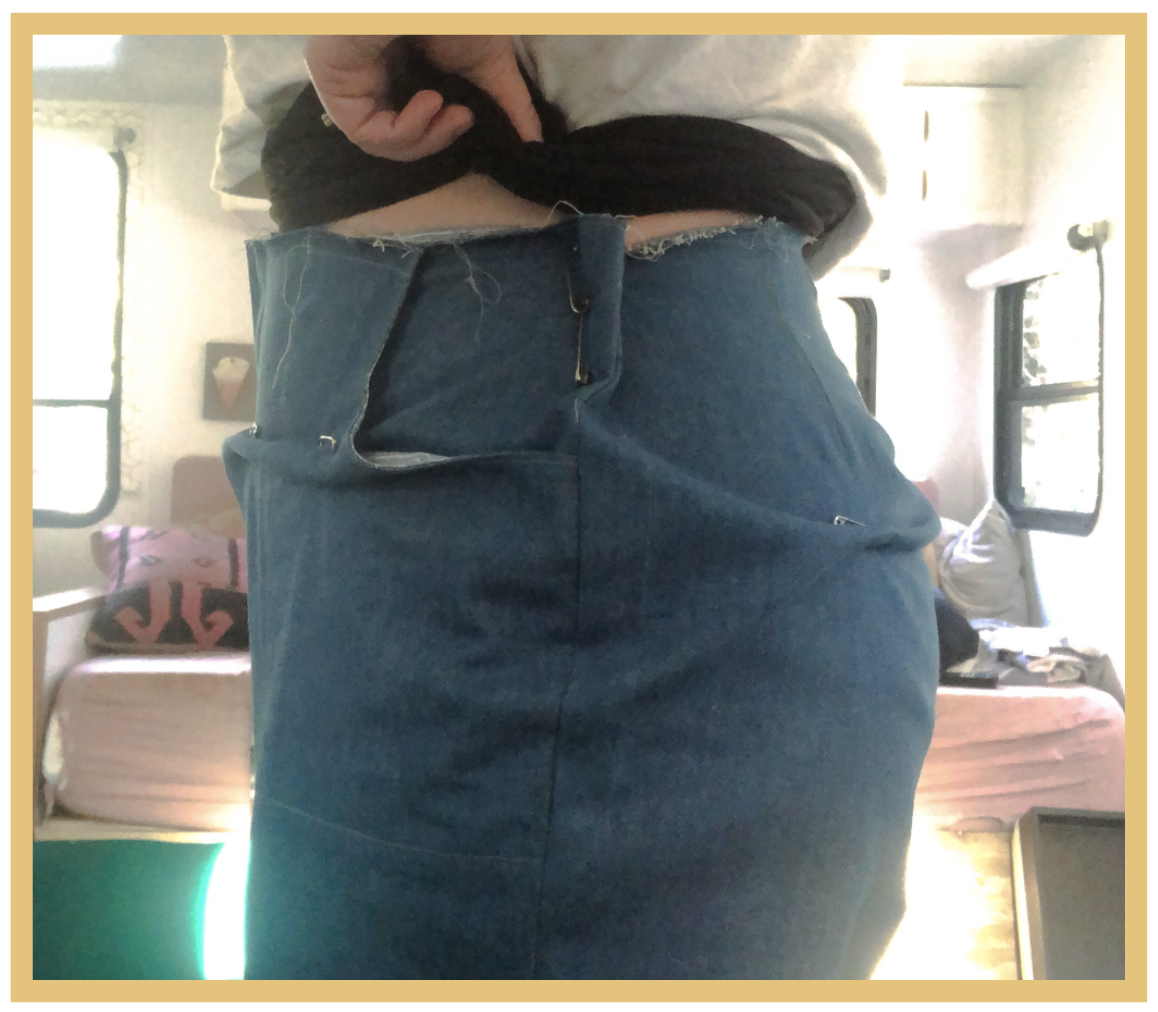
I’ve gone to a lot of fittings while working at Colette. I knew the adjustments I needed to make, and now I just had to figure out how much. So I started safety pinning. This is what I’ve observed the pattern team do a ton, and I knew I could do the same thing at home alone—not perfectly or evenly—but enough to get a good amount of my intention across. I took a good amount out of the rise and pinned the waist to where I thought would make the most sense. It was feeling good, so I took them off as they were pinned and measured the amount I took out and applied that to my pattern. I then seam ripped my entire pair of pants so that I could reuse the same fabric and pieces in my second go. It makes the process a little longer, but it’s a great way to save on fabric waste.
My Second Muslin
This time around, I felt more confident and knew I needed to trust myself and what I had adjusted.
The only pieces I ended up re-cutting were the legs, and then I sewed up my second muslin. I got to a place where I could try them on again, and I was really excited about the way they came out!
I knew I wouldn’t get the full effect of what they would end up being like unless I sewed the waistband on. After sewing the waistband, I wore them around a bit and thought that they were holding up well, but I still felt like they were too high in the front, and the waist was a tiny bit too tight. I ripped the waistband off and took out some of the seam allowances and sewed it all up again. It was a great adjustment, and I knew I had that perfect in-between of tightness and comfort. I again sent videos and photos to Haley to get her advice, and she agreed they were looking good and that I should maybe take a bit more out of the rise. Overall, they were close enough, and I didn’t think that making a third muslin made sense. So, I adjusted the rise one more time on my paper pattern by taking out 1/2” and then started cutting my main fabric for my final attempt.
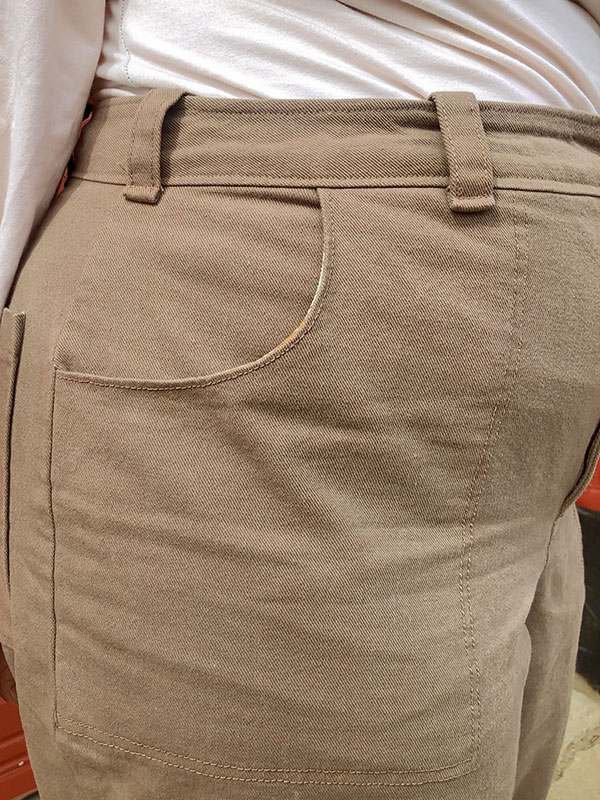
I made three additional adjustments: I added a sixth belt loop in the center back, made the legs longer since I had taken so much out of the rise—and I intend to wear them with boots and converse—and the final adjustment was making the leg opening slightly more straight. I liked the look of the peg-leg, but for me, I wanted it slightly more straight.
Picking My Fabric
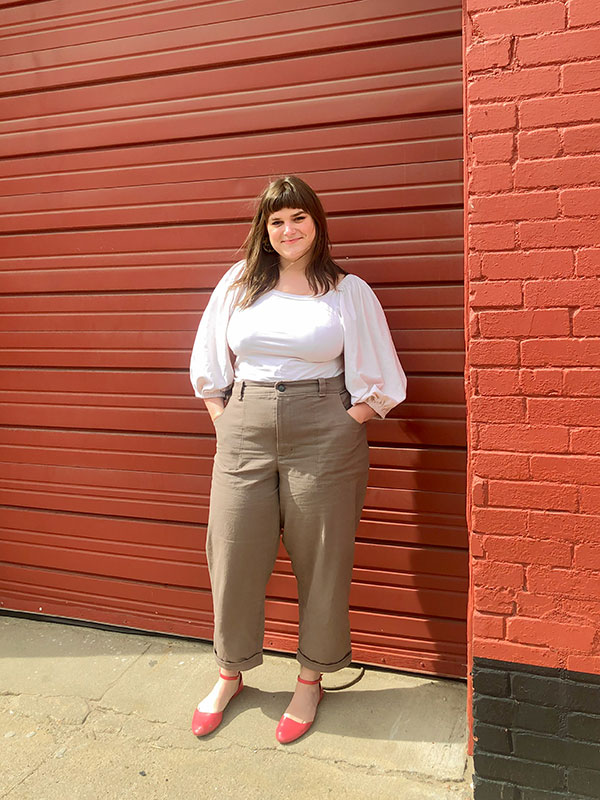
I was lucky enough to be near the Bay Area while I was working on these, which means I made a very special trip to Stonemountain & Daughter Fabrics in Berkeley. Whenever I travel, I try my best to make it to a local fabric store. I think it’s really fun to see all the different stores and how all the products are different in their own ways. I knew I wanted these pants to have a very workwear-inspired vibe. So obviously, khaki and browns were on my radar.
I thought using a canvas would be fun, but I’ve never owned a pair of canvas pants, and like I’ve said before, I want these pants to be comfortable and non-restricting. So, I thought bull denim would be a nice baby step to working with canvas in the future. (Side note: Bull denim has a bit of a tighter weave than denim, but not as tight as a canvas.)
I found this beautiful, rich, light brown bull denim and thought it’d be a perfect shade of brown for my Nolans. I brought it home and washed and dried it like I would my pants in the future.
The Final Go
Overall the sewing went super smoothly. Especially since this was my third time making them. Another bonus to making a muslin—fewer mistakes overall on your final pair! It was really exciting seeing them come together. I felt good because I knew I worked hard, and these are a pair of pants that really fit me and my body in the way I want them to. I think it’d be fun to add some more workwear oriented details to a future pair, like more pockets on the leg and a hammer loop, or maybe adding rivets around the pockets. This pair of pants has been a turning point in my sewing. I realized that I could fit things well, and I could figure it out, all with determination, confidence, and some help from friends.

Taylor Pruitt
UX Designer
Taylor has an eye for design. As the UX Designer for Seamwork and Colette she wants to make sure your online experiences are fun and enjoyable.

