Sign In

At the start of every single beginner sewing class I have ever taught I ask my students the same question. "Why do you want to learn to sew?" Though I might get the occasional "To make my cat Halloween costumes" or "To make holiday gifts" there was one answer that outnumbered all the others by far.
I want my clothes to fit.
As sewists, we strive for perfection. Perfect darts, perfect reversed corners, but the biggest feat of perfection is a spot-on fit. It doesn't matter if you are short, tall, round, angular, male, or female, hardly any of us conform to size charts, ready-to-wear, or otherwise.
Over the past few years the information available on fitting and pattern adjustments has skyrocketed. There is, however, a surprising lack of information on fitting the male form. Though there are many methods of fitting the male form, the most straightforward technique is based on three key points: length, shoulder, and waist. These are arguably the most important points of fit in any garment, and by paying close attention to these areas, we can achieve the ideal fit.
First and
Second Muslin
Achieving the perfect fit does not happen by magic. Making a muslin of the garment out of the envelope is the best way to determine the adjustments you will need to make. Carefully mark problem areas on your first muslin. This is your roadmap for pattern adjustments! After pattern adjustments are made, a second muslin will ensure that you have nailed the fit of your garment.
Lengthening and Shortening
Lengthening and shortening is perhaps the easiest way to make your finished garments appear well tailored and put together. Garments that are too short or long can looked dated and sloppy. But what is the correct length? This of course varies slightly according to taste but there are standard rules that you can easily apply to your fitting process.
Shirts should cover the belt or waistband and should finish above the pant zipper. Sleeves should end where the wrist and hand meet, approximately 1" below the wrist bone.
Trouser and pant length is the most challenging and is mostly determined by taste. The most important concept to understand is pant break. The break is the fold or bend above the cuff of the leg, which is created when the fabric of the leg is longer than your physical leg. Thus, the pant line “breaks,” or bends, below your shin when the cuff meets your shoe. If a pant has no break, then the front line of the pant will be unbent, and the cuff will just graze your shoe. A pant with no break usually appears too short. A larger break is common in more relaxed and casual styles, while a smaller break offers a more tailored look that is well-suited for more formal garments.
Never make changes directly on the original pattern. Instead, trace the original pattern and make flat pattern changes to the duplicate. If you are happy with the fit after making the garment, permanent changes can always be made to the original pattern for future use.
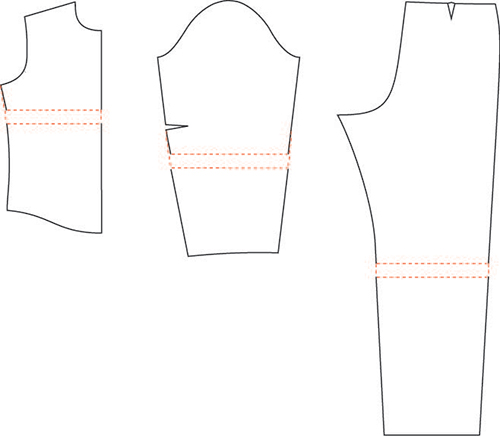
Lengthen
- Trace the original pattern.
- Draw a lengthen/shorten line that is perpendicular to the grainline and parallel to the hem. This line should be placed relative to where the lengthening needs to take place. For example, if you are short from your chest to your navel, the lengthen/shorten line should be placed between these two points.
- Cut along the lengthen/shorten line.
- On a separate piece of pattern paper, draw two parallel lines that are the amount you would like to lengthen. Draw a third line that is perpendicular to the previous lines. This will act as a continuation of your grainline.
- Align your slashed pattern pieces with your lengthening guide and grainline. Tape to secure. Blend jagged edges and trim.
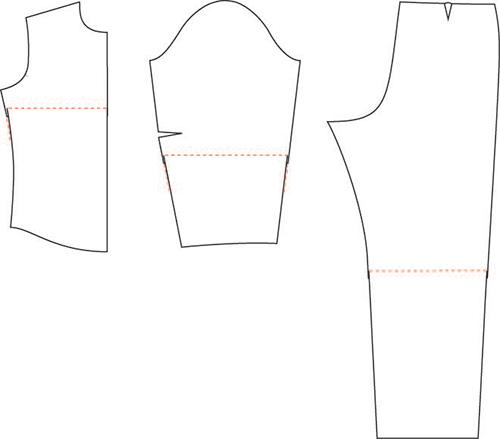
Shorten
- Trace the original pattern.
- Draw a lengthen/shorten line that is perpendicular to the grainline and parallel to the hem. This line should be placed relative to where the shortening needs to take place. For example, if you are short from your chest to your navel, the lengthen/shorten line should be placed between these two points.
- Draw a line above and parallel to the lengthen/shorten line. The distance between these two lines should be the amount you would like to shorten.
- Crease the lengthen/shorten line, and fold it to your new line.
- Tape and blend jagged edges.
Fitting the Shoulder
A fitted shoulder is a sure sign of a well-tailored garment. Shoulder is where the front shirt, back shirt, and sleeve all meet, and a variety of fit issues can affect the shoulder.
First, it is important to establish what a fitted shoulder looks like. A fitted shoulder lies flat against the natural shoulder. The seam on top of the shoulder should end perfectly at the tip of the shoulder. If this seam is too long or short, the poor fit will also affect the fit of the underarm and back. In these instances, you’ll see “ripple effects” that create lumps or wrinkles on the sleeve and underarm.
Wide and Narrow Shoulder Adjustment
Patterns are drafted based on statistical averages. It is incredibly common to find that the size you have picked based on your chest and waist measurements does not align with your exact shoulder width. Luckily, adjusting shoulder width is quick and easy.
- Trace the pattern, removing the seam allowance at the shoulder and armscye.
- Make a second trace of just the armscye without the seam allowance.
- Mark the new end point of the shoulder width.
- Place the armscye trace under the full trace. Match the top of the armscye with the new shoulder end point.
- Pivot the full trace until the bottom armscye becomes in line with the original side seam.
- Repeat on the back shirt piece. Add the seam allowance to the armscye and shoulder seams.
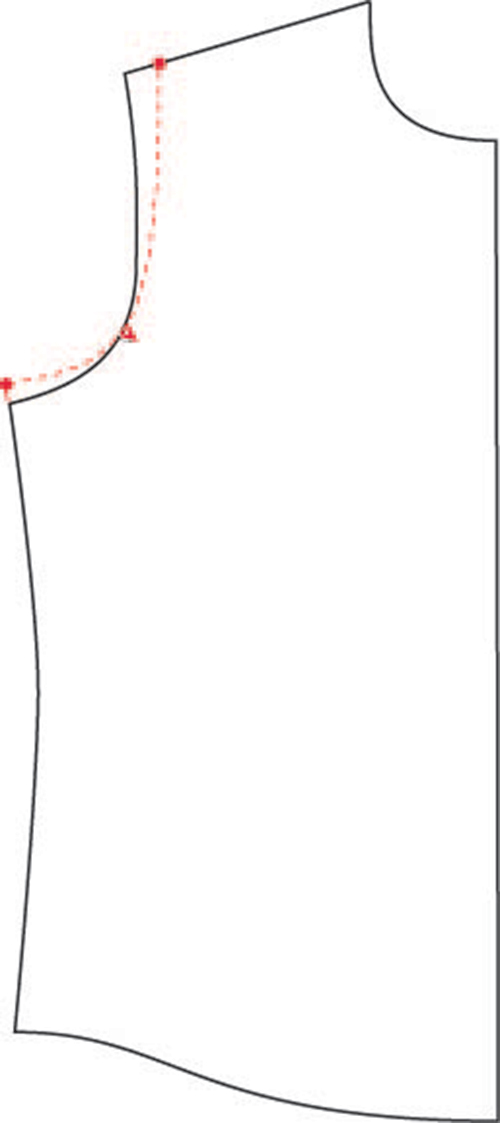
Balancing the Shoulder Seam
Trends have historically determined shoulder seam placement. Over the last one hundred years the shoulder seam has shifted from the back of the shoulder to a more central point at the shoulder. If you have a rounded back or chest you may find that shifting the shoulder seam slightly forward or backward is necessary.
To move the shoulder seam forward, follow the following steps. To move the shoulder seam back, simply follow the reverse.
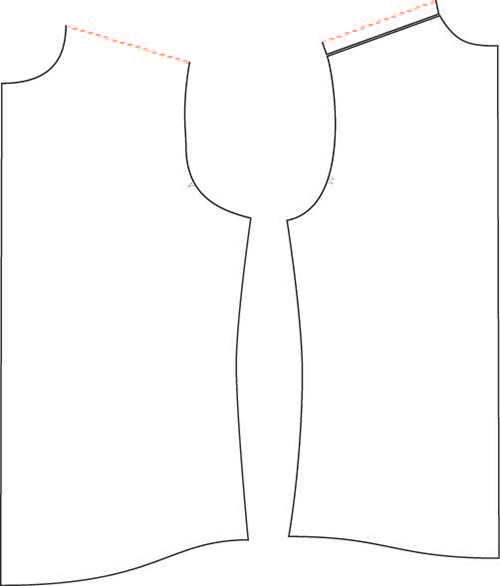
- Trace the front and back shirt pieces. Remove the seam allowance at the shoulder seams.
- Draw the new desired shoulder line on the front shirt. Cut along the line.
- Tape the cut pattern piece to the back shoulder.
- Add the seam allowance.
- Adjust shoulder seam mark on sleep to reflect change.
Seam allowance addition
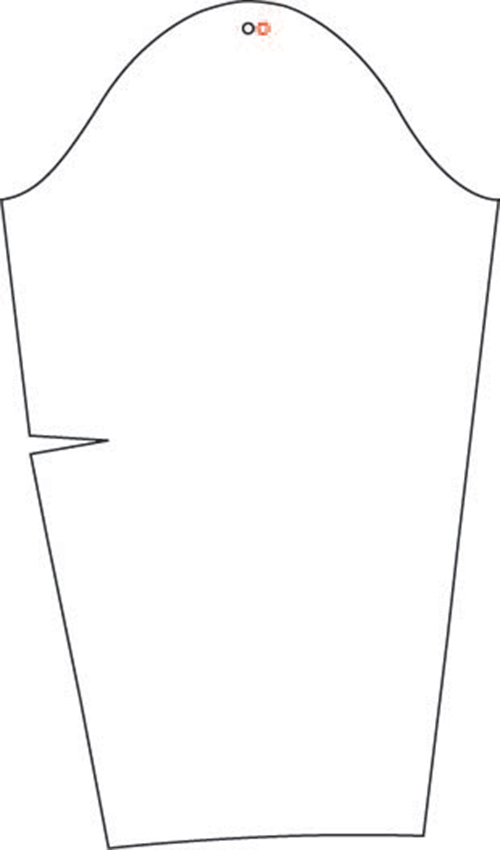
Shoulder adjustment seam mark
Full and Flat Abdomen Adjustment
Though patterns are typically drafted for a fairly streamline stomach, most people do not fall into this mold. A fitted midsection is flattering and will have you feeling confident.
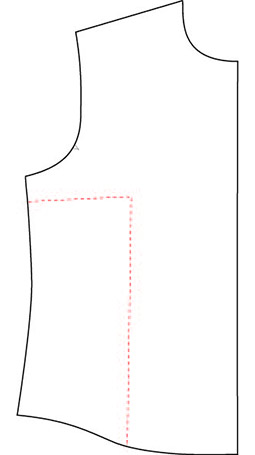
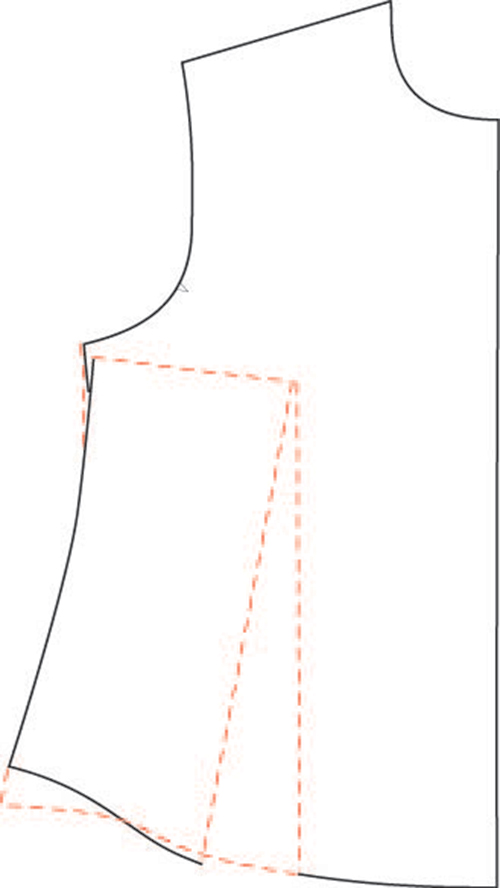
- Trace the pattern, removing the side seam allowance and hem allowance.
- At the chest, draw a line that is perpendicular to the grain line that starts at the side seam and ends at the fullest part of the chest.
- Draw a second line, parallel to the grainline, from the full chest point to the hem of the garment.
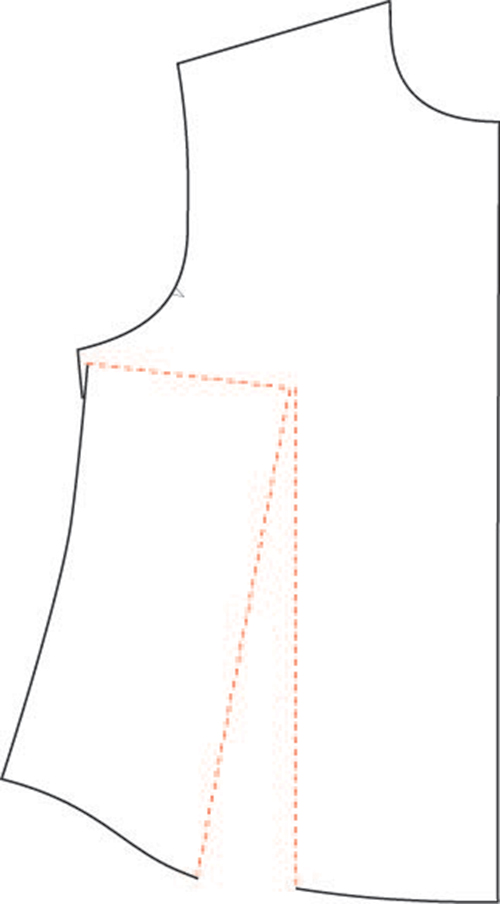
- Using paper shears, cut along the drawn lines, starting at the hem, stopping at the full chest point, then cut from the side seam to full chest point. Leave a small paper hinge.
- Pivot outward from the paper hinge to create more ease through the midsection, and pivot toward the center front to eliminate ease.
- Lengthen or shorten at the side seam hem to compensate for the length added or subtracted when pivoting.
Pants and Trousers
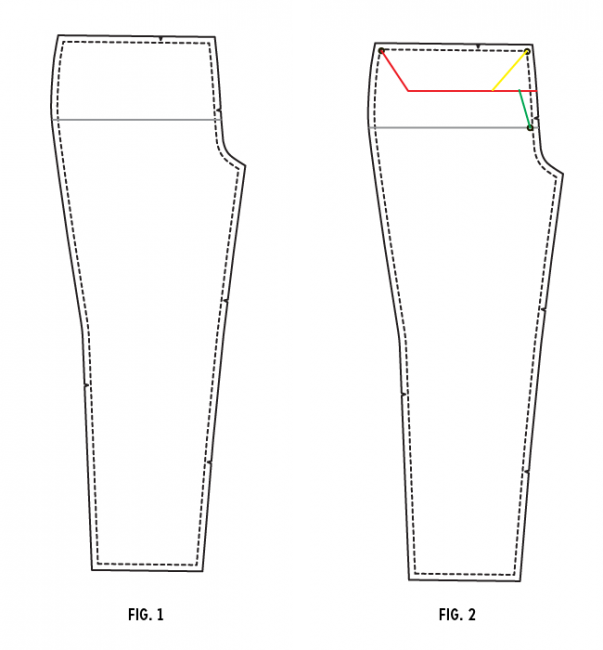
To adjust for a full abdomen:
- Trace the front pant leg, eliminating any front fly extension.
- Draw in the hip line on your pattern front. For this adjustment, you’ll only be working with the front of the pattern.
- Draw the lines shown in figure 2.
- Cut the pattern along these lines. Note the circles, which indicate where you will pivot the pattern. Cut a hinge here in the seam allowance rather than cutting all the way through to the edge (see notes above).
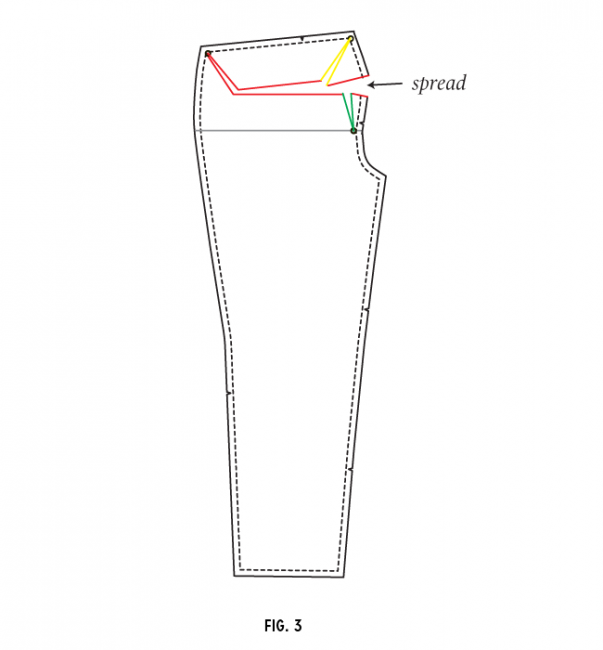
- Spread the pattern as shown in figure 3. You are adding both width and length over the belly. Note how the center front seam will now be more curved over the belly.
- Tape the pattern in place and retrace, smoothing out the curve at the center front.
- Redraw the fly extension.
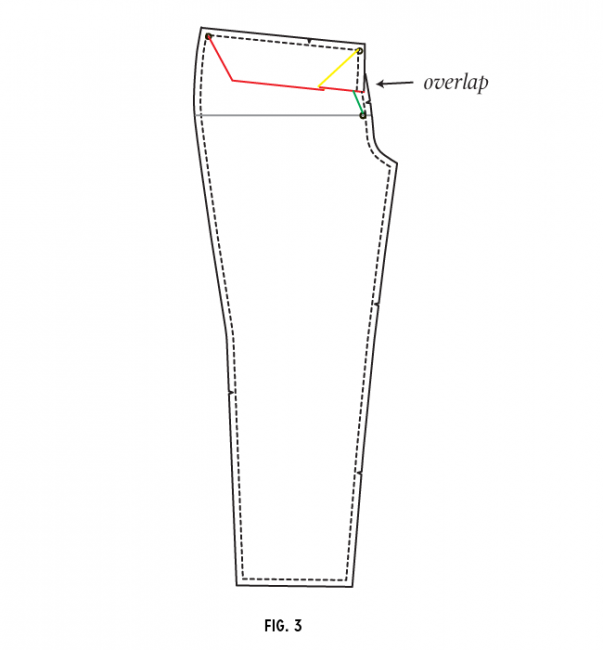
To adjust for a flat or concave abdomen:
- Trace the front pant leg, eliminating any front fly extension.
- Draw in the hip line on your pattern front (the grey line in fig. 1). For this adjustment, you’ll only be working with the front of the pattern.
- Draw the lines shown in figure 2.
- Cut the pattern along these lines. Note the circles, which indicate where you will pivot the pattern. Cut a hinge here in the seam allowance rather than cutting all the way through to the edge (see notes above).
- Overlap the pattern as shown in figure 3. You are removing both width and length over the belly. Note how the center front seam will now be less curved over the belly.
- Tape the pattern in place and retrace, smoothing out the line at the center front.
- Redraw the fly extension.
Achieving a custom fit in your clothing does not have to be hard or intimidating. Establishing good sewing habits such as making a first and second muslin is the first step to great fit. Learning your body and the adjustments needed to custom fit your clothes will elevate every garment you make. This will keep you looking sharp, whether you are in a me-made T-shirt or an immaculately tailored coat.

About the Author
Haley Glenn is a managing editor for Seamwork. She is a professional sewing writer and teacher based in Portland, Oregon.