
 Sign In
Last year, I set an ambitious goal: create a wardrobe that's 80% handmade. I wanted to see if I could move away from buying clothes and instead sew pieces I'd actually love and wear consistently.
What I discovered over twelve months of dedicated sewing surprised me. It wasn't just about the clothes I made—it was about understanding my personal style in ways I never had before. Some projects became wardrobe workhorses, while others taught me valuable lessons about what doesn't work for me.
If you've ever wondered whether it's possible to create a truly functional handmade wardrobe, or if you're curious about what you might learn about your own style preferences through sewing, let me take you through my year of intentional making.
Winter: Embracing Luxury in Simple Shapes
Winter arrived with my creativity at its lowest ebb. The shorter days and grey skies always drain my energy, so I knew I needed a strategy that wouldn't overwhelm me. My solution? Focus on simple shapes in really special fabrics—pieces that would feel like self-care when I put them on.
I planned six projects using a palette of black, white, cream, and taupe-brown for basics, with bright cherry red as my statement color. The goal was creating clothes that matched how I actually live in winter: working from home, layering for warmth, wanting to feel put together without much effort.
The Greer Sweater Dress: Two-Hour Luxury
My first project was the Greer sweater dress—a maxi-length dress with beautiful bell sleeves that add just enough interest without being dramatic. I used a taupey-grey wool knit from Denver Fabrics, and I'll admit I was nervous ordering it online. Would it be itchy against a high neckline?
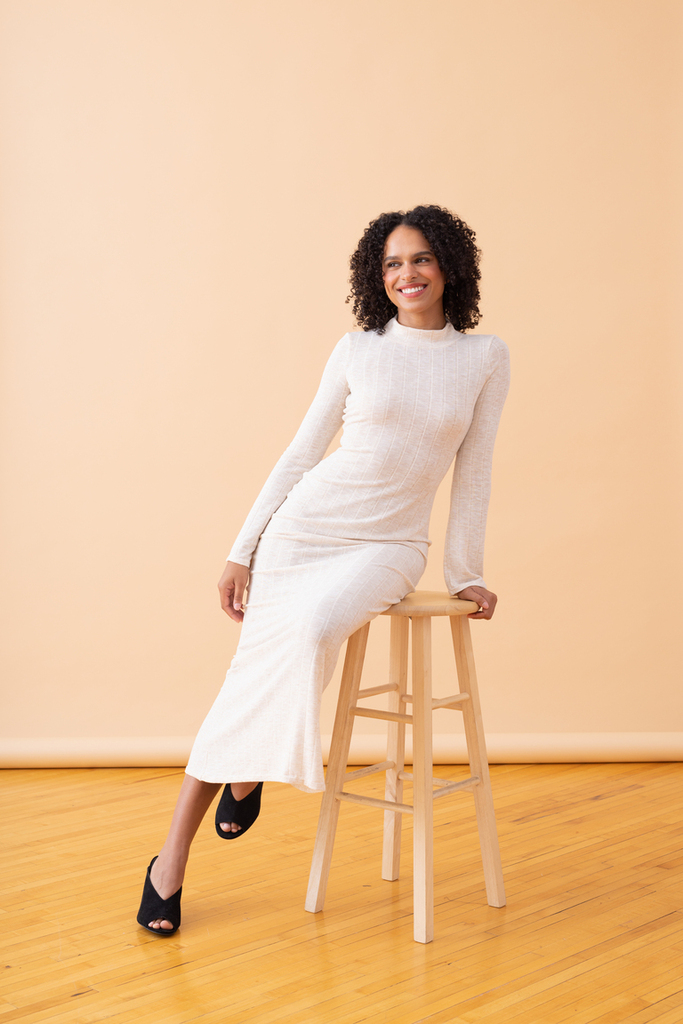
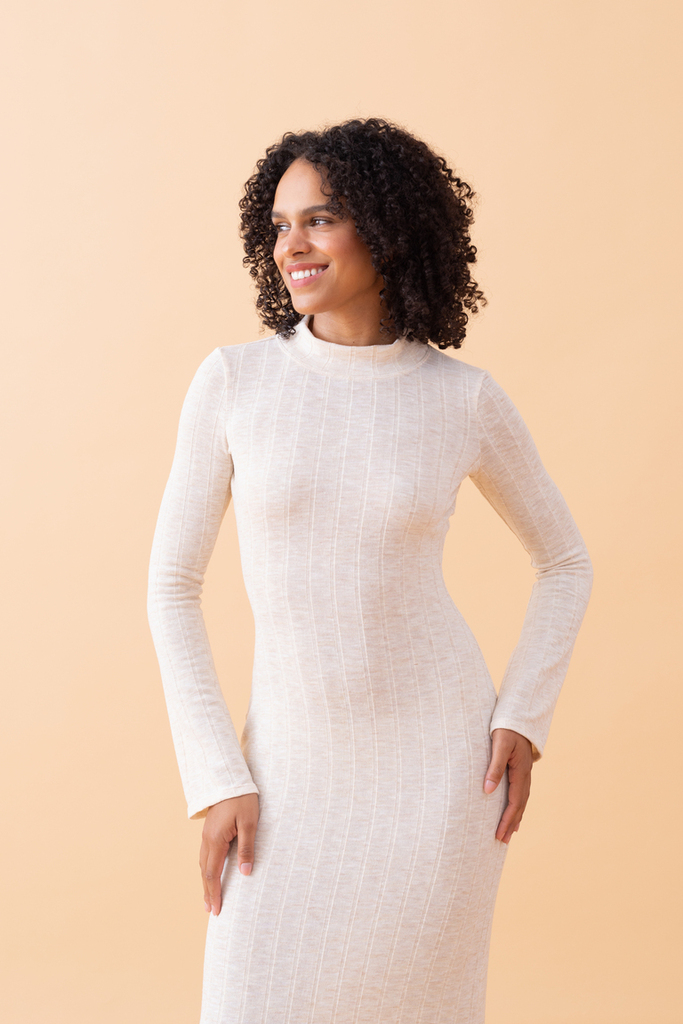
Thankfully, it turned out soft and fuzzy, exactly what I wanted. The knit is thin enough to be slightly transparent, but that works perfectly for winter layering with silk long underwear or wool tights underneath.
The entire dress took just two hours to make. Wonder tape became my best friend for hemming—it kept the folds in place and stabilized the knit so it wouldn't stretch while sewing. I've been wearing this constantly with a structured blazer I found at a thrift store, sometimes with a belt, sometimes with knee-high boots and wool socks.
What I learned: Quick projects in luxurious materials give you that feeling of accomplishment without the marathon sewing session.
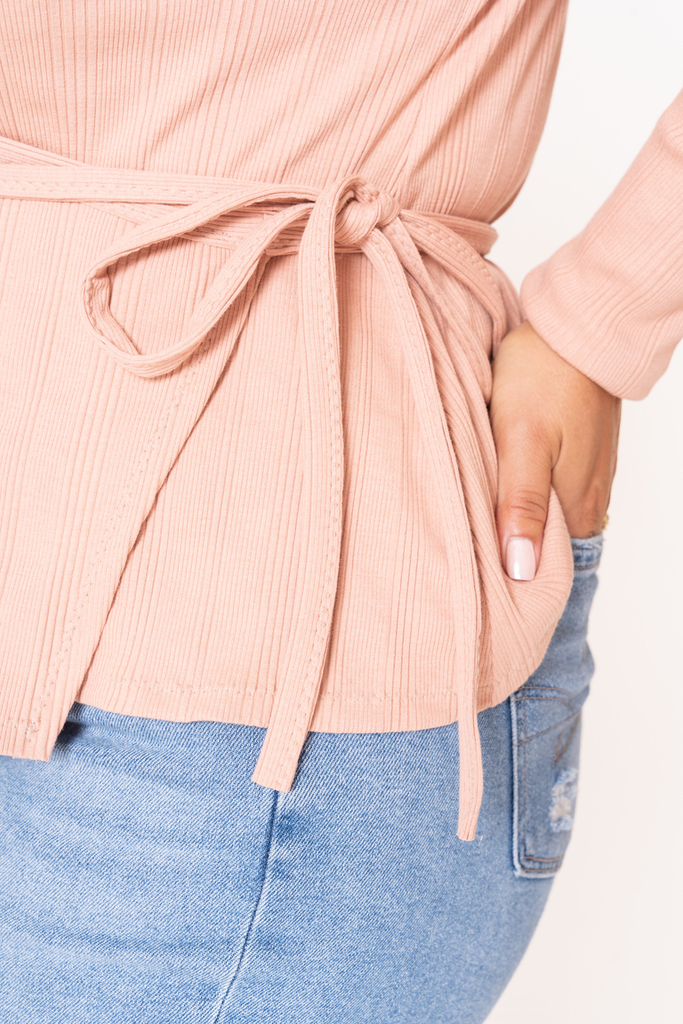
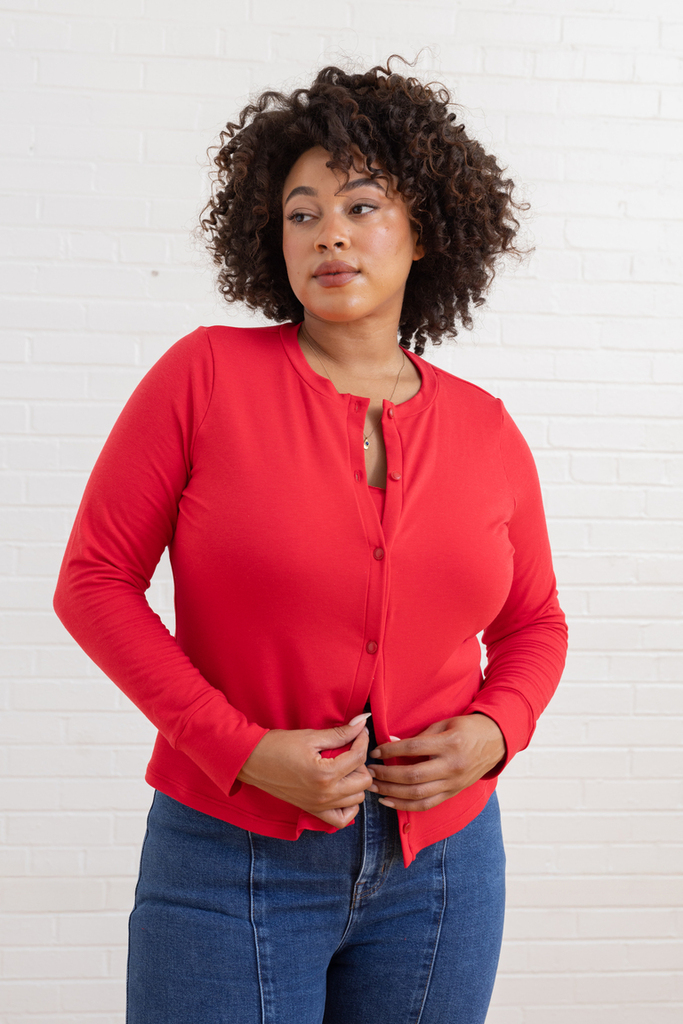
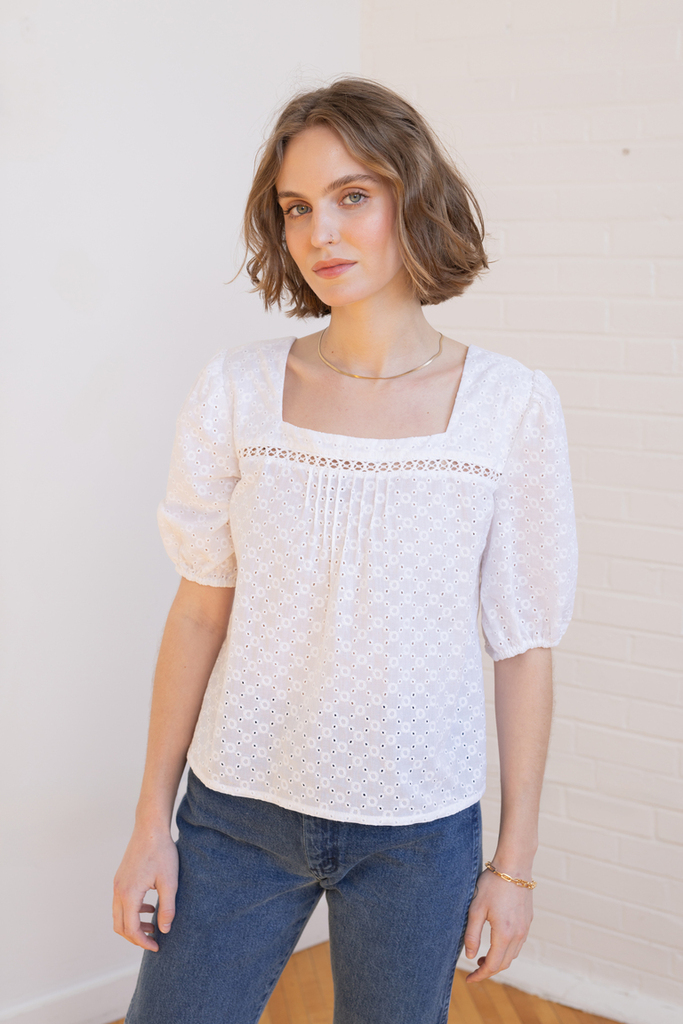
The Sage Blouse: Investing in What You Love
Next came the Sage blouse in Liberty tana lawn—a gorgeous cherry red floral print that makes me happy every time I look at it. Liberty prints are expensive, but I've loved them for decades, so I knew this wouldn't be a passing phase.
The pattern itself is wonderfully classic: princess seams, front buttons, and romantic sleeves. I used vintage mother-of-pearl shell buttons from a flea market, and there's something about the way they feel when you button them—cool and crisp—that makes the whole garment feel more special.
I thought I'd wear this with a sweater vest, but ended up pairing it mostly with dark denim. Sometimes the simplest combinations work best.
What I learned: Small details really matter. A high-quality button is one of those tiny things that elevates your finished garment. And choosing prints you've loved for years, not just what's trendy, means you'll actually wear them for years.
The Joss Pants: My Most-Worn Make
These black silk Joss pants became my fastest make and, surprisingly, my most-worn piece of the year. I've worn them at least once a week since finishing them.
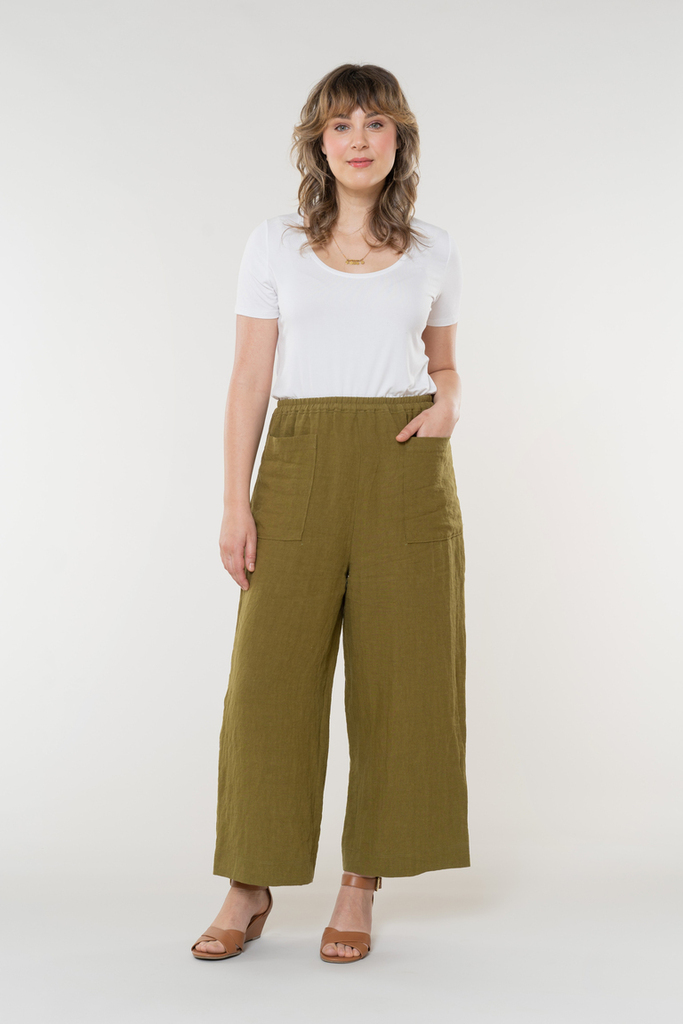
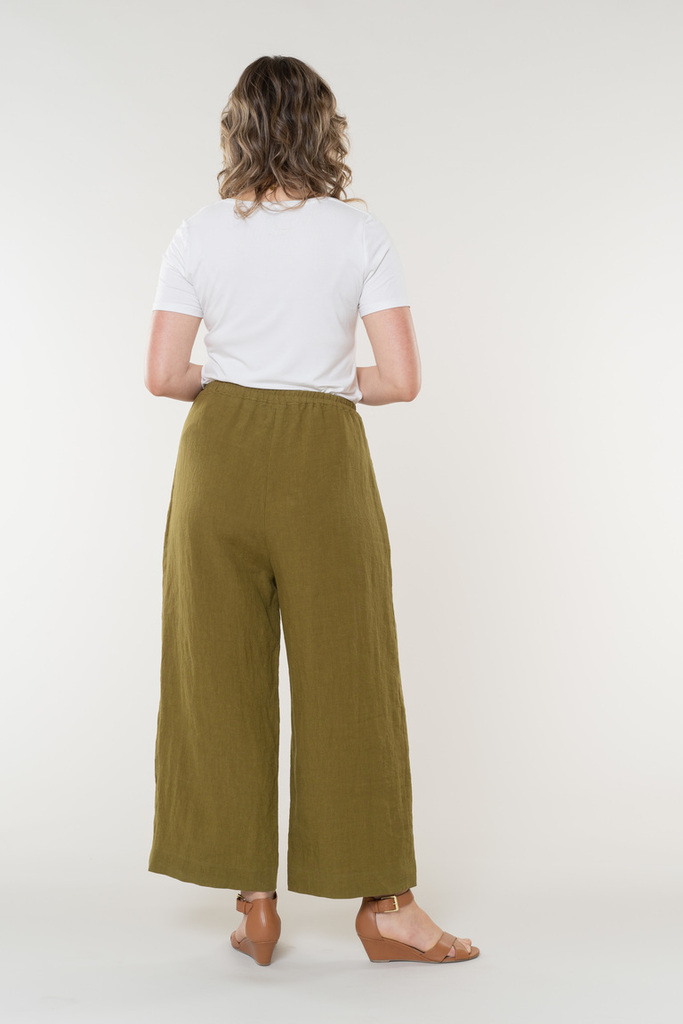
The fabric is black silk charmeuse—lightweight silk satin that feels luxurious and soft. Silk is actually quite warm, making it perfect for winter. I feel like I'm wearing very fancy pajamas.
Working with black silk presented challenges. It's slippery and hard to see what you're doing. I had to pin everything carefully, sew slowly with a microtex needle, eliminate the pockets for a sleeker look, and hand-sew the inner waistband because silk is too slippery to control under the machine.
For the hem, I used a machine blind hem to avoid visible stitches and puckering. I've been wearing these with crisp white button-downs, fluffy sweaters, or slim knit tops, usually layered over tights or silk long underwear.
What I learned: If you choose a difficult fabric like black silk, pair it with a simple shape and take the details extra slow. Don't rush and frustrate yourself.
The Pepper Sweater: Cashmere Splurge
This was my biggest splurge—Italian ribbed cashmere knit from Loro Piana in bright red. So soft and luxurious it almost seemed criminal to cut into it.
Getting the look of a true sweater from cut-and-sew projects can be challenging. We often use French terry or sweatshirt fleece, which looks great but different from actual sweater knit. Finding the right sweater knit changes everything.
This became another winter staple. I've been wearing it with those black silk Joss pants for complete softness, or with leggings for comfort, or with shorter skirts to balance the oversized Pepper sweater. I even made matching neck scarves with the leftover fabric.
What I learned: Pairing simple design with truly luxurious fabric is transformative. And knowing the colors that make you feel good means you automatically feel brighter when you put them on.
The Black Poplin Dress: Learning from Mistakes
This project taught me some hard lessons. I lengthened the Sage blouse pattern and added an eight-gore skirt to create a black cotton dress with lots of volume, using stretch cotton poplin for its crisp, swishy texture.
But I made several mistakes. I should have made a muslin—I thought since I'd just sewn the Sage blouse successfully, I didn't need one. But a dress needs to fit differently than a blouse. Changing the neckline affected the back fit, and the waist curve was too dramatic.
I also added topstitching to all vertical seams before finalizing the fit, which made adjustments nearly impossible. And five yards of black fabric was a nightmare for my eyes—I need better task lighting.
What I learned: Always make a muslin when modifying a pattern significantly. Don't add topstitching or decorative details until the fit is exactly right. And I discovered that crisp, structured dresses might not be for me—I prefer shapes with flow and drape.
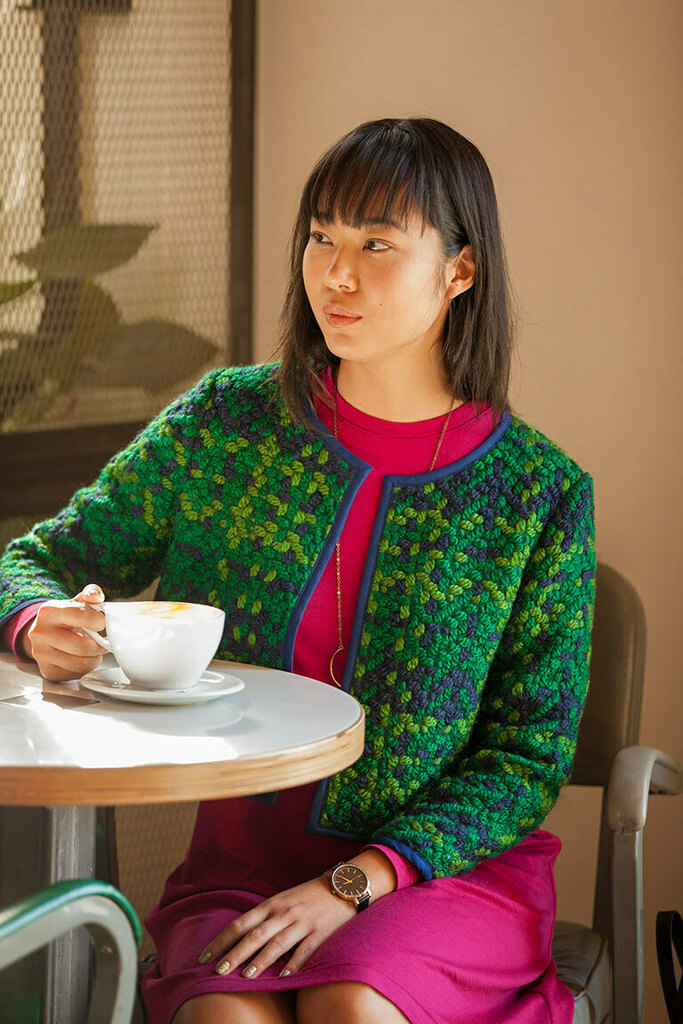
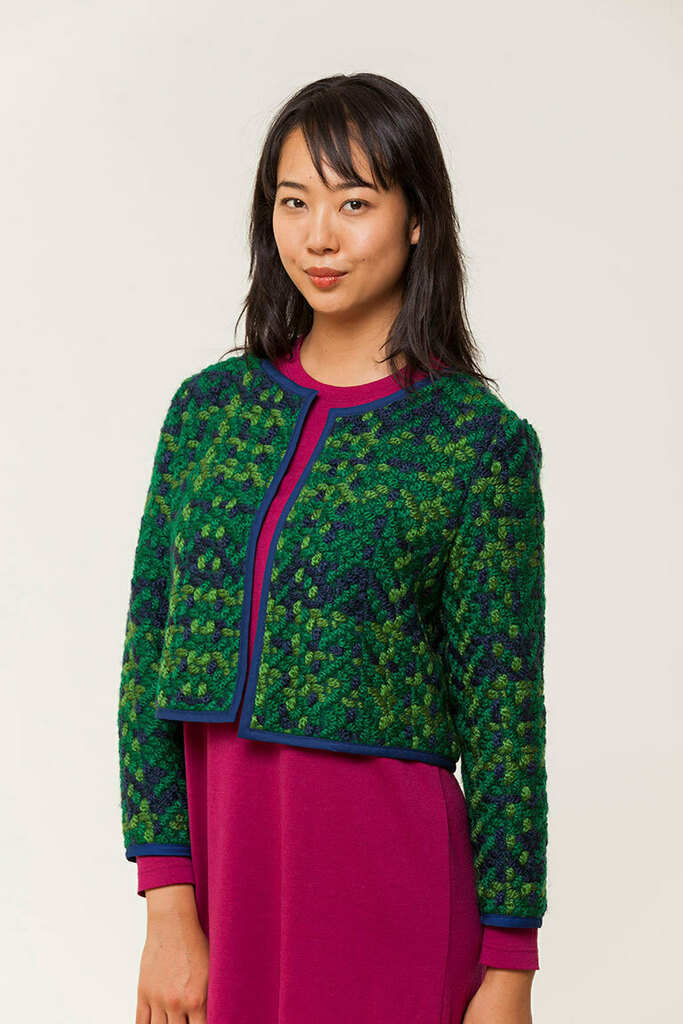
The Lilliana Jacket: Sherpa Success
My biggest winter project was a sherpa jacket with quilted lining. The outer fabric is organic cotton sherpa, lined with pre-quilted black and white checks, finished with faux leather binding and snap toggles.
Sherpa can be tricky to sew. I sized up for bulk, finished raw edges immediately to prevent fluff everywhere, used Wonder Clips instead of pins, and used a walking foot for both sherpa and faux leather.
The faux leather binding was challenging—it comes pre-folded and doesn't open fully, making mitered corners impossible. I solved this by sewing the ends at 90-degree angles, which looks fine.
The Lilliana jacket keeps me extremely warm, though it's quite bulky. Because it's cropped, I really like it with high-waisted jeans or trousers, but honestly think I should have lengthened it for better proportions.
What I learned: Simple shapes in beautiful, cozy, statement fabrics are my favorite things to sew and wear in winter.
By winter's end, I'd discovered something crucial: I love mixing quick wins with challenging projects. The easy victories keep me motivated, while complex projects teach new skills. But the real secret? Choosing luxurious, tactile fabrics makes even simple projects feel special.
Spring: The Art of Patience
As winter faded and light returned, I felt drawn toward softer, flowing shapes. Spring is always tricky for me—I want light, airy clothing, but the weather remains unpredictable.
This season, my goal shifted. I wanted foundational pieces I could wear for years. My wardrobe felt too full, and I wasn't wearing things even though I loved them. So I decided to try a limited capsule wardrobe—only wearing pieces from a carefully curated selection.
My theme was soft, flowing, and detailed. I created a mood board with textured knits, light printed silk scarves, dark denim, and spring colors: pink, ivory, camel, and pale yellow mixed with black, cream, and navy blue.
The Chelsea Jeans: Labor of Love
First up were Chelsea jeans in classic dark denim. I'd made Chelsea once before and adjusted the fit, so I could dive right in.

These jeans are a real labor of love with so many steps—pressing, topstitching, hardware decisions. I worked on them an hour here and there over almost a month. Taking it slow made it feel creative rather than overwhelming.
The biggest challenge was the mental commitment. But when I think about how much I'll wear dark denim—with practically everything—it only makes sense to invest that time.
What I learned: Breaking large projects into small chunks makes them enjoyable instead of overwhelming. Making things you'll wear constantly is more meaningful than whipping up something you'll rarely use.
The Farah Wrap Top: Stash Success
Next is the Farah wrap top—a ballet-inspired knit wrap that's fitted throughout with full-length sleeves. I used lovely off-white wool knit that had been in my stash for years, almost like cashmere but not as delicate.
This top is incredibly versatile. I can wear it lounging in winter, over a cami in spring, or even over a dress for evening. I chose the bonus flared sleeve option but wanted full-length rather than three-quarter, so I added strips of knit interfacing to the hems and cuffs for body and structure while maintaining softness.
What I learned: Interfacing isn't just for when patterns tell you to use it. It can be a design choice, helping you achieve exactly the look and structure you want.
The Vintage 1930s Dress: Embracing Challenge
This was my first vintage pattern in years—Hollywood pattern 1028 from the 1930s, originally a nightgown that I turned into a short dress. The fabric is moody floral rayon from Mood with beautiful dobby texture and subtle raised dots.
Vintage patterns from this era are unprinted—everything is marked with punched holes rather than lines, making them much harder to understand. I labeled each piece with masking tape, which was essential.
The instructions were incredibly terse, basically assuming you know what to do. For long vertical seams, I used a narrow zigzag instead of straight stitch—critical on bias seams so fabric can stretch without creating waves.
Then disaster struck. After letting the dress hang overnight, I tried measuring the hem length myself and cut it too short—verging on indecent. But I didn't give up. I used leftover scraps to cut a ruffle for the hem, making it about an inch longer.
What I learned: Don't rush the end. Sometimes we're so excited to finish that we push through final steps quickly, leading to silly mistakes. Practice patience all the way through.
The Everly Bias Mini Skirt: Quick Win
Next is my bias mini skirt using the Everly pattern, modified to be single-layer instead of double. I chose black rayon with scattered florals from my stash—that perfect 1930s-meets-1990s look.

For cutting, I made sure to support the fabric—never let slippery rayons hang off the table. I staystitched the waist carefully, used narrow zigzag for side seams, and premade bias tape for the waistband. And I got help measuring the hem this time!
This took only 2-3 hours and I've worn it constantly with t-shirts. I can see it working with tights and boots in fall too.
What I learned: When you find something you love to sew, make it again. Don't just move on to the next idea.
The Madhu Smocked Top: Challenging Myself
My final spring project was the Madhu smocked crop top—adapting the gathered blouse for hand-smocking. This was... a journey.
I used white cotton swiss batiste, traditional for heirloom sewing. In retrospect, I wish I'd chosen a print because white shows every mistake.
Here's what I didn't realize: smocking requires fabric at least three times bigger than the finished width to accommodate all those pleats. I had to seriously modify the pattern.
Then my machine started spitting oil and dust onto the white thread, leaving grey marks all over the fabric I'd spent hours marking. I almost cried. I tried spot cleaning but it was difficult without removing markings.
I almost gave up multiple times. I was so frustrated, realizing my beginner decisions made everything harder—modifying a pattern, smocking a curve instead of straight, using white fabric so every mistake shows.
But when I tried it on, all that frustration melted away. I felt so proud of finishing my first smocking project.
What I learned: When trying something new and challenging, make it as easy as possible on yourself. If you feel frustrated, that's okay—it's part of learning.
Spring taught me something about patience I'd been resisting all year. Sewing should be enjoyable, not another source of stress. The projects I loved most were ones where I gave myself permission to slow down, make mistakes, and learn.
Summer: Discovering My Shape Preferences
Summer arrived with sunshine and blue skies, and I wanted bright colors and easy shapes. My goal was creating pieces I could turn to year after year.
My theme was soft, bright, and easy. I called this collection "Juicy Summer," inspired by picking cherries at an orchard last summer. I incorporated bright cherry red, black, ivory, tan, navy, pink, and soft yellow—more color than usual.
Before starting anything, I did something new: cut out all my projects at once. This was brilliant because I always had a project ready, making it easy to sew in small windows of time.
The Kari Romper: Style Revelation
First is the Kari romper—a loose, swingy romper that ties at the shoulders. Originally planning white rayon challis with pink rosebuds, I realized it looked baby-ish after getting input. So I went with plain white linen and added topstitching for detail and structure.
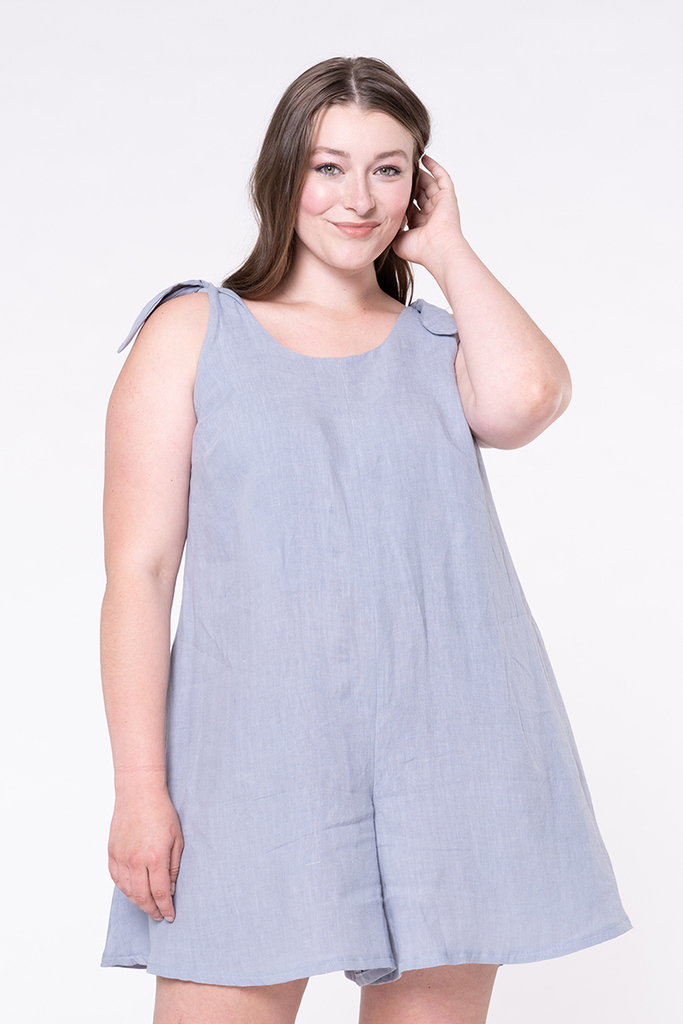
The most time-consuming part was turning those straps using the needle and thread method. But once I put it on, the pocket bags collapsed toward the floor and were visibly poking out. I had to tack each pocket bottom to the hem.
This romper is light and breezy, perfect for hot days or over swimsuits. But the short length with all that volume makes me feel exposed, so I've mostly worn it around the house.
What I learned: I had a huge realization about personal style. I love volume and loose shapes on others, but I feel better in things with at least some waist definition. I prefer shapes that skim my body and feel sleek without being tight.
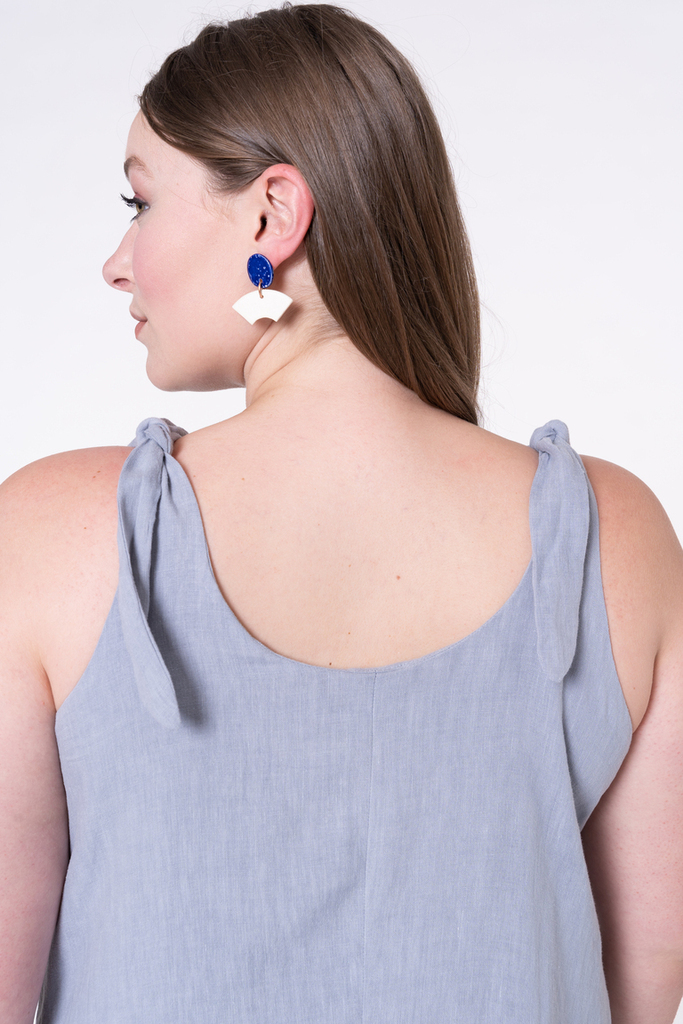
The Rey Bucket Hat: Quick and Practical
Next is the Rey bucket hat—reversible and lined, perfect for scrap-busting. I spend lots of time outdoors in summer and needed sun protection while gardening or walking dogs.

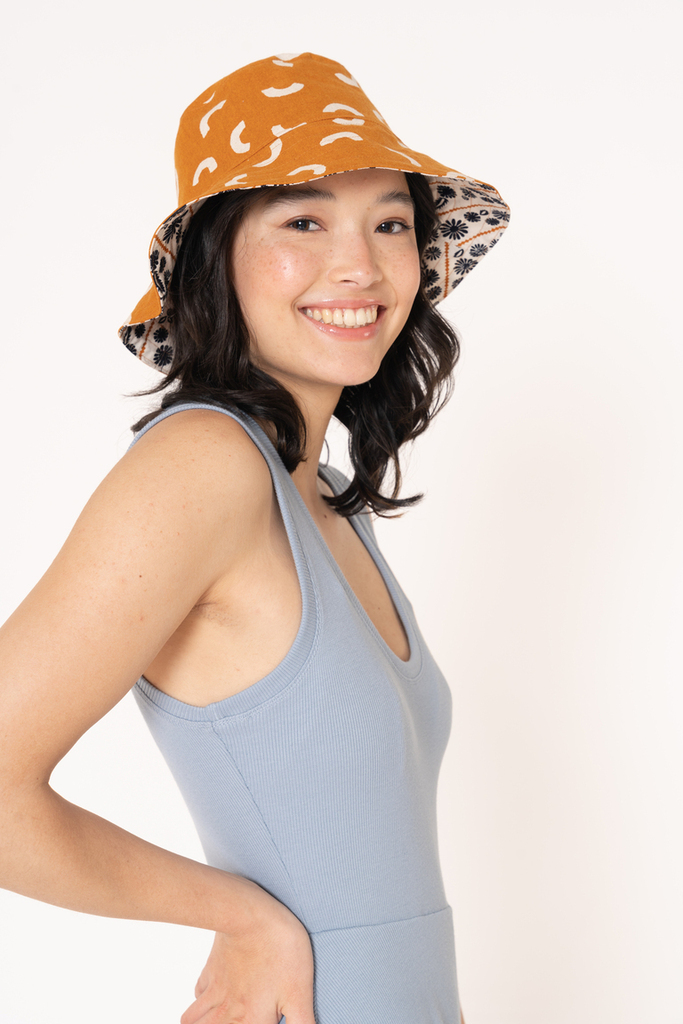
I used leftover Liberty lawn from my winter Sage blouse for one side and tomato red cotton poplin for the other, with contrasting white topstitching. To choose size, I measured my head—turns out I'm a medium, not small like I thought.
The whole thing took about an hour and fifteen minutes after cutting. I added stitched eyelets at the sides and threaded ties through them so I could hang it from my neck when not wearing it.
What I learned: Take time to test. Figuring out what works is half the fun of sewing. Instead of rushing to finish, enjoy the process of problem-solving creatively.
The Fern Blouse: Problem-Solving in Action
The Fern blouse features raglan sleeves, gathered neckline, band collar, and staggered buttons. I used Liberty tana lawn in a gorgeous print called Sambourne—like an Indian block print with Liberty flair. I added red linen flat piping as trim.

Since the print was directional (which I hadn't realized until cutting), everything went in one direction. Then I hit a problem: the placket is folded at center front, so I couldn't add piping there. I recut one piece in two parts, added seam allowance, and sewed piping down the center.
Even with thorough planning, you'll run into unconsidered issues. Being willing to solve problems creatively is such a key skill.
What I learned: If you find fabric you absolutely love, pair it with a pattern that lets it shine and sew it sooner rather than later. I'd saved this fabric for months—that's the power of planning and designing.
The Lilac Dress: Taking Time for Special Details
Finally, my absolute favorite of the season—the Lilac dress in polka dots. I chose the bonus sleeveless sweetheart neckline version using rayon challis in black with white polka dots.

I wanted more buttons, so I doubled the number, drawing in marks between each existing one. I reinforced stress points at the neckline with tiny interfacing squares and decided not to put a deadline on it—just work a couple hours at a time.
I made bias tape using the continuous method and created button loops using narrow zigzag. Wonder Tape helped attach both loops and buttons beautifully. I chose shell buttons from my stash instead of covered buttons because you can actually see them against the black fabric.
I love that it has vintage, classic style yet feels light and comfortable for everyday wear. I can wear it in fall with tights and a cardigan, or layered over a turtleneck in winter.
What I learned: Taking time to make something you'll really cherish is worth the effort. I consciously slowed down because I wanted to enjoy making something special, and I wear it more because of that care.
Summer brought another revelation. The Kari romper showed me that billowy, voluminous pieces without waist definition aren't working for me right now. The Lilac dress proved it even more—I loved the sleek, body-skimming shape. You learn so much about your style from both wins and misses if you spend time reflecting.
Fall: Embracing What Works
Fall arrived with changing leaves and perfect mild temperatures—my favorite season to sew for. I feel so inspired by warm colors and all the layering possibilities.
But I tend to take on too much, both in sewing and life. After feeling overwhelmed one day, I spent an hour sewing and felt so much better. I realized I need more time for sewing without it adding to overwhelm.
My theme was warm, classic, and sleek. I created a physical mood board this time, incorporating artwork and textiles. I missed creating with my hands, choosing images, adding texture bits.
My palette: ivory and black, deep chocolate brown and medium brown, a peach tone, and bright olive-chartreuse as my statement color.
The Kimmy Dress: Comfort for Performance
First is the Kimmy dress—versatile with dolman sleeves, adjustable gathers, and elastic waist. I needed something for Stitchfest, our annual Portland event, where I'd be on stage.
Being on stage is nerve-wracking for this introvert. I needed something comfortable and confident, not focused on what I was wearing. I used gorgeous vintage cold rayon from my stash—1940s fabric with chocolate brown and big lacy ribbon print.
The biggest challenge was matching the large-scale pattern at center front. I cut everything single layer, folded back seam allowances to match perfectly, then used my favorite lapped seam method with Wonder Tape.
I felt lovely in this dress at Stitchfest, and loved showing off that perfectly matched seam. The easy shape kept me comfortable all day.
What I learned: When you feel physically comfortable, it helps you feel more present. You're not distracted by discomfort.
The Chelsea Jeans (Again): Tried and True
Next, Chelsea jeans in chocolate brown corduroy—my third pair. I knew I'd wear them constantly.
Working with corduroy requires careful cutting—all pieces face the same direction because of nap. I covered my tailor's ham in the same fabric to prevent crushing the pile and pressed from the wrong side with just the iron's tip.
Originally planning brass buttons, I realized simple brown tortoiseshell looked better—less conspicuous. These became my perfect fall pants with cool 70s vibes.
What I learned: Making jeans is a labor of love, but investing time in things you wear constantly is more meaningful than quick projects you rarely use.
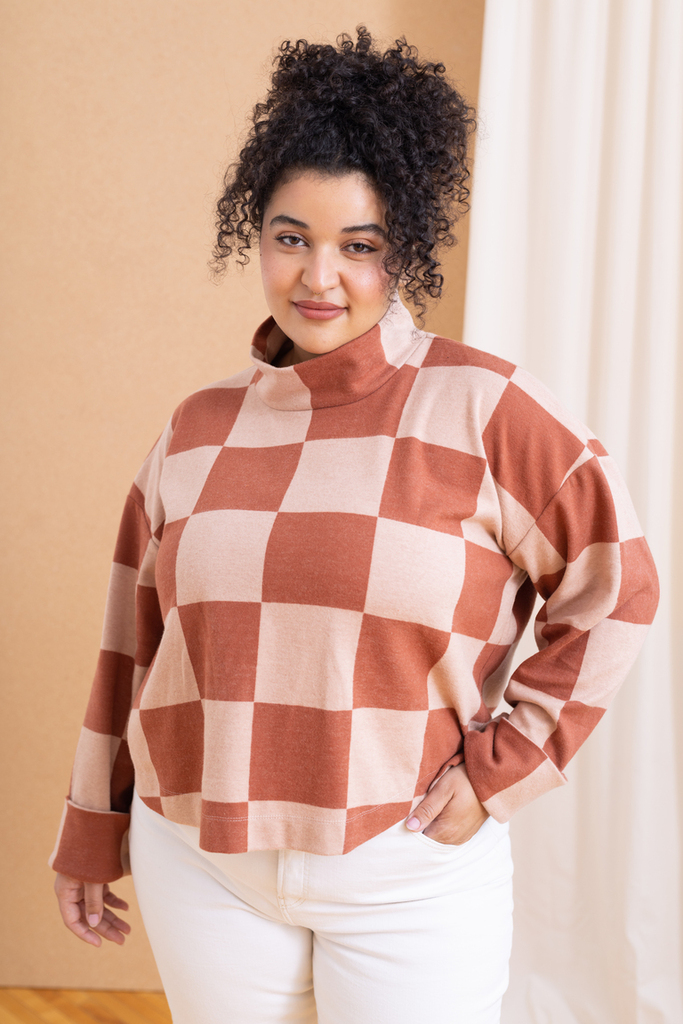
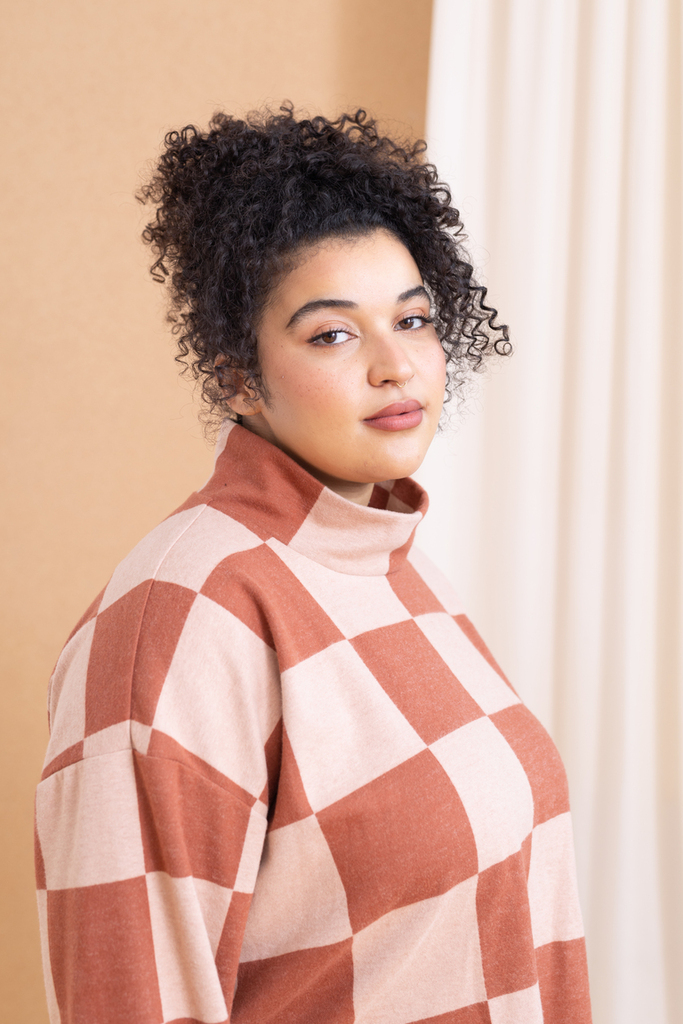
The Fig Cardigan: Quick Confidence
The Fig cardigan in golden olive merino wool from The Fabric Store. I'd made Fig before in brown and loved it, so this was fast and easy.
The Lemongrass color reminded me of leaves outside—that pretty mix of green and gold. Not a color I normally wear much, so it was fun trying something new.
I tried on the garment while sewing to check fit continually. Instead of twin needle on neckband and hem, I used 3-step zigzag—stable and stretchy simultaneously.
This cardigan adds flair and color but goes with almost everything. I love it with scarves or jewelry, like this vintage silver brooch from my grandmother.
What I learned: Having a few quick, tried-and-true knit projects like Fig is invaluable. Tons of wear, and it came together in just a couple hours.
The Dezi Skirt: Secret Pajamas
The Dezi skirt—fluted, midi-length bias-cut with elastic waist. In my early twenties, I had a vintage black silk half slip with pleated organza trim that I wore as a skirt. I wanted to recreate that look.
I used Radiance cotton-silk blend, shortened Dezi, added wide chantilly lace at the hem, and used lingerie elastic with looped edge at the waist instead of encased waistband.
For vertical seams on bias, I used narrow zigzag and sewed French seams along sides. I pinned lace right over the bottom edge and zigzagged it on.
Then I accidentally snipped into the lace while trimming! After momentary frustration, I zigzagged over the hole. It practically disappeared.
This skirt is secret pajamas—looks fancy but feels like underwear. I've been wearing it with soft fuzzy sweaters.
What I learned: Almost any mistake can be fixed. Don't berate yourself—take a deep breath and turn it into a problem to solve.
The Leather Mini Tote: New Skills
Something completely different: a leather mini tote from a kit at buckleguy.com. Our sample sewer showed me a leather journal cover she made, and I fell in love with this candy apple red version.
The whole thing is hand-stitched. I worked on it evenings when I didn't feel like machine sewing. Took me a minute to figure out the saddle stitch—lots of thread nests at first.
This bag is so cool, and I can't believe I made it. It gave me that beginner spark of "wow, I made this!" again.
What I learned: Trying a totally new craft feels really good and keeps momentum going. A little change of pace is energizing.
The Bryn Dress: Working with Texture
The Bryn dress—one part shift, one part pinafore. It's sleeveless, fully lined, with scoop neckline and French darts. I used wool blend tweed with heavy, nubby texture.

For thick, textured fabric like tweed, you work with the fabric, not against it. I took time pressing darts around the tailor's ham, used a clapper to flatten seams, added fray check to weak areas, and finished all raw edges even though it's lined.
My new machine doesn't have an invisible zipper foot, so I used a regular zipper foot carefully. The thick tweed was hard to pull through when using the burrito method for armholes—definitely an arm workout.
What I learned: Fabric is always a variable. Even if you've made something before, you have to think on your feet to find the best techniques for your particular fabric.
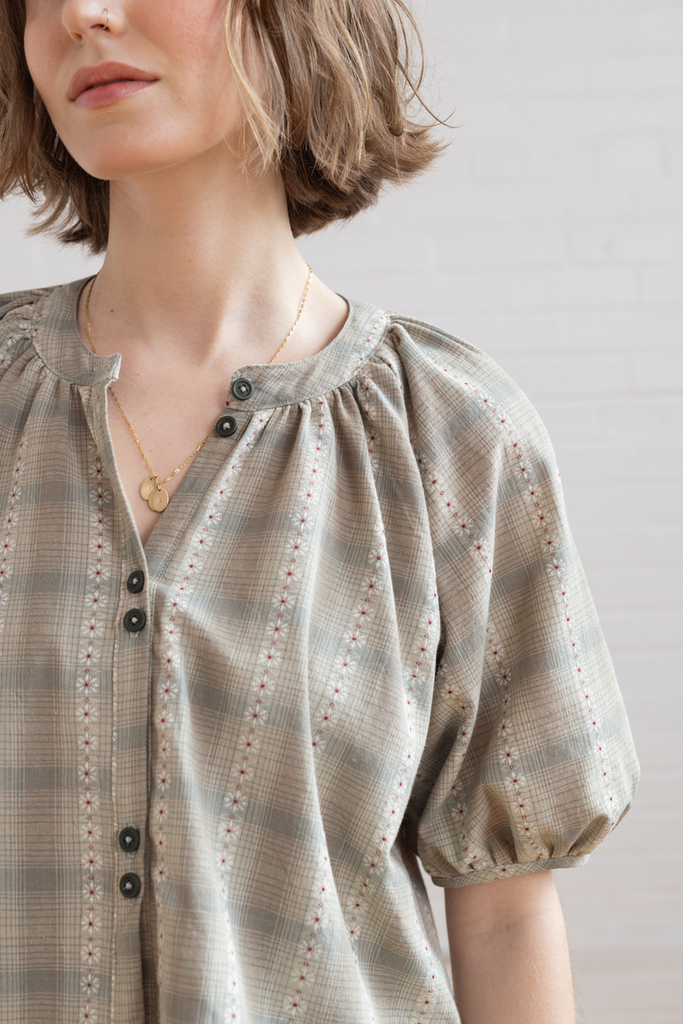
The Bloom Blouse: Thoughtful Details
My final project: the Bloom blouse with square neckline, gathered sleeves with elastic casing, and heirloom-inspired in-seam trim.
I used embroidered cotton from my stash with lace insertion trim. Since the fabric had scalloped edges, I used those as design details along the hems.
For insertion lace: pin it to fabric edge, edgestitch along one side, press away, edgestitch to flatten, then stitch the other side. You get this beautiful peekaboo stripe.
What I learned: Take extra time to think through details. You can turn simple projects into something special and meaningful.
Fall taught me the power of tried-and-true patterns—some I'd made before and loved, others that took old favorites and made them new with different details, and some that were new patterns in classic styles.
The Big Revelation
After sewing 22 pieces over twelve months, here's what surprised me most: this wasn't really about reaching 80% handmade. It was about understanding my personal style in ways I never had before.
Through both wins and misses, I learned I prefer:
- Shapes that skim my body rather than voluminous cuts
- Natural waist definition over completely loose fits
- Flow and drape over structured, crisp fabrics
- Rich textures and luxurious materials in simple shapes
- Colors I've loved for years over trendy choices
The projects I wore most weren't necessarily the most challenging to make. They were the ones that aligned with my lifestyle and made me feel like myself.
Some patterns became workhorses I'll definitely sew again—like Chelsea jeans and the Fig cardigan. Others taught me valuable lessons about what doesn't work for my body or lifestyle. Both types of projects were essential for building a wardrobe I love.
If you're considering a similar challenge, here's my advice: start small. Choose one season and commit to sewing most of what you need for those few months. Pay attention to both what works and what doesn't. Your closet—and your understanding of your personal style—will thank you.

