
 Sign In
If you're new to garment sewing, even a simple woven t-shirt can feel like climbing a mountain. You're juggling pattern instructions, keeping track of pieces, and hoping you don't make a mistake that ruins hours of work. When that feels overwhelming, it's tempting to think that making clothes just isn't worth the effort—yet.
But here's the thing: sewing a beautiful, wearable t-shirt doesn't have to take all day. With the right pattern and a few smart shortcuts, you can go from flat fabric to finished garment in just one hour. I know because I timed myself doing exactly that, and I'm going to share every trick I used to make it happen.
We'll use the free Hansie pattern—just five simple pieces—and I'll walk you through the beginner-friendly techniques I rely on to keep things clean, simple, and totally achievable, whether this is your first top or your hundredth.
Why the Hansie Pattern Is Perfect for Speed Sewing
What I love about the Hansie pattern is how its simple shape works beautifully in almost any fabric while remaining incredibly straightforward to construct. With only five pattern pieces total, you spend less time cutting and more time sewing. I've made this pattern in everything from cotton jacquards to silk, and it always delivers that effortless, woven tee look that goes with everything.
For this project, I chose a lightweight cotton gauze from Blackbird Fabrics—a beautiful black fabric with tiny tan flowers that was actually leftover from one of our Seamwork samples. Since gauze has that lovely natural crinkle, I only pressed the edges and selvages to keep the fabric flat during cutting, then gave everything else a light steam to preserve that beautiful texture.
Smart Prep Work That Saves Time Later
Before I even touched my scissors, I did something that might seem small but makes a huge difference: I printed out the instruction table of contents so I could check things off as I went. It sounds simple, but it keeps you moving forward and gives you that little dopamine hit every time you cross something off. Plus, if you step away for a while, you can come back and know exactly where you left off.
The Labeling Trick That Prevents Confusion
Here's something that will save you so much time and frustration. Tell me you've done this: you're holding up two pieces of fabric and you cannot remember which one is the front and which is the back.
Take a moment to label any pieces that might be confusing with a little scrap of tape marked "front" or "back." This tiny step can save you from that maddening moment of trying to figure out which piece is which when you're in the middle of construction.
The Interfacing Shortcut You Need to Know
If you're cutting out your facing pieces and then fusing interfacing to each one individually, you're making this way harder than it needs to be. Instead of cutting first and interfacing second, I interface a larger piece of fabric first, then cut the facing pieces from that.
Think about it: if you cut first and interface second, you're handling four separate pieces—cutting, positioning, fusing, trimming. But if you interface first and cut second, you only handle two pieces. It might seem like a small thing, but those minutes add up. I cut out all five pattern pieces, including interfacing, in about ten minutes using this method.
The Five-Minute Step That Prevents Neckline Disasters
If your necklines keep coming out stretched and wavy, you're probably skipping this crucial step: staystitching. It's like putting a seatbelt on your fabric.
Staystitching is simply a line of stitching placed slightly inside the seam allowance on curved edges. Curves—especially necklines—have a tendency to stretch out as you handle the fabric, and once they're stretched, they won't match up properly with your facing. Staystitching locks everything in place before that can happen.
This step only took me about five minutes to complete on all my neckline pieces, but it's the difference between a professional-looking neckline and one that never quite sits right.
The Dart Secret Nobody Tells Beginners
Here's the secret to darts that nobody tells beginners: stop sewing in a straight line. A lot of people get nervous about darts, but they're actually pretty simple once you know this trick.
You want to gently taper your stitching as you approach the tip, curving it slightly instead of sewing straight. This creates a much more natural, rounded shape instead of that pointy pucker that happens when you sew darts in a straight line.
Then press over a tailor's ham to maintain that curved shape. The ham supports the curve of the fabric so you're not flattening out all that nice shaping you just created. Read this article for even more dart techniques and troubleshooting tips.
The darts took me about five minutes total, and we're already making great time!
Perfect Pocket Placement Every Time
Now for one of my favorite parts: making the pocket. A well-made pocket is such a satisfying detail that really elevates the whole garment.
I marked the fold lines on the right side of the pocket with chalk so I could see them easily during folding. Normally you'd mark on the wrong side, but for precision details like fold lines, it's helpful to see exactly where you're working.
After finishing the raw edges on three sides and turning them under for a hem, I used one of my absolute favorite notions for perfect placement.
Forget Pins—Use This Instead
Wonder Tape is a wash-away basting tape that I use constantly. It's perfect for holding pieces like patch pockets in place without the distortion you can get from pins. You just stick it on the back of your pocket, position the pocket exactly where you want it, and it holds everything perfectly while you sew. Then it washes away completely.
I edge-stitched the pocket in place using my edge stitch foot, which has a little guide that runs right along the folded edge for perfectly even stitching without having to eyeball it. The entire pocket assembly and attachment took just over ten minutes.
Assembly: Where Things Get Really Fast
By this point, I was wondering if I could really finish in the remaining time, but assembly moves quickly when you're not dealing with complicated construction. It's just shoulder seams, side seams, facing attachment, and hemming—all straightforward techniques.
I sewed the shoulder seams first, finished them with my serger, and pressed them open. Then I did the same with the side seams. This entire step took only about five minutes. It's funny how detail work like pockets can take longer than major construction steps, but that's sewing for you—the devil really is in the details.
The Facing Technique That Makes All the Difference
Next came assembling and attaching the facing, which is where your garment really starts to look finished. I sewed the facing pieces together at the shoulders, then finished the outer edge with my serger for a quick, clean finish that doesn't add bulk.
After pinning the facing to the neckline and matching all seams and notches carefully, I did something that many people skip but makes a huge difference: understitching.
Why Understitching Is Non-Negotiable
Understitching is what keeps your facing from rolling to the outside of your garment. You know how sometimes you see necklines where the facing keeps peeking out? That's what happens when you skip this step.
Here's how: First, press the seam allowance toward the facing, clipping curves as you go so everything lies flat. Then edge stitch the seam allowance to the facing about an eighth of an inch from the seam line, sewing through the facing and both seam allowance layers, but not the main garment.
This anchors everything so when you flip that facing inside, it wants to stay there. It's one of those invisible techniques that separates polished garments from ones that look slightly off.
Finally, I topstitched the outer edge of the facing to the garment to hold everything in place. All of the facing work—assembly, attachment, understitching, and topstitching—took fifteen minutes.
The Final Sprint: Hemming for the Win
With just the hems left to finish, I was cutting it close on my one-hour goal, but simple turned hems on sleeves and bottom edge came together quickly. I pressed them under, stitched them down, and finished the project right on time!
The satisfaction of going from flat fabric to finished garment in an hour never gets old. And if you're more of a beginner, don't worry about matching that timeline—the shortcuts I've shared will still save you time, and you'll get faster with practice.
Creative Ways to Make Hansie Your Own
The beauty of a simple design like Hansie is that it's a perfect canvas for creative touches. Here are some of my favorite ways to customize this pattern:
Add a contrast pocket in a different fabric—either something that picks up colors from the main fabric or goes completely bold and unexpected.
Topstitch with contrast thread to turn functional stitching into a design element.
Use decorative machine stitches instead of straight stitching for topstitching—those fancy stitches you never use finally have their moment.
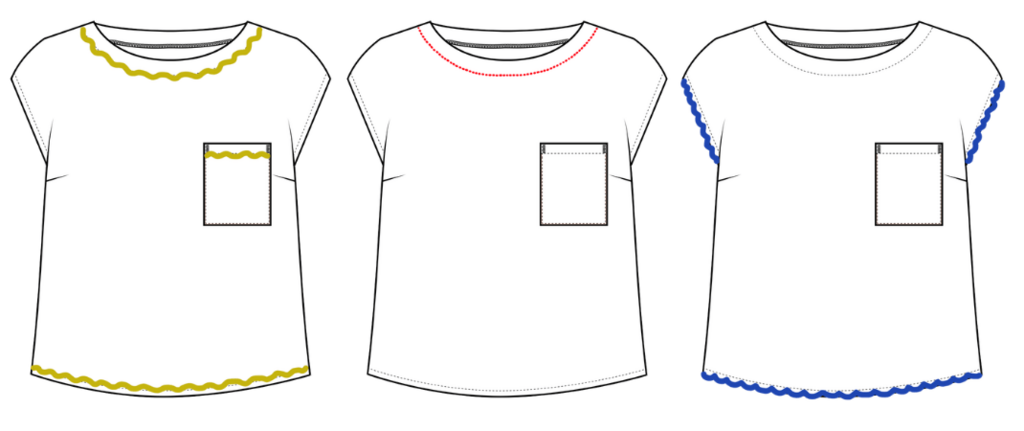
Add trim at the neckline—lace, rickrack, or bias binding can completely transform the look.
Change the pocket shape from the basic square to something curved, heart-shaped, or geometric.
Include embroidery details on the neckline or pocket—even simple running stitches or lazy daisies make it feel completely custom.
Once you know you can sew this basic version in an hour, you've got room to experiment. Make a simple one first to nail the construction, then go wild with embellishments on the next version.
Your One-Hour Victory Awaits
The techniques I've shared here aren't just about speed—they're about building confidence through smart, efficient sewing practices. When you can see a project come together this quickly, it removes that intimidation factor that keeps so many people from trying garment sewing in the first place.
Download the free Hansie pattern and give yourself permission to sew something beautiful today. Whether it takes you one hour or three, you'll have a versatile, wearable piece that you made with your own hands—and that's always worth celebrating.

