
 Sign In
Sewing a shirt placket might seem intimidating at first glance, but it's actually one of the easiest ways to add a polished, professional finish to any shirt or dress. I know many sewists avoid plackets, thinking they're too complicated, but once you understand these five essential techniques, you'll realize just how straightforward they really are.
The truth is, if you skip these steps, you'll end up with bulky, uneven plackets that make your entire garment look sloppy. But follow these tips, and you'll create perfectly crisp plackets that rival anything you'd find in stores.
What Exactly Is a Placket?
Think of a placket as a neat way to finish any opening where you don't want to use a zipper. It's made from two strips of fabric, one sewn on each side of your opening. The two sides then overlap, creating a clean finished edge that can accommodate buttons, snaps, or even be left open for a casual look.
You'll find plackets most commonly on shirt fronts, but they're incredibly versatile. Use them on back necklines, wrist openings on sleeves, or anywhere else you need a closure. They're like the Swiss Army knife of garment finishing—once you master them, you'll find endless applications.
Gathering Your Materials
Before we dive into construction, let's make sure you have everything ready. You'll need your garment with the hem already sewn—this is crucial for proper alignment. I'm assuming you'll be adding a collar or band at the neckline once the placket is complete, though we'll discuss variations later.
For your placket pieces, cut two strips of fabric that are twice the width of your finished placket, plus seam allowances on each side. For length, measure your hemmed opening and add an additional 3/8 inch to account for the hem finish.
You'll also need two strips of interfacing, each one half the width of your placket pieces. This brings us to our first essential tip.
Tip #1: Interface Only One Side of Your Placket Pieces
This is a mistake I see constantly—people think more interfacing means more structure, but it actually just creates unnecessary bulk.
Here's exactly how to do this right: Take your interfacing strip and place it on the wrong side of your placket piece, positioning it to cover exactly half the width. This interfaced section will be where your buttons and buttonholes go. The interfacing should run the full length of your placket piece.
Fuse it according to the manufacturer's instructions, using a press cloth to protect your fabric. This gives your placket the structure it needs for crisp buttonholes without making it thick and unwieldy when the pieces overlap.
Tip #2: Pre-Press Your Placket Pieces
This step is absolutely crucial for getting crisp, even edges, and it's where many people rush and end up with wobbly results.
Start with your interfaced placket piece. Fold it in half lengthwise with wrong sides together, making sure the interfaced side is on the inside of the fold. The fold you're creating will become the finished edge of your placket. Press this fold with a hot iron, really setting it well.
Now unfold the piece and lay it flat, wrong side up. Take the long edge that doesn't have interfacing and fold it to the wrong side at exactly 3/8 inch. Use your seam gauge to ensure consistency along the entire length. Press this fold well too.
When you unfold it, you'll see two pressed lines—these are your roadmap for perfect construction. Repeat this process with your second placket piece. These pressed lines eliminate guesswork and ensure both sides of your placket will be identical.
Tip #3: Hem Your Garment First
Your placket needs to align perfectly with your finished hem, and it's much easier to achieve this when the hem is already in place. With your garment hemmed and pressed, take your interfaced placket piece and place it right sides together with your garment. The interfaced edge should align with the center front edge of your dress or shirt.
Pin carefully, starting at the hem and working toward the neckline. When you stitch, start from the hem and sew toward the neckline—this prevents fabric shifting that could throw off your alignment. After stitching, press the placket away from the garment, being careful not to press out those creases you made earlier.
Tip #4: Create a Clean Hem Edge Finish
This is where I see the most confusion, but it's actually quite straightforward once you understand the process. At the bottom of your placket, you need to create a clean finish that aligns perfectly with your hem.
With your placket still pressed away from the garment, fold the entire placket piece back on itself with right sides together. You're looking for that pre-pressed fold line you created earlier—this folded edge should meet exactly with your seam line where you attached the placket to the garment.
Think of it like making a perfect corner on a picture frame. Pin this in place, then stitch across the bottom of the placket at 3/8 inch, creating a line that's perpendicular to your first seam line. Before turning it right side out, clip the corner at a 45-degree angle, getting close to but not through your stitching.
When you fold the placket back to the inside of your garment, you'll have a perfectly clean end that aligns with your hem.
Tip #5: Use Adhesive for Perfect Edge Stitching
This is my secret weapon for perfect edge stitching, and this technique will change how you approach any project requiring multiple layers to be caught.
When you're ready to edge stitch the long edge in place, the challenge is making sure you catch the underside of the placket every single time. Instead of using pins, which can shift and distort your fabric, use a glue stick or Wonder Tape to hold the loose edge in place.
Fold your placket to the inside along that center fold line you pressed earlier. The loose edge needs to lie flat against the seam line where you attached the placket to your garment. Apply the adhesive right along the seam line, then carefully position your folded edge so it just covers the original stitching line.
Start your edge stitching from the bottom of the placket, stitching about 1/8 inch from the fold. Since everything is held securely with the adhesive, you can focus on keeping your stitching straight rather than worrying about catching all the layers. The adhesive will wash out completely, leaving you with perfectly even edge stitching.
Perfect Patterns for Practicing Plackets
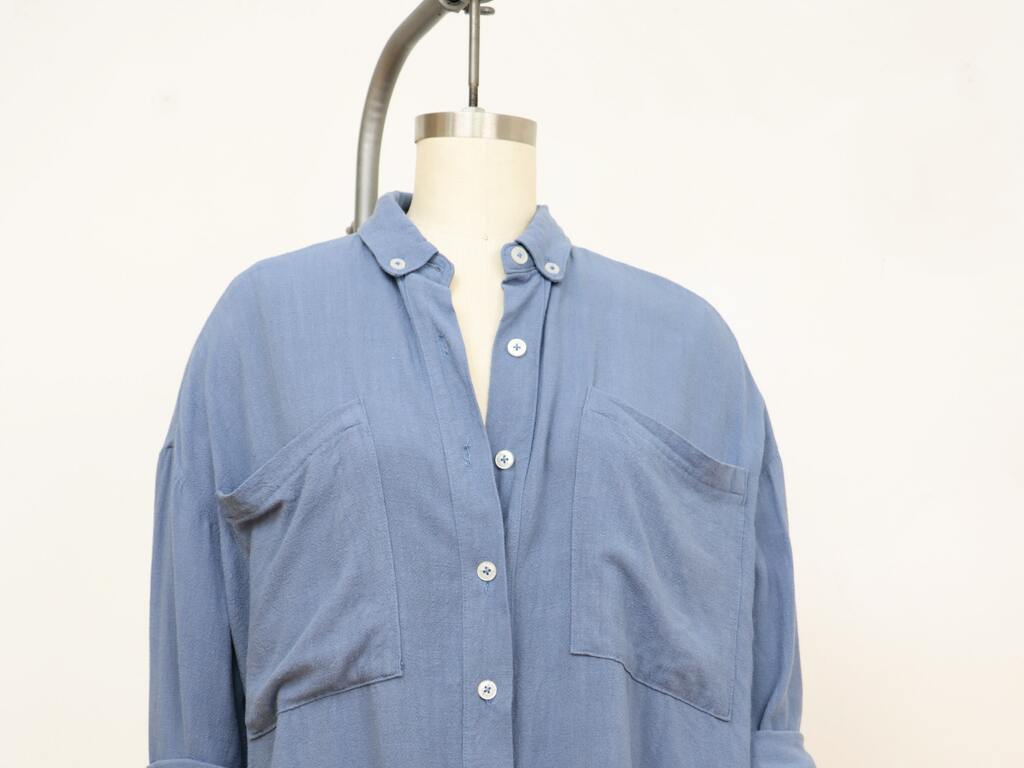
The new Brom shirtdress is an excellent opportunity to practice these placket techniques. It features a unique pleated sleeve, stand collar, fitted bodice with an A-line skirt, and a placket that runs all the way down the front. Seamwork members can download this pattern for free.
For other great placket practice, try the Fern blouse, which features a gathered top with raglan sleeves and a contoured band collar. The Roan tunic offers an oversized fit that's forgiving for beginners, while the Sage blouse shows how to finish a placket without a collar or band.
Creative Placket Variations
Once you've mastered the basic technique, the creative possibilities are endless. You can add trim like lace, rickrack, or ribbon to one or both sides of your placket. Since plackets are cut on the straight grain, these embellishments lie beautifully flat.
Piping creates a gorgeous tailored edge—just remember that if you want piping at the front edge, you'll need to cut each placket piece in two instead of one continuous strip, then add a seam where you insert the piping.
Consider sewing the under placket in a contrasting fabric for a beautiful pop of color when the placket is unbuttoned. If you're working with striped fabric, try changing the stripe direction on your placket for an interesting geometric effect.
For hand-sewing enthusiasts, adding embroidery or decorative topstitching transforms a simple placket into something truly special. You can even add embroidered motifs between button markings.
Planning Your Placket Design
The key to all these variations is planning ahead. Decide on your design elements before you cut your fabric, and adjust your construction sequence accordingly. Some details need to be added before you attach the placket, while others can be added afterward.
Remember, some of the most beautiful garments feature the simplest techniques executed with care and precision. A well-constructed placket elevates any shirt or dress from looking homemade to looking handmade with professional results.
Once you've mastered the basic placket, you'll find yourself looking for excuses to add them to your projects. They're that satisfying combination of practical and beautiful that makes sewing so rewarding. And speaking of completing your plackets, you'll want to master buttonholes too—read this article on buttonhole secrets to learn how to create flawless buttonholes that perfectly complement your beautiful plackets.

