Sign In
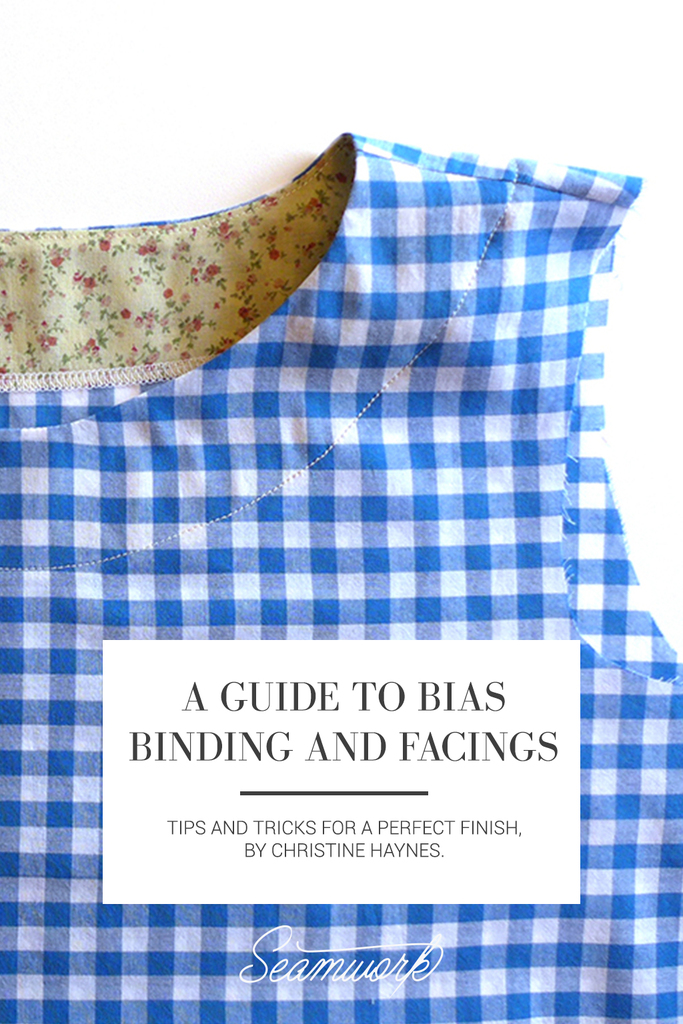
Nearly every unlined garment has either a facing or a bias bound edge somewhere. Most likely you will find these finishes on a neckline or on a sleeveless armhole, but facings and bindings can even show up on sleeve hems, pockets, and skirt hems. Suffice it to say, if you plan to sew clothing, it’s best to familiarize yourself with these two key skills.
There are many ways to apply facings and bias tape, but there are a few that you will see more frequently than others. I will walk you through the most common techniques, and if this is all new to you I will also help you understand the basics. It’s not hard!
Bias Tape 101
Let’s start at the beginning. What is bias tape? Is that the same as bias binding? Indeed it is. Bias binding and bias tape are interchangeable phrases for the same thing. Bias tape can be used to bind an edge, thereby finishing that edge. That’s where the “binding” comes in. Bias tape can be easily made at home, or you can purchase it pre-made.
Pre-made bias tape comes in a wide range of solid colors in three-yard packages and can be bought in most big-box sewing stores. Some shops also sell pre-made bias tape in prints and solids by the yard, so if you only see the packaged options, find their notions by the yard area to see what else they might have. It’s one of my favorite things to bring home from traveling, as it packs light and adds personalized details to your projects.
Single-Fold vs. Double-Fold Bias Tape
The two main varieties of bias tape are double-fold and single-fold. Each of these two types also comes in a range of widths, which is handy because depending on how you intend to use the binding, you might want something wide or narrow.
All bias tape starts the same way, with a strip of fabric cut to a specific width along the 45-degree true bias of the fabric. Single-fold bias tape is created by folding the two long raw edges of the strip into the center of the tape, so that the final width ends up being half that of the original strip. Double-fold bias tape is created by simply folding single-fold bias tape in half one additional time, so that the finished width is a quarter of the cut width.
Ready to make your own? Great! Let’s walk through two ways to make either single-fold or double-fold bias tape.
Method 1: Bias Tape Maker
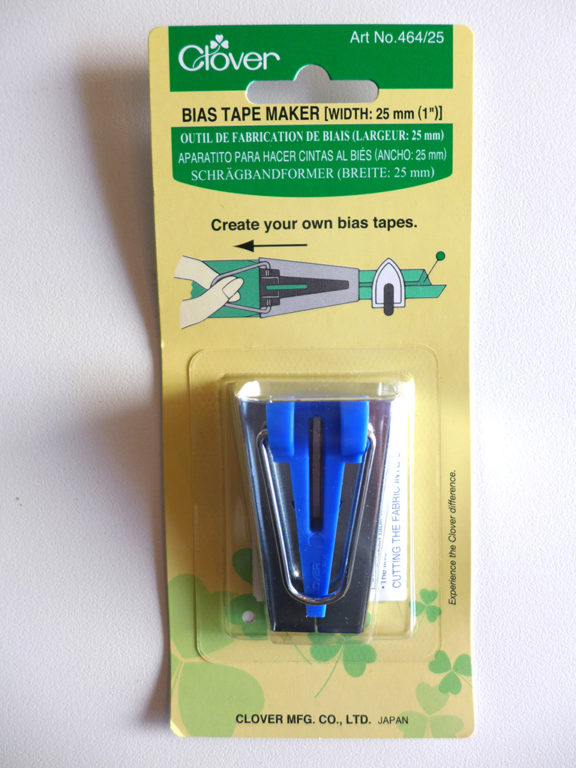
A popular way to make bias tape is to use a tool called a bias tape maker. It has an open end where the fabric slips into the maker that is shaped like a “U.” The fabric spans the whole U and as it goes through the maker the two sides of the U are folded into the center, making single-fold bias tape. The key detail when choosing a bias tape maker is the size. The maker will only work if the fabric is cut to the exact U shape. If it is smaller or larger, it won’t work correctly. So depending on the application and the project’s needs, be sure you are picking a maker that will end in the right sized single-fold or double-fold binding.
Determining Width
Here’s a tip: look for the measurement on the top of package, where it will list the width or the size the fabric will be when it comes out of the maker. For example, if it says 25 mm (1”), then this particular bias tape maker will make 1” single-fold bias tape. If you then fold it in half to create double-fold bias tape, that will be 1/2" double-fold bias tape.
Once you know that, it’s easy to do the math to figure out how wide to cut the fabric as well. Since the finished bias tape will be 1” and two quarters will be folded into center, this means the fabric strip should be double the 1” amount. You can use this same method to figure out the finished width and the fabric needs for any maker.
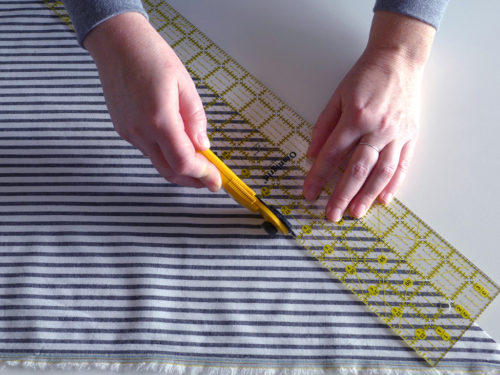
Step | 01
I prefer to use a ruler with a 45-degree line on it to cut my strips. Line up that 45-degree line on the ruler with the selvage of your fabric, and simply cut strips in the required width using a rotary cutter. If you cannot get the length you need in one strip, not to worry, we can join them to make continuous bias tape.
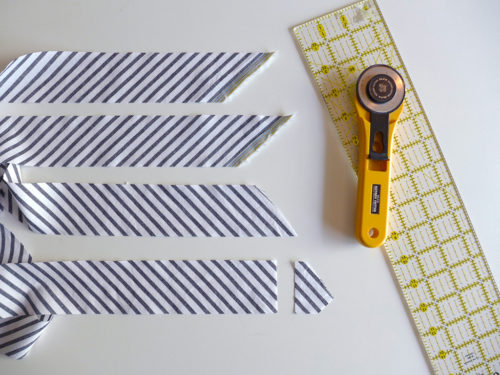
Step | 02
Once you have strips cut out, use the ruler and rotary cutter to trim the ends to a perfect 90-degree angle, like on the bottom strip in the image.
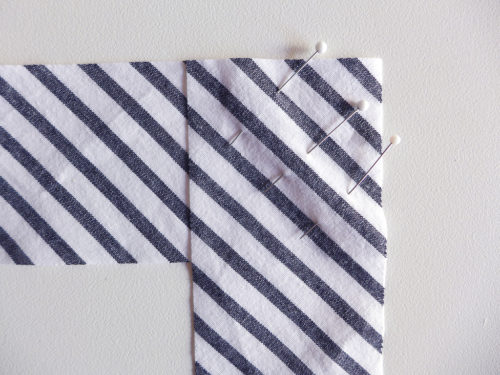
Step | 03
Place two of the strips on top of each other, with right sides facing. The top and right sides should be perfectly aligned. Pin in place.
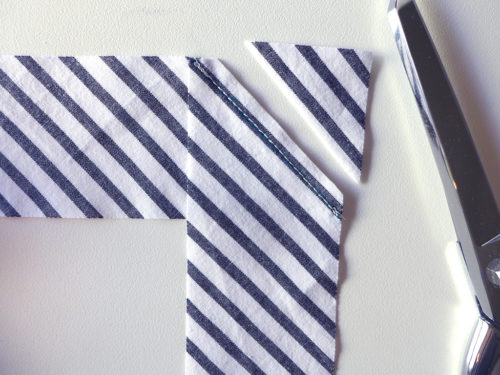
Step | 04
Sew from the top left corner to the bottom right corner of the intersection. If you cannot see the line, use a water soluble marking tool and ruler to draw in your sewing line first. Trim the triangle away, leaving about 1/4" seam allowance.
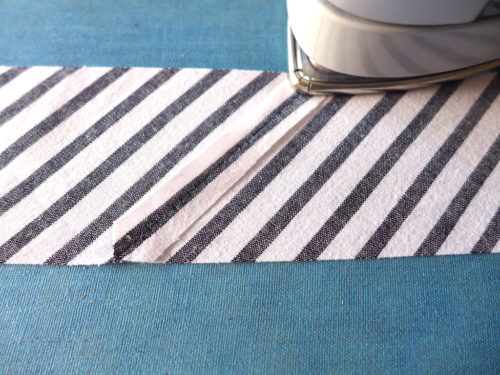
Step | 05
Press the seam allowance open. This seam is now sewn diagonally through the fabric, which will help distribute the bulk of the seam once the fabric is folded.
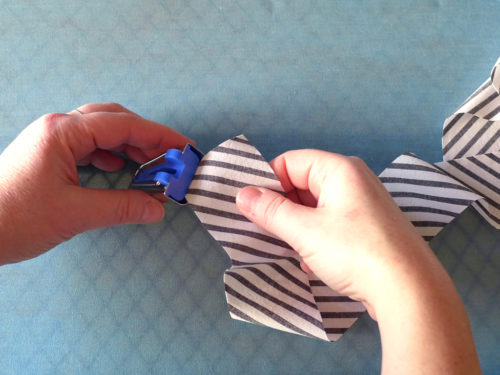
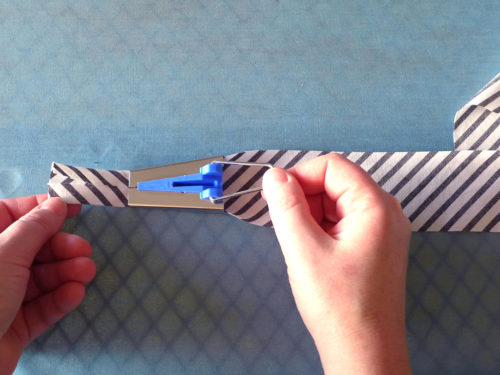
Step | 06
Slip the fabric into the wide end of the bias tape maker with the wrong side up. Getting it in can be tricky. I like to help pull it through with an awl or point turner to help get it started through the tool.
Step | 07
Once you can grab the fabric on the other end, straighten it out so that the fabric is coming out of the maker perfectly and evenly.
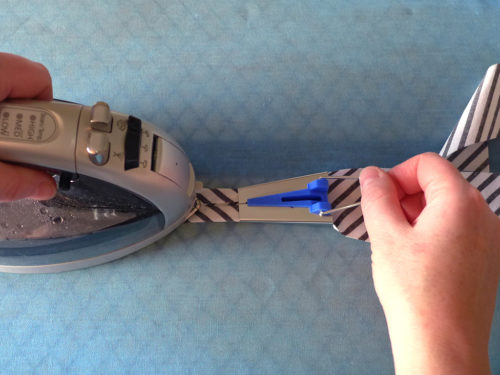
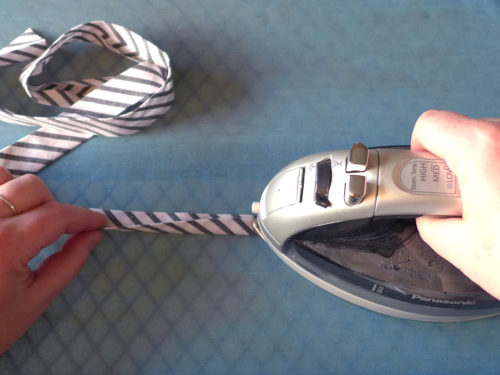
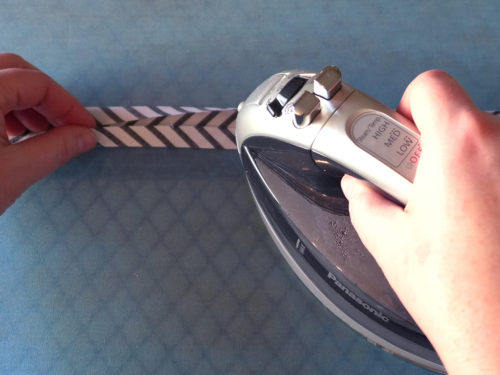
Step | 08
Place the fabric down on your ironing board. Pull the handle on the maker with your right hand, grab the iron handle with your left hand, and use the iron to press the fabric coming out of the maker.
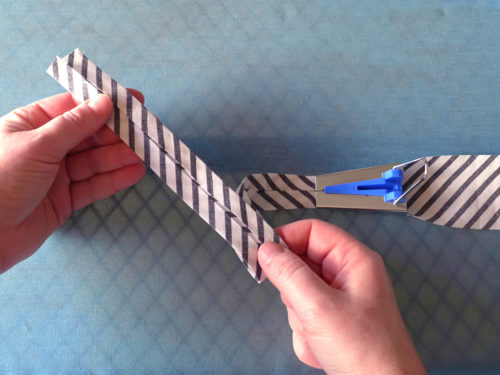
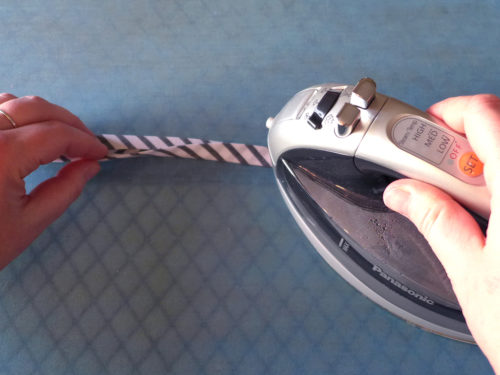
Step | 09
This is now single-fold bias tape! But what if you actually need it to be double-fold bias tape?
Step | 10
Simply fold the tape in half, lining up the top fold so the tape is now folded in half again, for double-fold bias tape.
Method 2: Without Bias Tape Maker
If you do not have a bias tape maker, or if you want to see the difference between making it yourself and using the maker, here’s how to make bias tape with just your iron.
Step | 01
Follow steps 1–5 of making bias tape with the maker to create the bias strips.

Step | 02
Fold the fabric in half, wrong sides together. Be sure to line up the top cut edge. Press with an iron.

Step | 03
Open up the first fold and press the lower half so the long raw edge is lined up with that first fold. Be careful not to flatten the first fold you created.
Step | 04
Turn the fabric around and repeat step 3 on the other side of the fabric, so both sides are now pressed into the center. If you want single-fold bias tape, press out the center fold, and you are done!
Step | 05
For double-fold bias tape, simply close the entire bias tape up and press it flat with all the folds tucked inside and the top folded edges lined up.
So now you know two methods for making bias tape! I often teach classes that involve garments with bias bound edges, and I have found that many of my students prefer to use hand-held bias tape makers. The main advantage is that it is significantly faster to use a maker than to do it all by hand, like in method 2. The only disadvantage is that you have to be very careful to get the sides perfectly lined up at the center. The main advantage of method 2 is that it can be more accurate than using the maker. This is helpful if you have fabric that is not behaving well in the bias tape maker, like something especially thin, slippery, or thick.
You might prefer using a bias tape maker, and you might not. Truth be told, I usually make my bias tape by hand. But if you have never tried a bias tape maker before and use bias tape a lot, you should give it a try.
Bias Facings
Now that you have made bias tape, how on earth are you going to finish a neckline with it? This is one of the most common tasks you will come across in sewing garments, and it is not complicated at all. But there are a few key steps that will assist you in creating a professional finish, so follow along to finish your neckline perfectly.
There are a number of approaches to applying bias binding, and this example assumes you are using traditionally made or bought double-fold bias tape. Some patterns call for a strip cut on the bias that is then sewn to the neckline, which is a different approach. This method is specifically for double-fold bias tape, not a pattern piece cut on the bias.
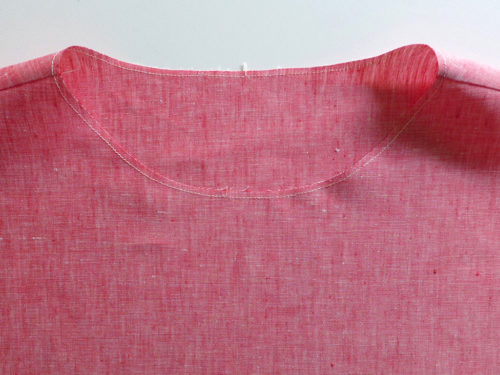
Step | 01
Prepare the neckline first. Curves like necklines should be staystitched at the very beginning of sewing to prevent the threads of the fabric from stretching out during the construction process. The curve is on the bias at certain points, and the more it is touched and handled, the more likely it will be stretched. Sew your staystitch inside the seam allowance from shoulder to center and stop, then turn the piece around and sew from shoulder to center again. This should be done on both the back and front pieces. This keeps the fabric from shifting in the same direction. Sew and finish the shoulder seams as desired.

Step | 02
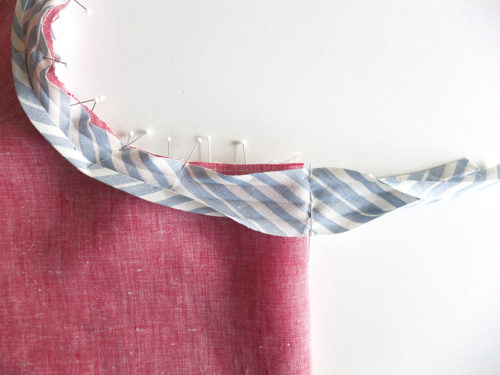
Prepare your double-fold bias tape so you have enough to go all the way around the neckline with about 4” to spare. Find the center point of your bias strip and place it right sides together at the center front point of the neckline. Pin in place, opening up the folds so the raw edge of the bias tape lines up with the raw edge of the neckline. Continue pinning all the way around to the center back.
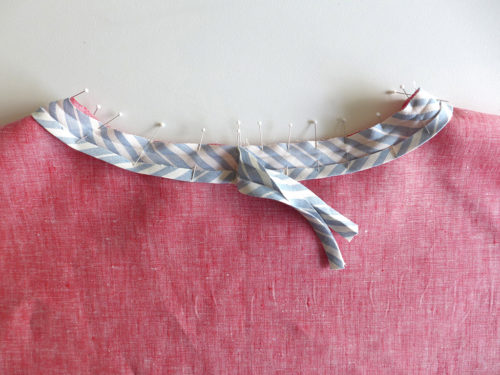
Step | 03
When you reach the center back, pin until the right sides of the bias tape are flush with each other.
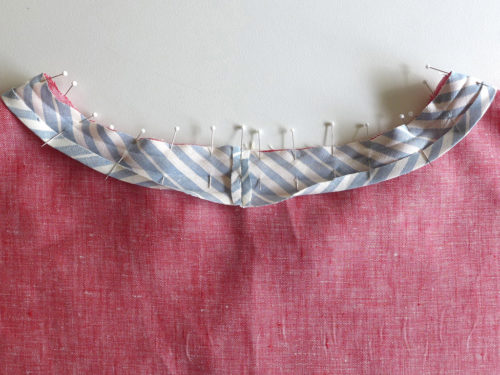
Step | 04
Fold the back in half along the center point, wrong sides together. Pin the binding together just to the right of the garment, so you are pinning only through the binding itself. Pin exactly where the stitch line will be. Remove a few pins on either side of this point so you can sew through the binding without the garment getting caught in the way.
Step | 05
Sew the binding together along the pin line, trim the excess bias tape away, and re-pin that area to the neckline. Make sure to press the seam allowance open where the binding was joined.

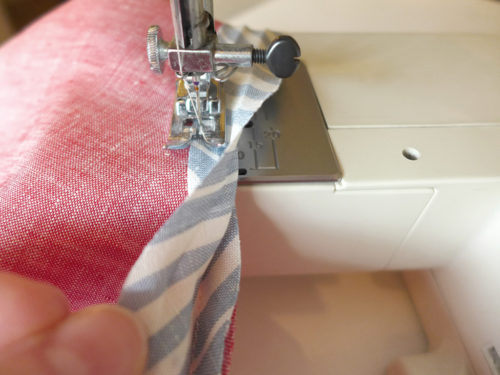
Step | 06
Sew the binding to the neckline by stitching in the first of the three folds. Check your seam allowance and be sure to stay on the same mark the entire way around.
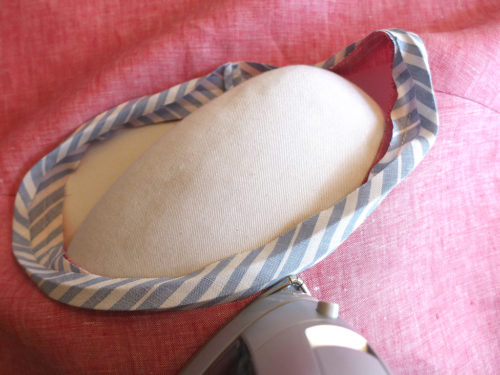
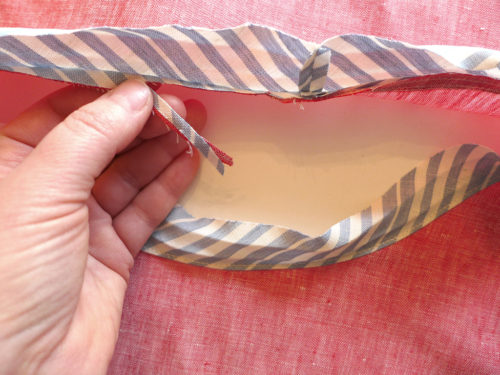
Step | 07
Gently press the seam allowance and bias tape away from the garment. Do not un-press any folds on the bias tape. Simply press along the seam line, using a pressing ham underneath for support.
Step | 08
Understitching is a key step that many people skip, but it helps give the neckline a very polished finish and keeps the binding on the inside of the garment, so that it is invisible on the outside. To understitch, sew through the binding and both seam allowances, stitching about 1/16–1/8” from the seam line created in the last step.
Step | 09
Trim away the seam allowance, leaving about 1/8” of fabric behind. This is a good moment to use small 5” trimming scissors.
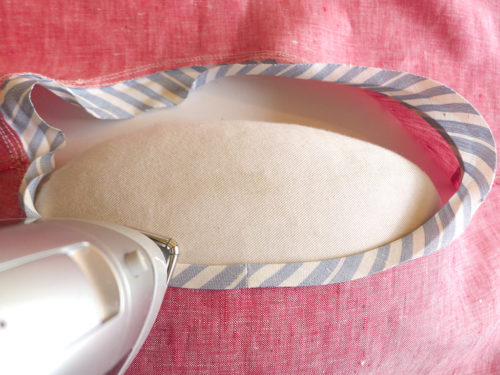
Step | 10
Refold the bias tape along the original folds and press. Use a pressing ham to help with the curve.
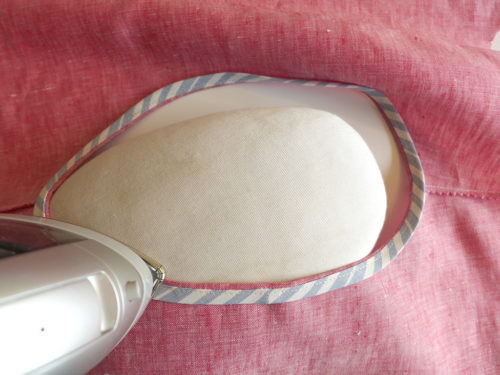
Step | 11
Fold the entire binding to the inside, rolling the fabric on the understitching. Again, use a pressing ham to help you press the curve smoothly.
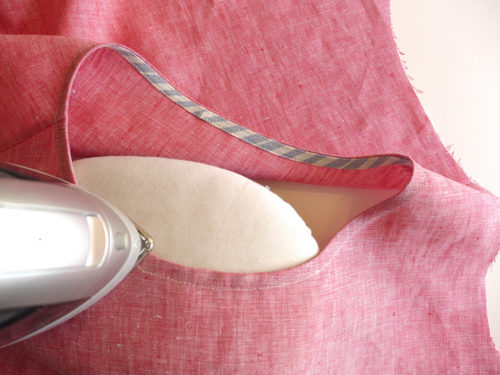
Step | 12
Topstitch the binding in place by sewing close to the outer fold on the bias tape. This will leave all the bias tape on the inside of the garment and so that only top stitching is visible on the outside. Press well, smoothing out the curve so it does not stick out or stand up away from the garment. It should be flat and smooth.
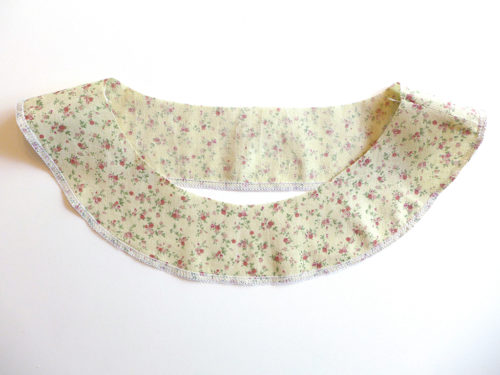
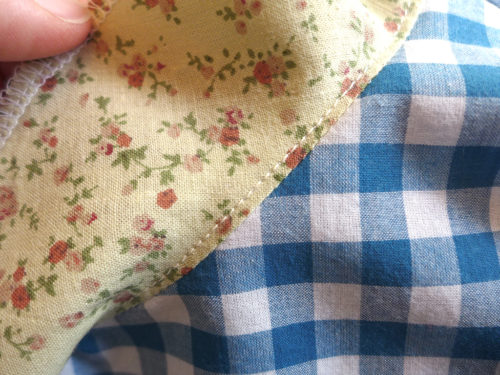
Facings
The principal behind traditional facings is very similar to that of a bias facing—it is a way to finish a raw edge. The main difference is that a facing is a pattern piece that is the same shape as the pattern piece it is being sewn to, instead of a trim that is added on.
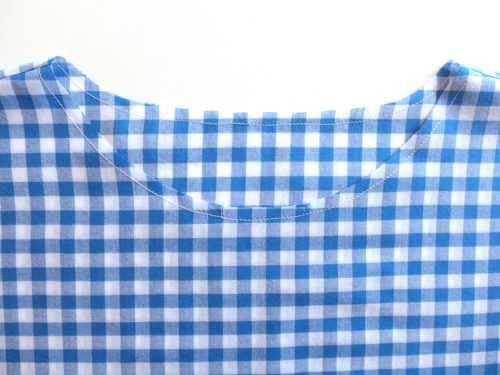
Why would you want to use a facing instead of bias tape? Many people prefer one or the other, so it’s nice to know that often they are interchangeable. Where this is not true is when the main purpose of the facing is to provide stability, like on jackets, coats, or other garments with structure. Even a simple dress can benefit from the strength of a facing if the fabric is more structured. The Laurel Dress, for example, is finished with bias binding, but I sometimes make it with a facing when I want a crisper neckline that has no topstitching.
Usually when you sew a facing you would follow the steps in the pattern instructions, but here are some pointers that often are left out of the pattern.
Step | 01
Much like with bias binding, your neckline should be completely prepared in advance of sewing on the facing. The neckline should be staystitched inside the seam allowance, sewing from shoulder to center, on both the front and back. The shoulder seams should also be sewn and finished as desired.
Step | 02
You should also prepare your facing. For a basic opening like this one, there will likely be a seam at each shoulder, just like on the garment itself. The bottom edge should be finished in a manner you prefer. The most common methods are to turn the edge under twice and top stitch it, cut it with pinking shears, finish the edge with a zigzag stitch, or finish it with a serger stitch (as I did in this example). All are acceptable, but I use the fold and topstitch method the least, as it creates the greatest amount of bulk inside your garment.
Also, many pattern instructions will call for your facing to be interfaced. For this example I didn’t apply interfacing, but note that your pattern might instruct you to use it for stability.
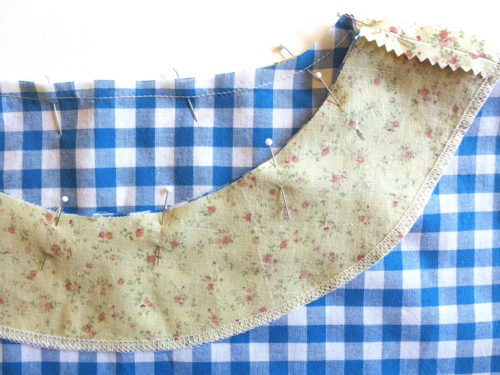
Step | 03
Place the facing on the neckline, right sides together. Line up the shoulder seams and pin in place at those seams to anchor those points first. Next, pin around the rest of the neckline, lining up the raw edges around the opening.
Step | 04
Sew the facing to the neckline around the opening using the seam allowance called for in the pattern instructions.
Step | 05
Understitch the neckline to the seam allowance by sewing about 1/16–1/8” from the seam line made in step 4. Be very careful not to pinch any spots along the facing, and take your time! This step can be very fussy, but it is critical and not to be skipped.
Step | 06
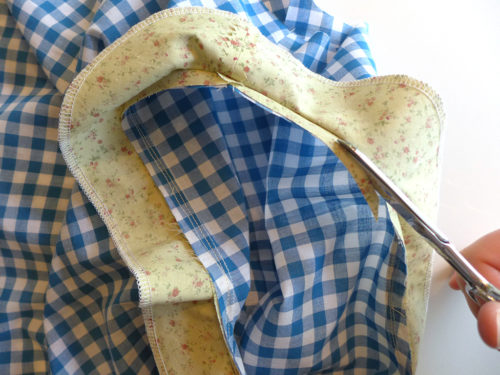
Trim the seam allowance away, leaving about 1/8” behind. Note that your instructions might tell you to clip or notch your curve as needed, so consult the pattern at this step.
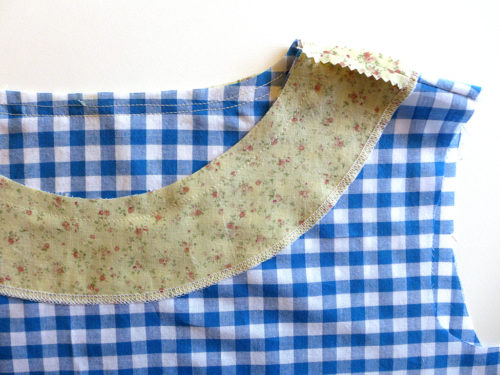
Step | 07
Flip the facing to the inside of the garment and press around the neckline. Because of the understitching, it will roll perfectly to the inside, taking a scant amount of the garment fabric with it, which keeps the facing on the inside at all times. Use your pressing ham to help press this curve.

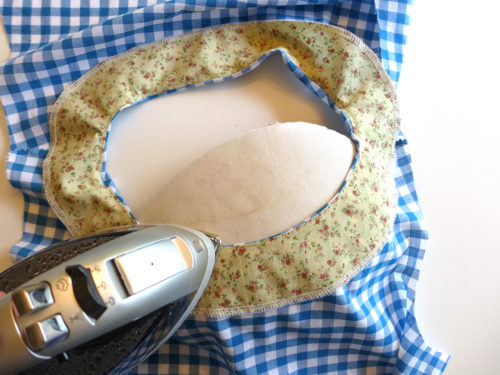
Step | 08
Pin the facing in place all the way around your opening, making sure to keep it smooth and that you don’t trap any balloons of air within the layers.
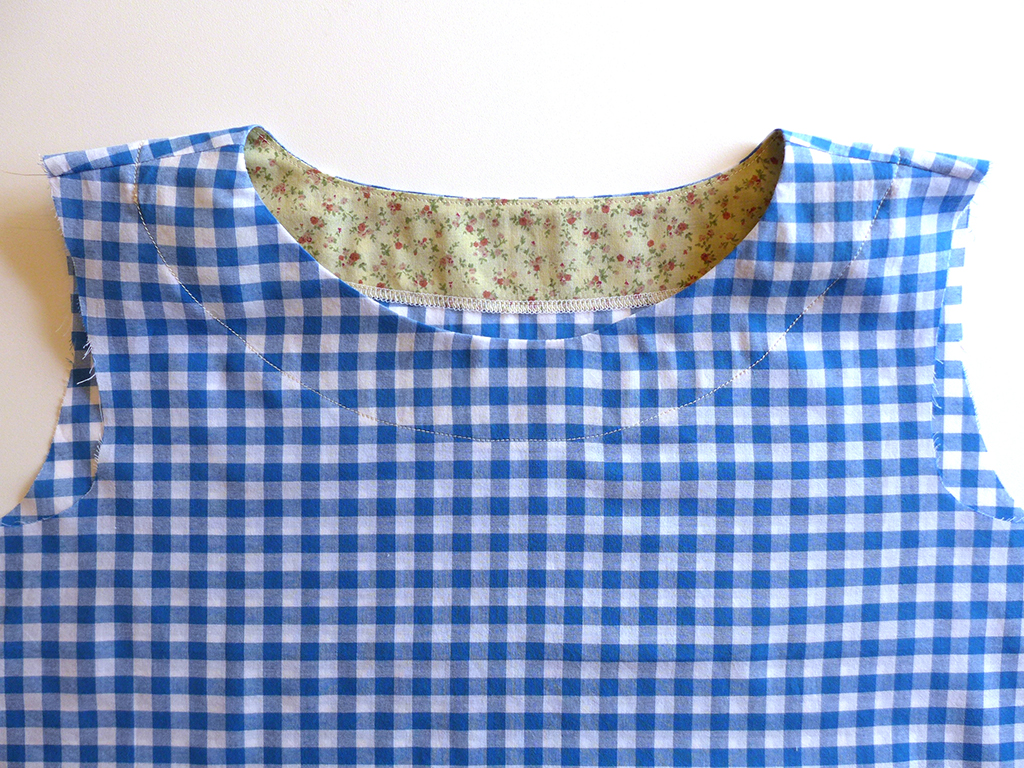
Step | 09
Topstitch all the way around the outer edge of the facing, sewing it to the opening. This step secures the facing in place so that it doesn’t flap around when you wear your garment. If you would prefer not to topstitch, simply hand sew a few stitches at invisible spots, like at seams, to tack the facing in place on the inside.
Give the neckline a final press after topstitching to smooth everything out. You’re done!

About the Author
Christine Haynes is a patternmaker, teacher, and author living in Los Angeles. When not sewing, she's often indulging her love of traveling. Learn more about Christine at www.ChristineHaynes.com or www.CityStitching.com.