Sign In

Knit garments tend to present a different set of fit challenges for sewists. It can be intimidating for those of us who have been hiding in the wovens department, hoping no one notices. Knit fabrics are mischievous and change in shape. Fitting a garment that is smaller than your actual measurements can get quite confusing.
There are many ways to make fit alterations to a knit dress, but there a few quick and easy alterations that everyone who sews knits should know. The most common problems are improper knit-fabric-to-pattern combinations, ill-fitting busts, and gaping.
I will walk you through finding the perfect pattern for your knit fabric and how to alter your pattern for the perfect fit. Maybe that knit fabric you bought years ago but are too scared to cut can see the light of day!
Know Your Fabric
First things first, what’s so different about knit fabrics?
Recovery and Stretch Ratios
Recovery refers to a fabric’s ability to “bounce back.” When the fabric is stretched, does it immediately come back to its original measurement or does it stretch out more and more, every time you pull on it? If it bounces back, you’re in business. As a rule, I avoid knits without good recovery, they can’t be counted on to consistently fit correctly. However, they can make for a beautiful loose-fitting knit garment that doesn’t have negative ease. Usually, a knit with good recovery has just a sprinkling of spandex in the fiber content to give it the oomph it needs to stretch back and forth.
Each knit fabric has a stretch ratio, which refers to the amount that the fabric can stretch compared to its un-stretched length. Even though all knit fabrics have a stretch ratio, not all stretch is equal. Knit patterns are usually designed with negative ease, which means that the finished garment is actually smaller than your body measurements. Therefore, a certain amount of stretch is needed for the garment to fit correctly, per the design. Each pattern will tell you what stretch percentage it is designed for and usually give you a stretch key as a reference.
Determining Stretch Ratios
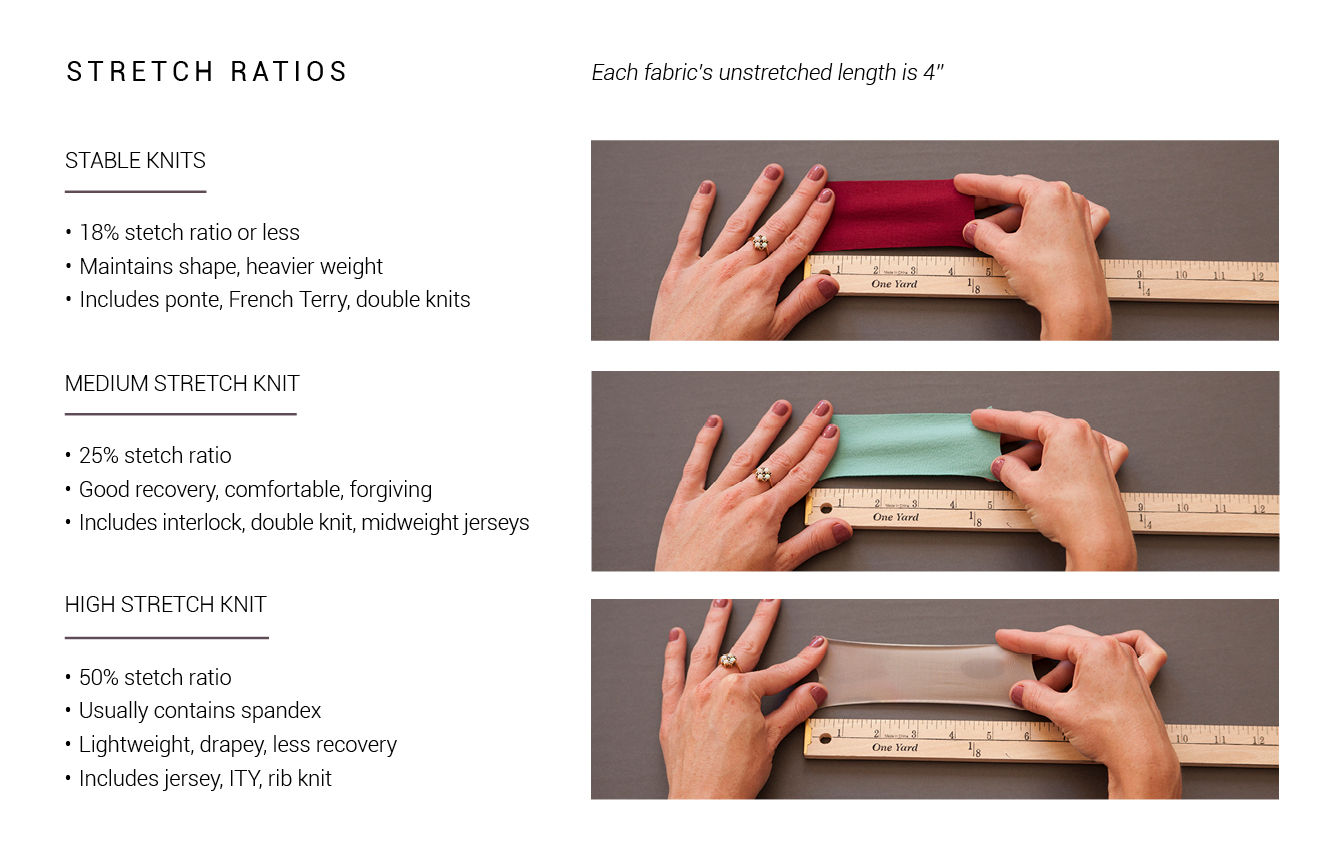
This chart is a great starting place, yet different varieties of knit can differ in recovery and drape due to fiber content.
Selecting Your Size
Select your size from the measurements listed on the back of your pattern. Don’t worry that some of the finished garment measurements are smaller than your body size. Remember—knit garments are often designed with negative ease because the garment will stretch to fit.
If you’re in-between sizes and unsure of which one to choose, I’d recommend choosing the larger size. When fitting, it’s much easier to take something in than conjure up extra fabric to let something out.
The Knit Muslin
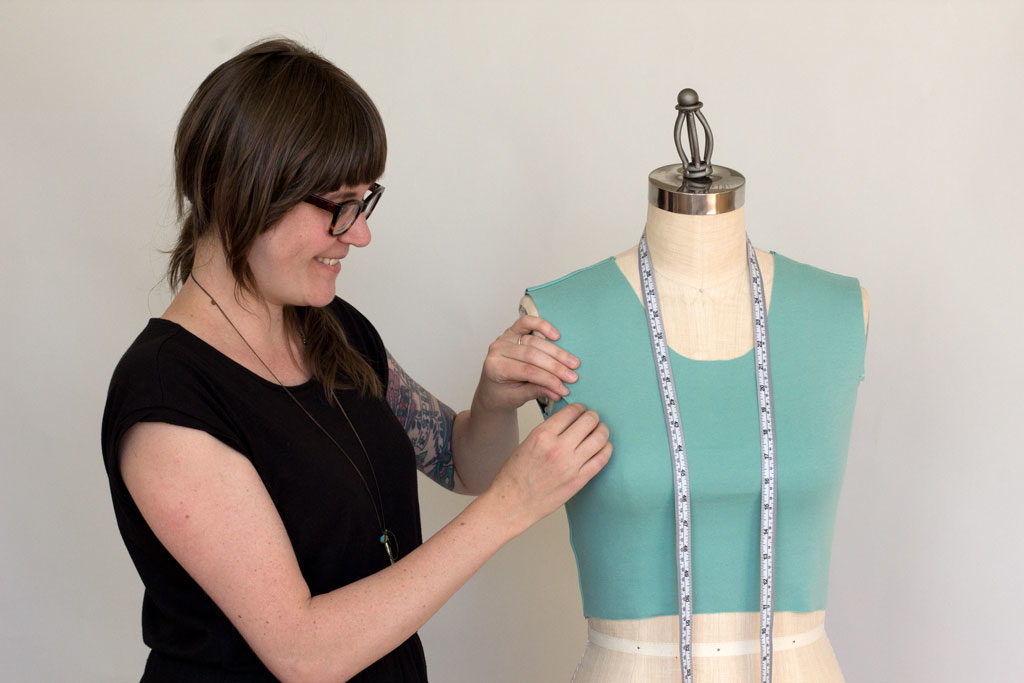
A muslin is a mock-up of a pattern that is used to assess fit, proportion, style and construction of the pattern.
Making a muslin in knit is arguably the most important muslin to sew. Knit fabrics have many more factors to them that can affect fit compared to woven fabrics. Fiber content, weight, stretch, and even gravity can really alter the way your finished garment turns out. When making a knit muslin, it is important to use a fabric that has a similar drape, fiber content, and stretch ratio.
You may have heard the term “wearable muslin." I’m big fan of this idea. Why waste perfectly good fabric and throw away your muslin when you’re finished assessing fit? Even if the muslin doesn’t fit all that well, it could be worn while cleaning the house or look great on a scarecrow.
Knit Garment Alterations
These are the three most common fit alterations to a knit dress. After trying on your muslin check for these fitting problems in this order.
Increasing or Decreasing the Bustline
Bust fitting is the first alteration on everyone’s list. Knit fabrics are forgiving in this area but present some of their own issues. On a woven garment, shaping, either with tucks, darts, or seams is used to make room for a bust. Knits typically do not have this sort of shaping. Instead, they rely on the shape of the pattern piece along with the stretch of the fabric to accommodate the bust.

If your dress has drag lines between or across the bust points or on the side of the bust, you likely need to increase the bustline measurement. If the bust is too loose or drooping, you may benefit from a bustline decrease.
Once you have decided how much you would like to add to the bustline, divide that amount by 4, the total number of cut edges on each side seam. For instance, if I needed to add 1” to the bustline, I only need an additional ¼” at the side seams of the front and back bodice.
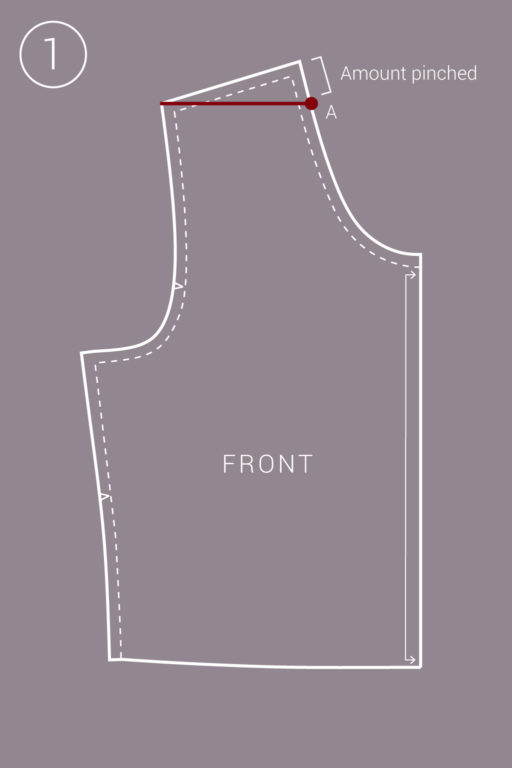
1. Trace the front bodice piece on a new sheet of paper. Measure the needed increase or decrease amount from the bottom portion of the armhole and mark.
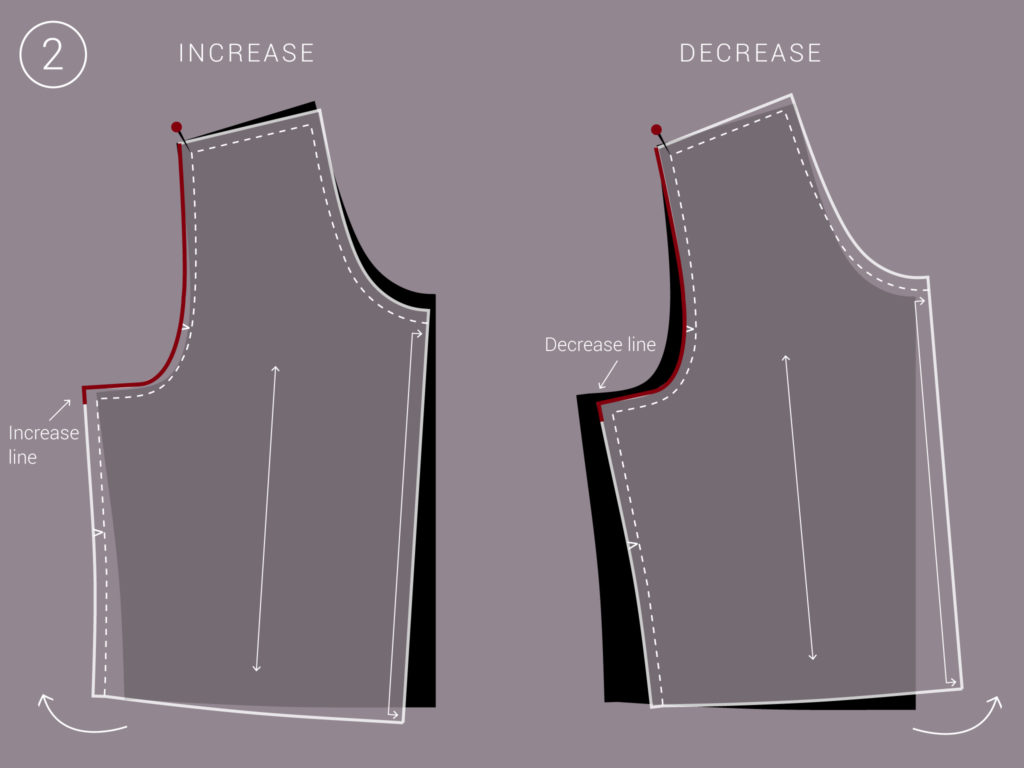
2. With the original pattern piece still on top of the traced pattern, stick a pin into the intersection of the shoulder and armscye stitching line. Pivot the side seam to increase/decrease. Trace the armhole of the original pattern.

3. With the pattern still pivoted at the side seam, stick a pin into the intersection of the armhole and side seam stitching line. Pivot the original pattern piece to the waist and side seam intersection. Trace the new side seam cutting line and notches
Repeat these steps for the bodice back.
Gaping Armhole
In a fitted knit dress, if your fabric doesn’t have excellent recovery, or if it gets a bit stretched out when being sewn, you may end up with a little bubble of fabric in the armhole. This is caused by either an armhole that is too large or improper shaping at the side seam. This alteration will fix the gaping armhole, no matter what the cause.
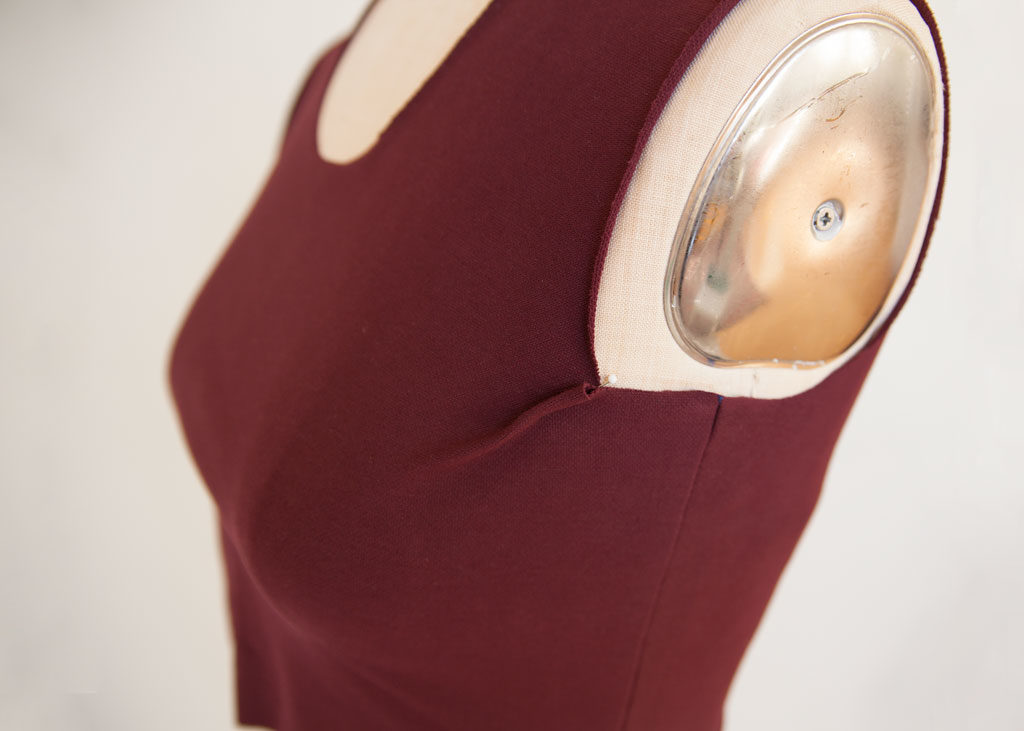
On your muslin pinch out the extra amount of fabric at the armscye and pin it closed. Measure this amount at the cut edge; this will be the amount removed in the following alteration.

1. Draw in the seam lines on the front bodice. Mark your apex placement (D) and draw a line from the armhole notch to the apex. This is line A.
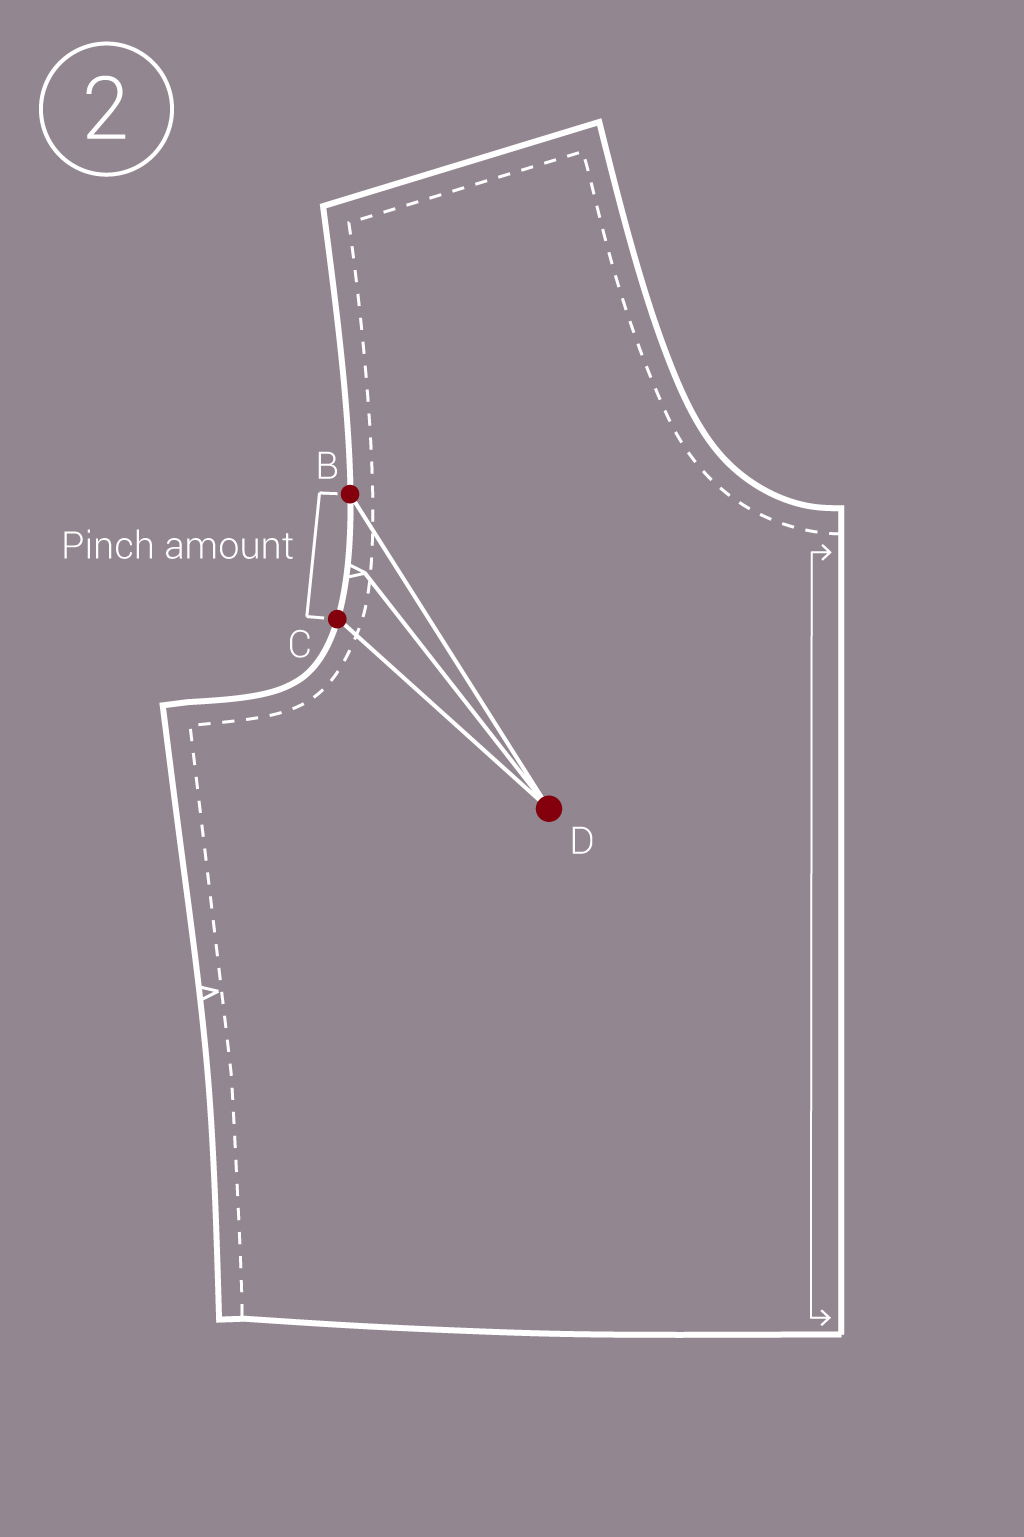
2. Divide the amount pinched from the armhole of your muslin by two. Measure up from the notch at this amount and mark (B). Measure down from the notch at the same amount and mark (C). Draw a line from mark B to mark D. Draw an additional line from mark C to mark D.
3. Draw a line, parallel to the fold line, from the apex to the waistline. This is line E.
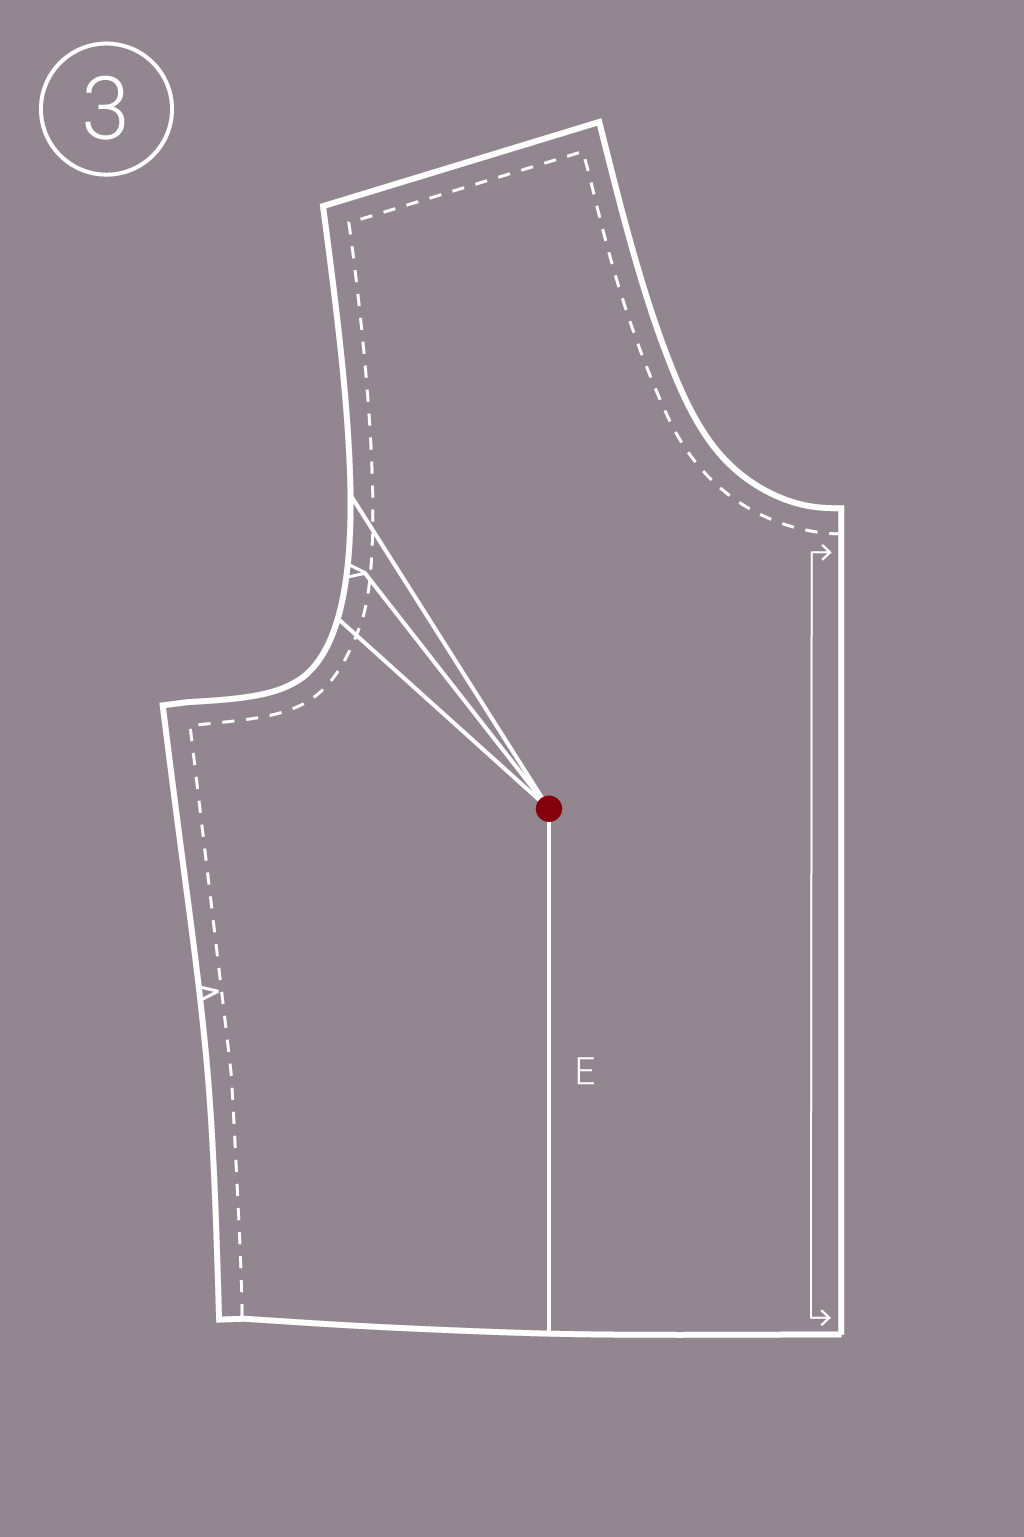
4. Cut and remove the entire armhole dart. Cut through line E to the apex, leaving a bit of paper at the apex as a hinge.
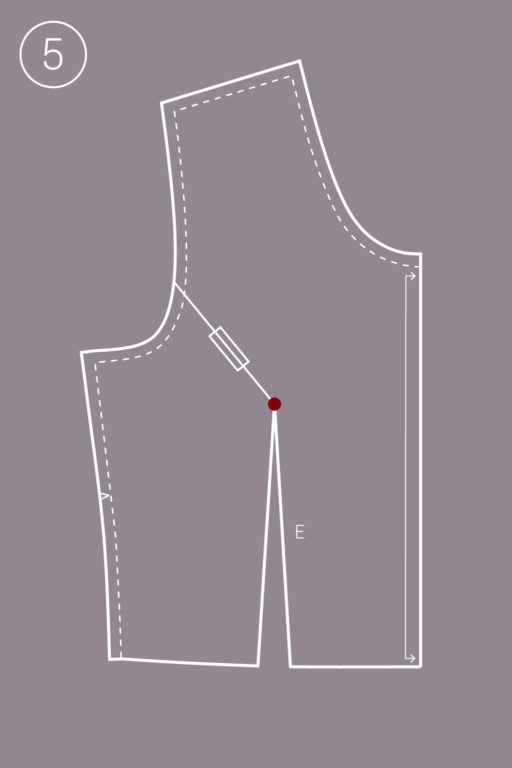
5. Bring the cut edges of the armhole dart together and tape in place, closing the dart. Redraw armscye to original length. This will open up line E. Bring a scrap piece of paper behind the opening of line E and tape in place.
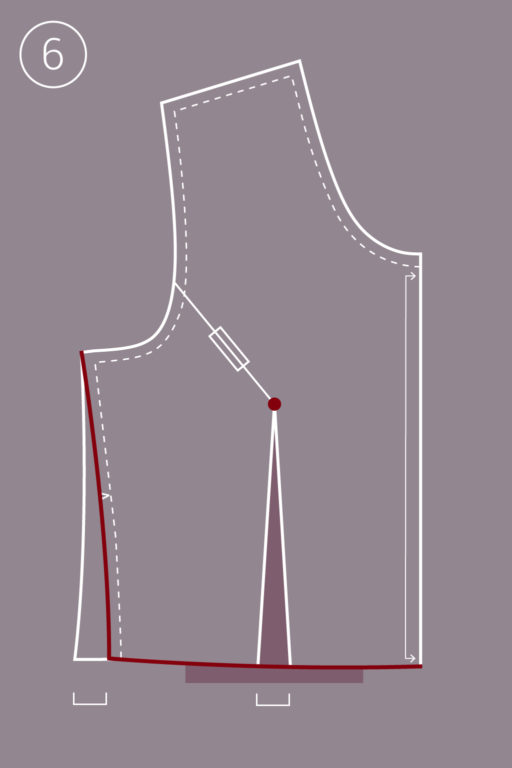
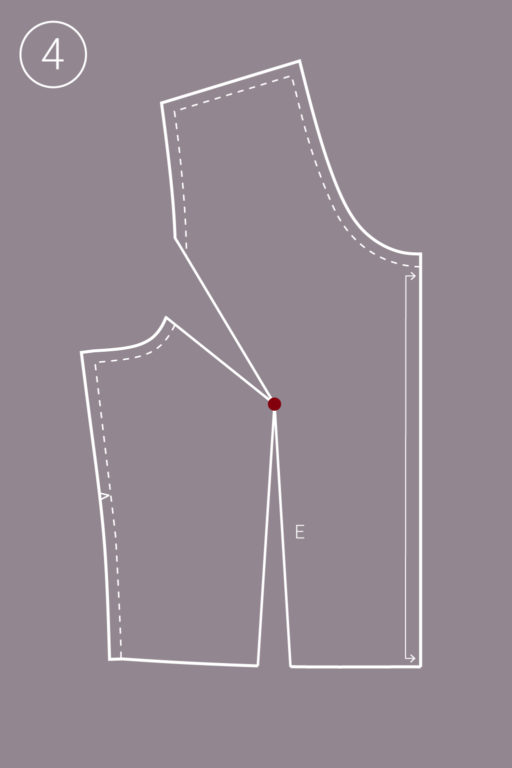
6. Now that you have opened line E, you have increased your waist measurement. You need to move your side seam toward the center front so your waist measurement does not change. Measure the amount line E has opened. Measure that same amount from the side seam toward the center front. This will be your new side seam. Redraw your side seam from the armscye. The new side seam line is shown in red.
Gaping Neckline
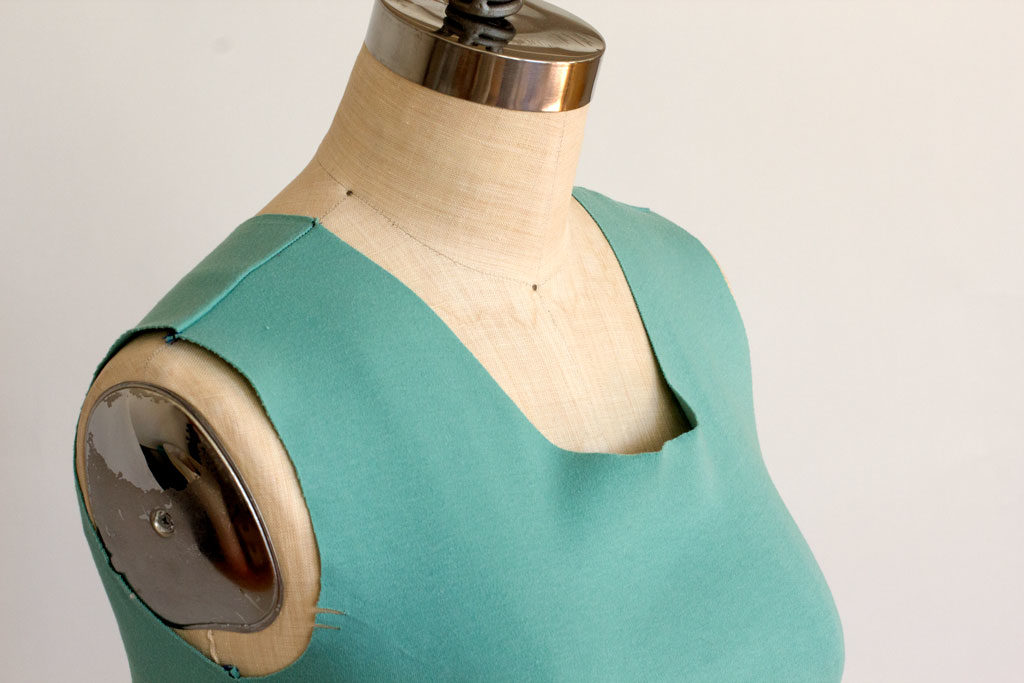
A loose neckline is a common fit problem in knits. Due to the variety of stretch percentages that knit fabrics may have, the curved edges can stretch in peculiar ways. Also, if you have even a slightly hollow chest, knit fabrics may have a hard time staying close to the body.
On your muslin pinch out the extra amount of fabric in the neckline at the shoulder seam and pin it closed. Measure this amount at the cut edge; this will be the amount removed in the following alteration.
Once you have decided how much you would like to remove from the shoulder, divide that amount by 2, the total number of cut edges on the shoulder.
1. Draw in seam lines on the armscye, neckline, and side seams. From the top portion of the neckline, measure the amount needed to be removed and mark (A). Draw a line from the top edge of the armscye to mark A. This is your new shoulder seam.
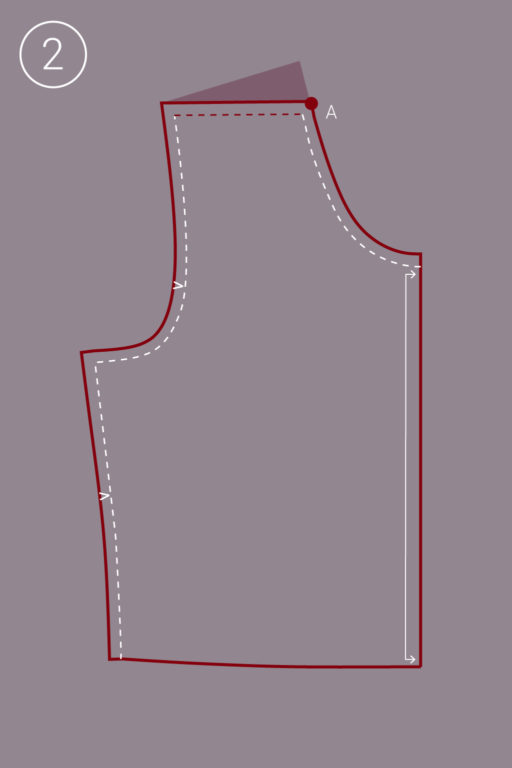
2. Add seam allowance to the new shoulder seam and true seams at neckline and armscye.
Knit sewing can go two ways; either it’s all you sew or you avoid it like the plague. But, isn’t that the great thing about sewing? We make up these limitations for ourselves. Then one day the clouds part and we nail it. It’s only a matter of learning the right techniques and having a good seam ripper handy.

About the Author
Katie teaches new skills through in-depth tutorials, sewalongs, and articles for Seamwork Magazine and The Colette Blog. She’s all about encouraging sewers to try new techniques and create a personalized wardrobe that makes them feel great!