Sign In
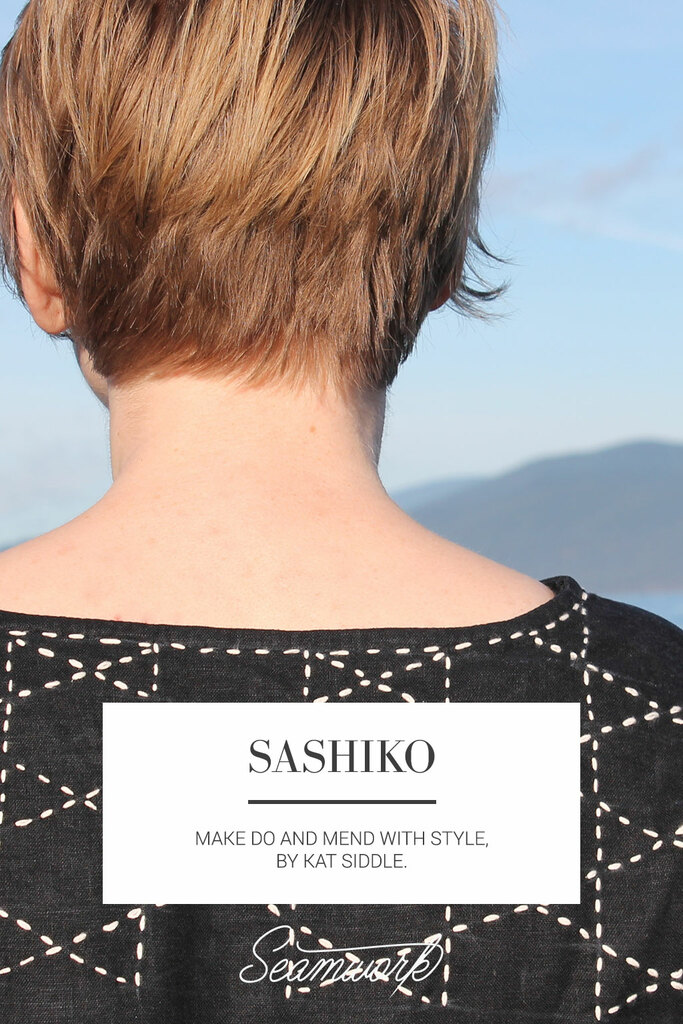
What is sashiko?
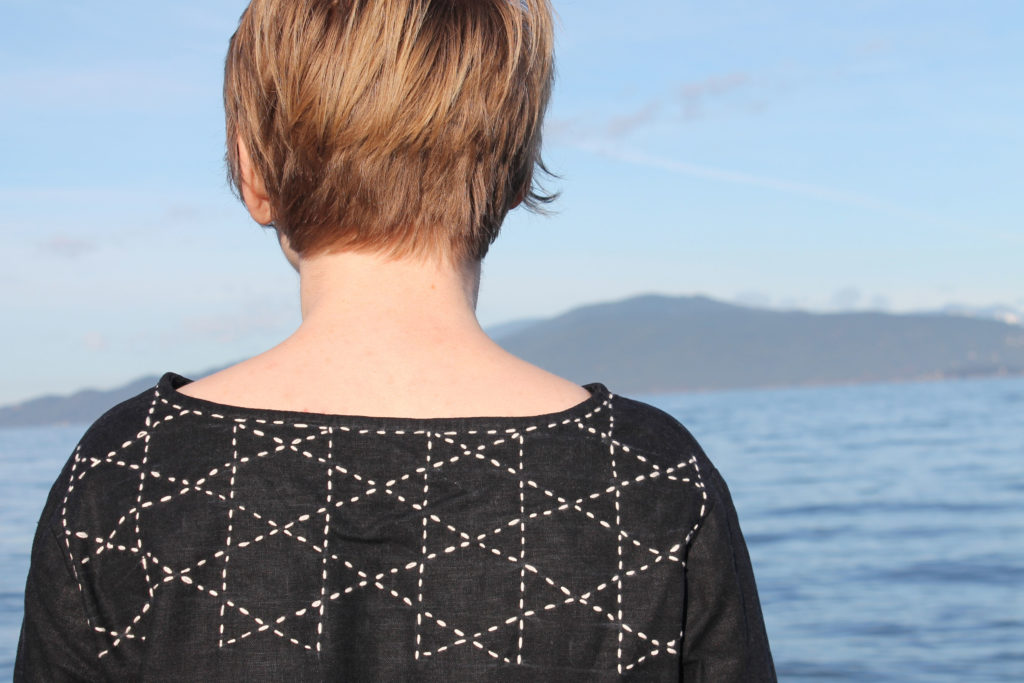
Sashiko’s all-over designs look especially good in variegated thread.
Sashiko is a striking hand-sewing technique that originated in ancient Japan. In Japanese, its name means “little stabs”—a reference to the plain running stitch that makes up sashiko’s geometric, all-over patterns. Sashiko is usually described as a kind of embroidery, but to me, this fails to capture its true complexity. Sashiko patterns are very pleasing, with their regular stitches and precise use of space. But aesthetics are only one aspect of sashiko.
Traditional sashiko combined decorative technique with mending and quilting. It was a practical technique that helped farmers and fishermen stay warm and make the most of their families’ resources.
To me, sashiko is a technique of transformation that honors the impulse to re-use waste and use materials efficiently. A long, sharp sashiko needle is a magic wand, a tool of salvage that produces style as well as economy. Its beauty demands the question: why just “mend and make do” when you can mend with gorgeous graphic patterns?
A Short History
Sashiko originated in Japan’s rural north and spread south along trade routes. Like many ancient textile traditions, its exact origins are lost to time. Sashiko probably developed some time during the Edo period (1615–1868). By the Meiji era (1868–1912), sashiko was a well-established technique.
In contrast to Japan’s gorgeous silk fabrics, sashiko is considered a “folk textile” because it was produced and used by the peasant classes. Sashiko was winter work for women from farming or fishing families, who used the technique to extend the life of worn fabrics, mend, and winterize clothing, and embellish everyday items.
Industrialized fabric production didn’t reach Japan until the 1870s. Cotton, linen and hemp were spun, woven, and dyed by hand. Cloth was a precious resource that represented huge amounts of labor, and even scraps had value. Even after mechanized mills were built near Osaka, the fabric produced there was too expensive for many people to afford, and they continued to weave their own yardage for clothing and household items. Cotton was particularly scarce in northern Japan, where it was too cold for it to grow.
Given these circumstances, mending was an utter necessity for survival. Sashiko was a crucial part of a mending technique called boro. Boro means “tattered rags” in Japanese. Boro textiles look like color studies: multiple shades of indigo fabric are patched or quilted neatly together with sashiko stitches, covering holes and reinforcing worn areas.
Boro vastly extended the lifespan of clothes and household textiles. When garments wore out, the fabric would be quilted into work wear. This made clothing warmer and stronger. Women would quilt two or three layers together, with the oldest cloth in the middle, where it could still be useful, but hidden. Worn-out work wear might be made into bags and aprons. Fabric from these items could then be quilted one last time into thick cleaning cloths, or zokin.
Color and pattern
Traditionally, sashiko is sewn with white thread on dark indigo cloth.
Traditionally, sashiko patterns were sewn with off-white stitches on dark indigo fabric. These colors always struck me as a classic combination, like whitecaps on the ocean, or dark blue mountains topped with snow. In truth, sashiko’s colors evolved from poverty and an oppressive class structure.
For much of Japan’s history, fabric was made from linen or hemp. Cotton farming began in about 1600. While cotton fabric was softer on the skin than hand-woven hemp, it was also difficult to dye—unless you used indigo. Families would weave their own fabric at home, and send it (along with their boro textiles) to a local dyer.
But even if people could afford other fabrics, they weren’t necessarily allowed to wear them. During the Edo period (1603–1868), the ruling classes established complicated laws that governed dress and colors. These laws forbade the lower classes from wearing silk, bright colors, or large patterns. Ironically, these laws encouraged innovations in dyeing techniques, as people with means sought out alternatives to forbidden colors.
If sashiko’s colors were set in stone, its patterns were not. There are a huge variety of sashiko patterns. Many were adapted motifs from other textiles, stationary, architecture, or ceramics. After the Edo period’s sumptuary laws were lifted, sashiko patterns became larger and even more varied.
Using sashiko in your garments
If you love the look of sashiko, but prefer to wear knits, check out the sashiko-inspired prints on Spoonflower. Ever since I saw a pair of faux-sashiko print leggings in Lululemon, I haven’t been able to get the idea of sashiko yoga pants out of my head.
Sashiko is a beautiful way to add visual interest to your handmade wardrobe. Because the patterns are hand-drawn, you can adapt them to fit almost any piece of woven fabric. The Akita T-shirt, Maeby dress, and Osaka skirt would all make excellent canvases. For a traditional quilted texture, embroider through two layers of fabric (the Osaka skirt would be perfect for this).
Sashiko works best on a medium-weight, loosely woven fabric that won’t scrunch around the stitches. Tightly woven fabric will be hard to work with—so don’t reach for denim, even when it’s the perfect color.
It’s important to make sure that the pattern works with the garment. Sketching the final garment on paper will help you choose scale and placement.
How to
Sewing sashiko is wonderfully easy—once you have the pattern on your fabric. Using the right tools is crucial.
You will need:
A sashiko needle. Using a special needle will help you sew the consistent running stitches that give sashiko its unique look. Sashiko needles are long, rigid, and very sharp. If you must substitute, use a long, strong darning needle.
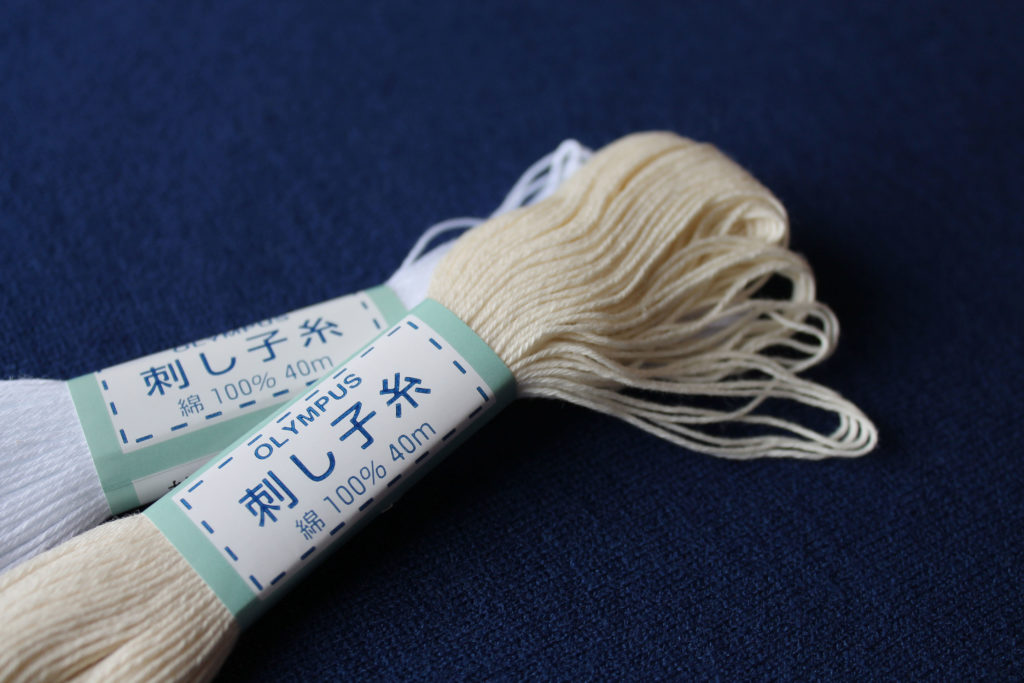
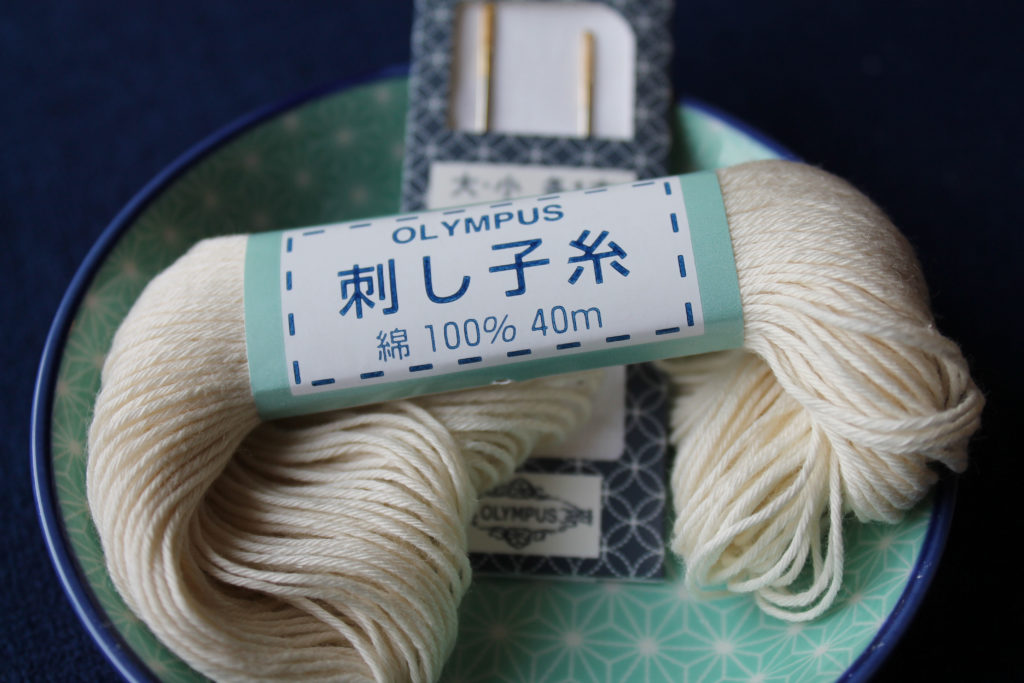
Sashiko thread. Sashiko thread is soft, strong, matte cotton. It has a strong twist to it.
Medium-weight woven fabric with a loose weave. Traditional sashiko fabric is indigo cotton, but any similar fabric will do as long as the stitches flow easily through the fabric.
A design. Designs can be found online or copied from books. Here is the book I used. A good book will tell you which parts of the pattern to stitch first.
If you’re drawing the design directly onto the fabric, you’ll need a few extra things:
A quilting ruler
A water-soluble marking tool.
Prep your Pattern
Always pre-wash your fabric to reduce the chance of dye transfer. Though tone-on-tone stitching can be lovely, it can be devastating to spend ours creating a crisp white on blue design, only to have your fabric bleed into your stitching.
Don’t cut the pattern piece out like you normally would. Instead, trace the outline of the piece onto the fabric. Use a clear ruler to draw stitching lines. this will make it easier to avoid stitching within the seam allowance.
Cut around the piece, leaving a few inches all around it. Serge or zigzag the edges to prevent the fabric from fraying and stretching.
Getting Started
Step | 01
Choose a pattern.
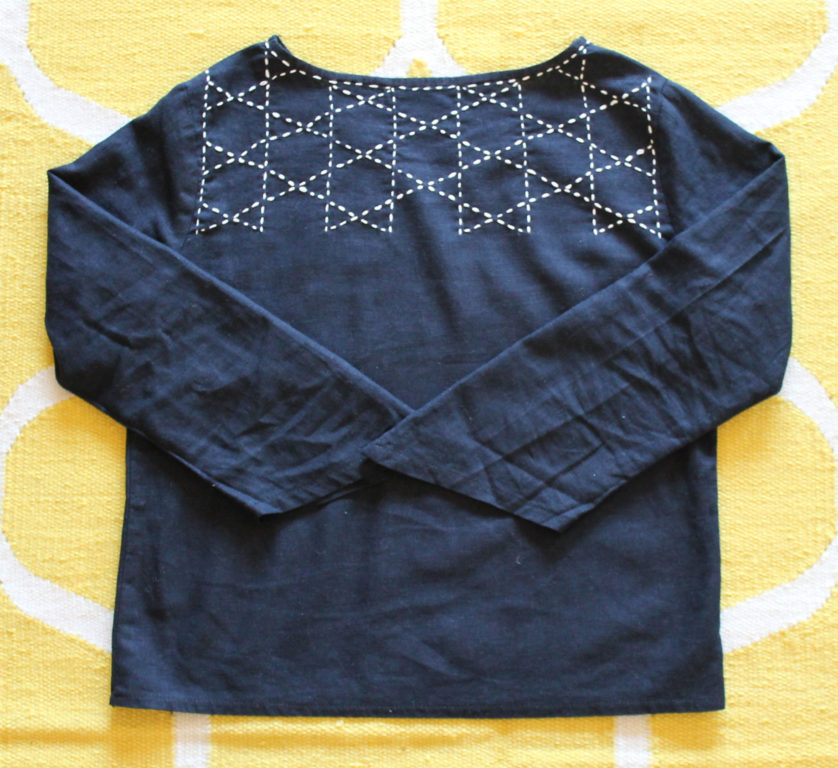
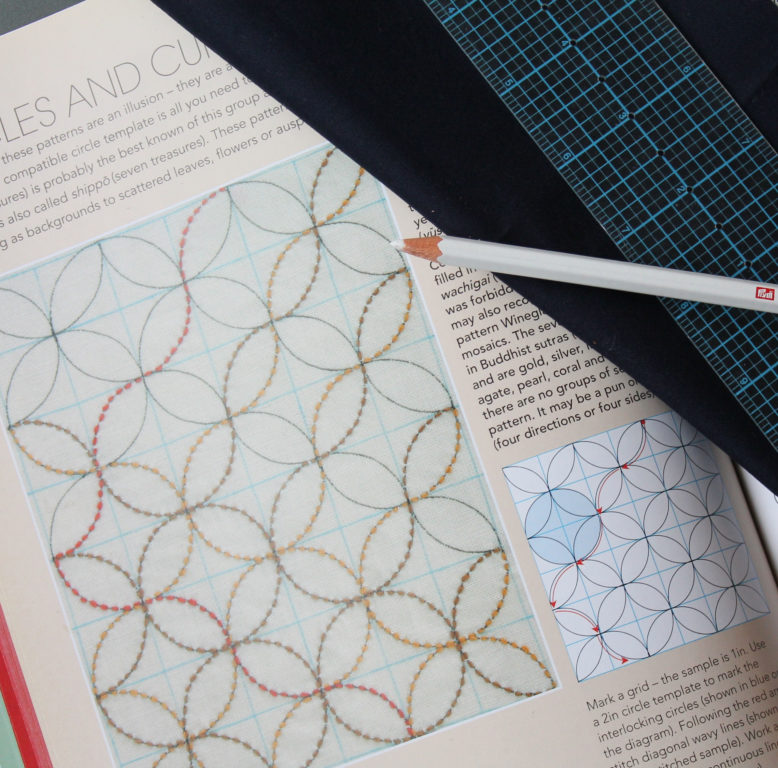
I chose a traditional pattern called “shippo tsunami,” or “linked seven treasures,” from The Ultimate Sashiko Sourcebook by Susan Briscoe. While you can also find images for free online, this book offers beginners some very helpful tips on the most efficient ways to draw and sew dozens of sashiko patterns.
Thread Basics
Thread the needle with a double strand of thread. This will make your stitches pop. If you want less texture, use a single strand.
Using thread conditioner like Thread Heaven or beeswax can help your thread pass more easily through your fabric.
Step | 02
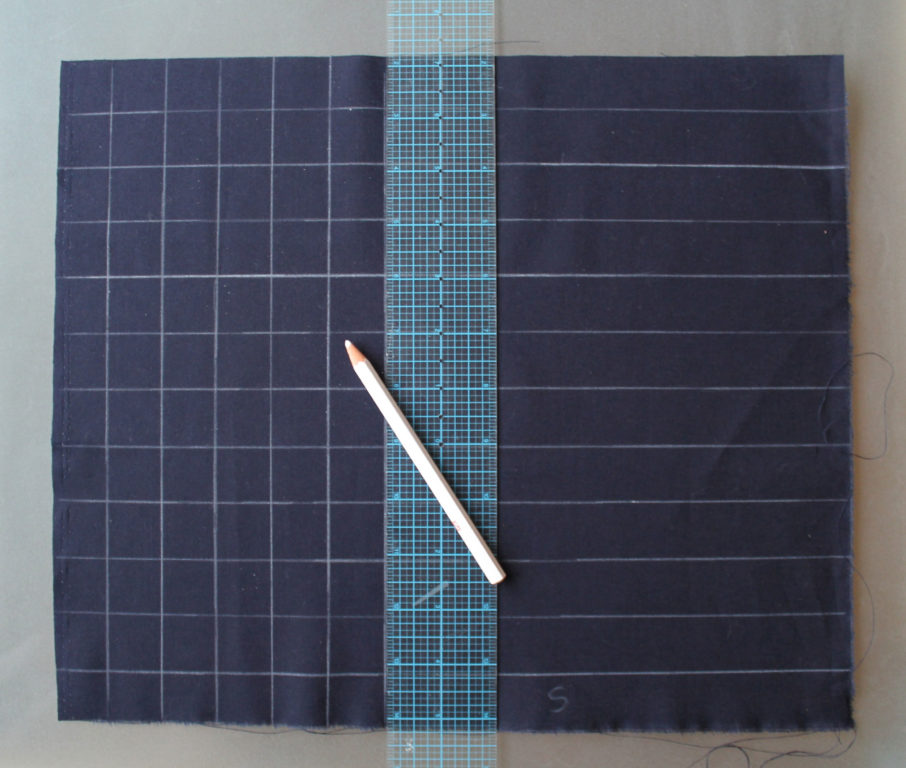
Draw a grid
A grid is the fundamental basis of any repeating sashiko pattern. You might not sew any of the grid lines, but it’s the best way to ensure a consistent geometric pattern. In the past, farmers’ wives probably eyeballed the grid using the weave of their coarse, homespun cotton. Today, we have quilting rulers that make this step easier.
This traditional sashiko cotton is treated with a sizing that makes it easy to draw on. The black linen shirt was harder to mark up, but not impossible.
Step | 03
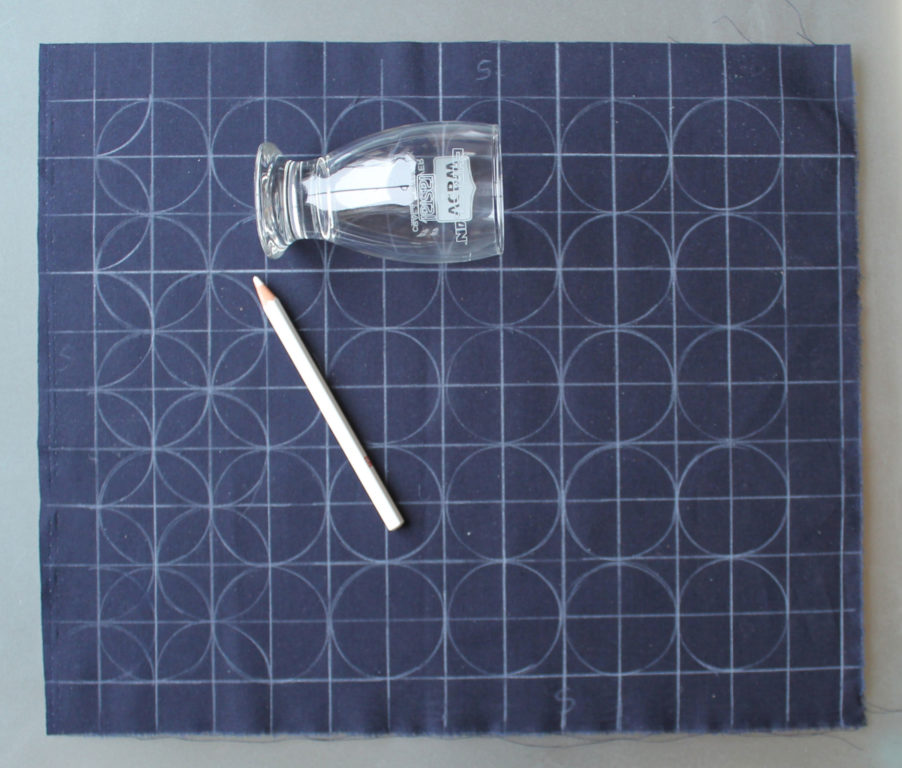
Draw your pattern
“Linked seven treasures” is a pattern made up of interlocking circles. I had to find a circle template that fit my 1”x1” grid. Your kitchen is a great place to find circle templates in various sizes. Here, I’m using a little novelty glass from Vancouver’s craft beer festival.
Step | 04
Start sewing
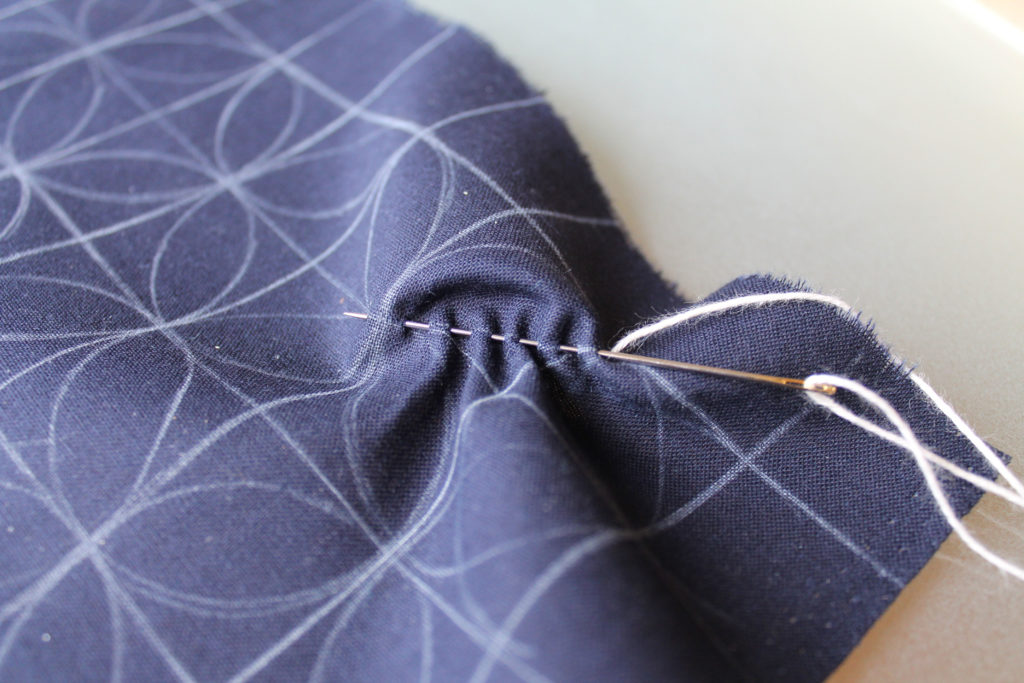
Sashiko is not sewed one stitch at a time, the way western embroidery is. Instead, the sewist must “load’ the needle with stitches in a pleating motion. Several stitches are loaded onto the needle before the thread is pulled through, resulting in smooth stitches of consistent length.
This is where having a real sashiko needle really helps. Your needle must be long, strong, and rigid.
Try to make your stitches even. Stitches should not touch each other or overlap.
Step | 05
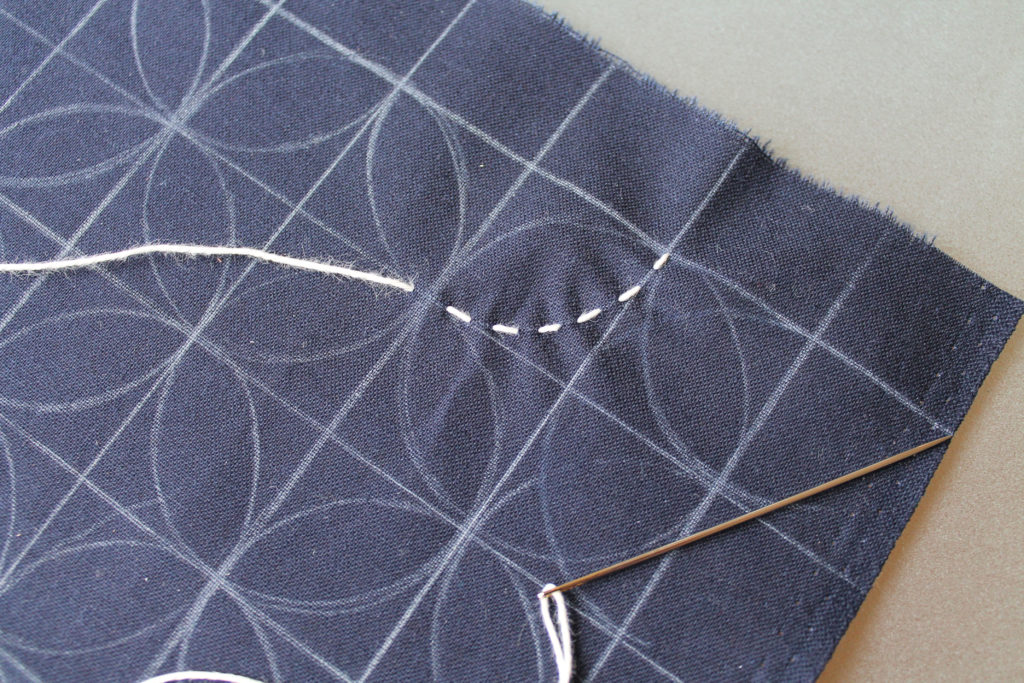
Keep going!
Sew in a direction that avoids creating long “floats” of thread on the wrong side of the fabric. Most traditional patterns have an established technique. For example, shippo tsunami sewn as a series of undulating lines (you never sew the circles themselves!). This is more efficient for the sewist, because you don’t have to turn the fabric constantly. It also saves on thread and avoids long floats.

About the Author
Kat Siddle is a librarian and fashion school dropout from Vancouver, B.C. She blogs about beauty at xovain.com and volunteers with Our Social Fabric, a textile re-use initiative.