Sign In
The bust adjustment is possibly one of the most talked-about fit adjustment in the sewing world. As a sewing instructor and pattern designer, I find that people get hung up on bust adjustments in general. I understand why, after years of poor ready-to-wear fit, we want things to fit just so, and the bust feels super intimidating, I mean it took most of us years to figure out our bra size, now we have to conquer a whole new set of rules? It is overwhelming.
I am here to tell you that the bust adjustment is so much simpler than it is made out to be. In my experience, there are four main types of bust adjustments. Adjustments for bodices with no darts, for those with bust darts, for those with four darts, and for princess seams. Once you have learned these basics, you can easily play with, and adapt techniques to work with a huge variety of bodice styles.
So let's get started!
Before jumping into how to execute a small bust adjustment, you'll want to learn how to measure your bust and determine your sewing cup size.
Taking your bust measurement

There are two vital measurements used to determine your sewing cup size: full bust and upper bust. Your full bust is the fullest part of your bust. When taking this measurement, your tape measure should be parallel to the floor, standing in front of a mirror can help ensure this—the upper bust is the area of your chest right below your underarms.
What is my sewing cup size?
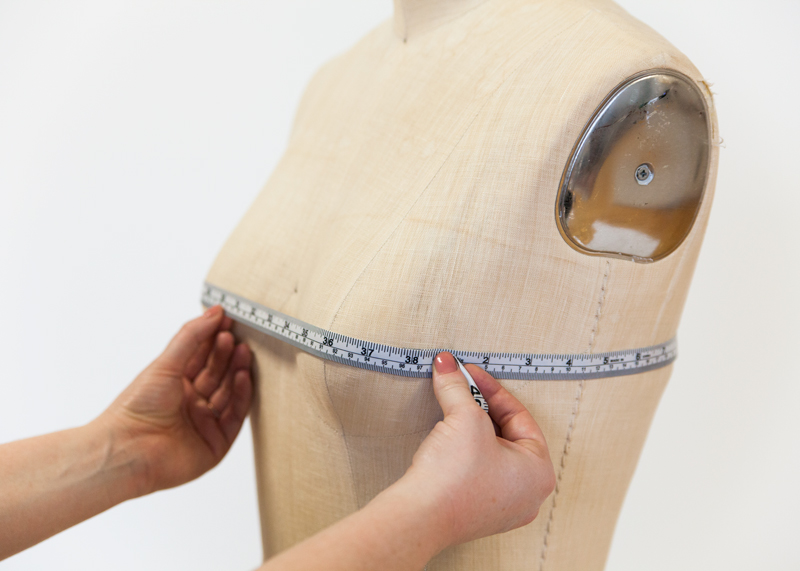
Measure your full bust.
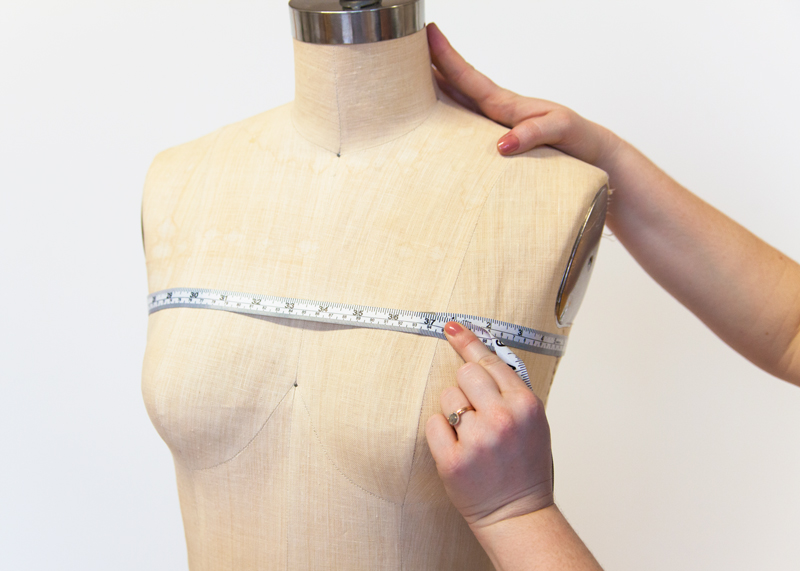
Measure your upper bust. The difference between your upper and full bust is your cup size. A cup is 1", B cup is 2", C cup is 3", DD is 5", etc.
What size should I cut?
Now that you know your sewing cup size, it is time to determine what size to start with.
When you require an FBA or SBA, picking a size isn't always as straightforward. Here is how to find your size:
If you are in the 0-16 size range, take your upper bust measurement, then add 3″. This will determine what size you would make if you were a C cup.
If you are in the 18-26 size range, add 5" to your upper bust measurement. This will determine what size you would make if you were a DD cup.
The difference between your actual bust measurement and the size you are cutting is the amount your pattern will need to be adjusted. This is your bust differential measurement.
I know this all can be a bit confusing, so here is an example:
Your upper bust measures at 33″ and your full bust measures at 34″.
33 + 3 = 36. This means you would cut a size 6.
34 (your actual bust measurement) – 36 (the pattern bust measurement) = -2 (your bust differential)
Meaning, you would subtract 2″ from your size 6 pattern with an SBA.
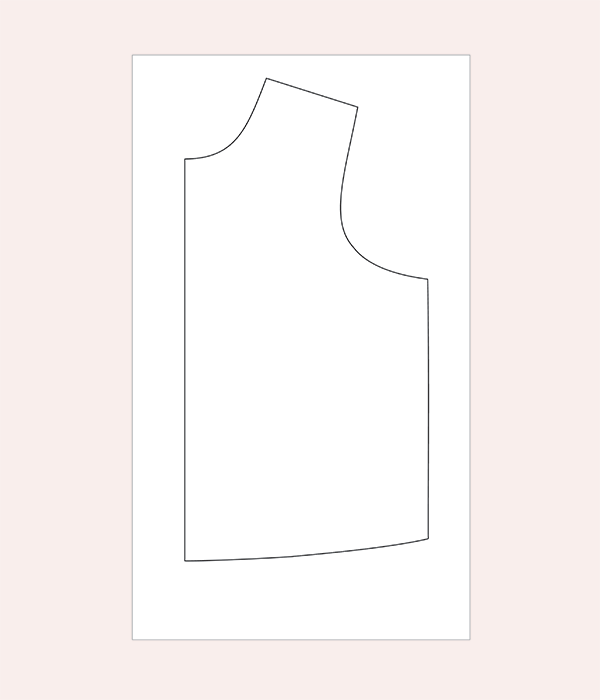
Small Bust Adjustments for Bodices without Darts
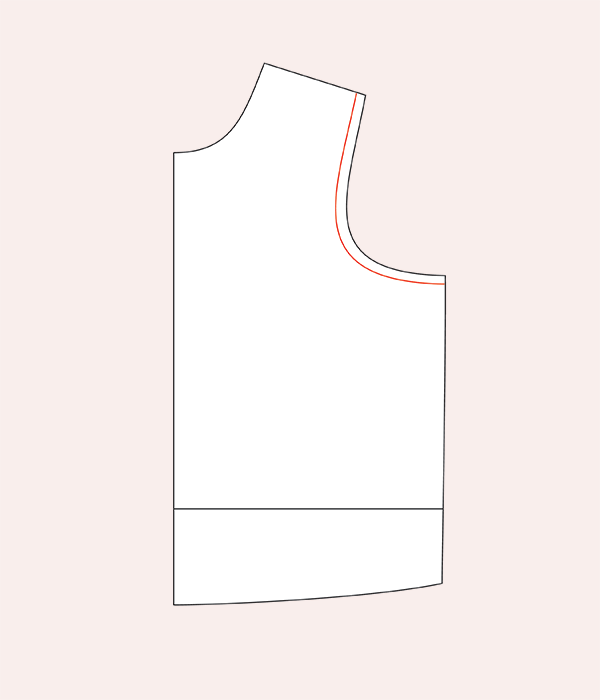
Prepare your pattern by tracing the front bodice, transferring all notches and markings. Also, mark the stitch line at the armscye.
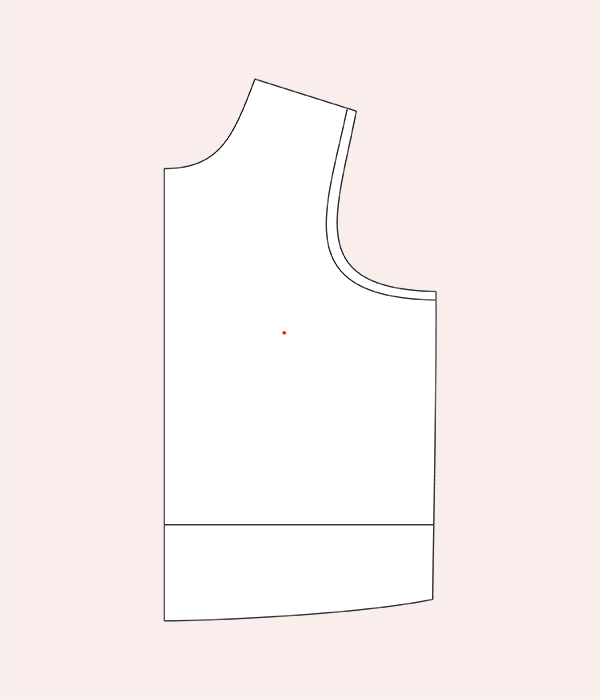
Hold the pattern up to your body, aligning the shoulder seam with your shoulder and the center front with the center of your body. Mark your bust point on the pattern piece using a pencil.
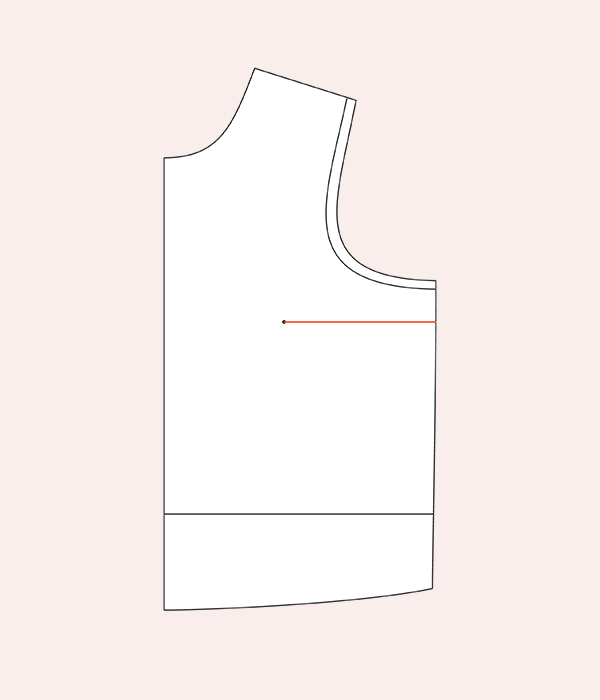
Draw a line from the bust point to the side seam, perpendicular to the grainline. This is line A.
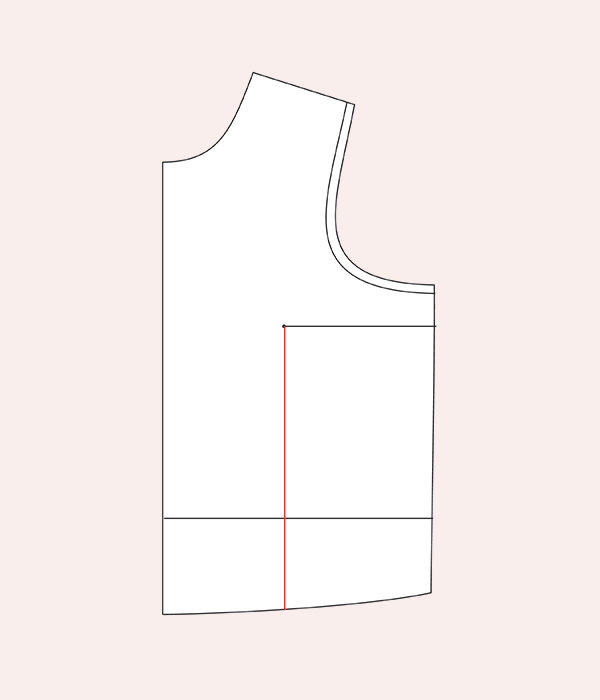
Draw a line from the bust point to the hem, parallel to the grainline. This is line B.

Draw a third line from the bust point through the armscye. This is line C.
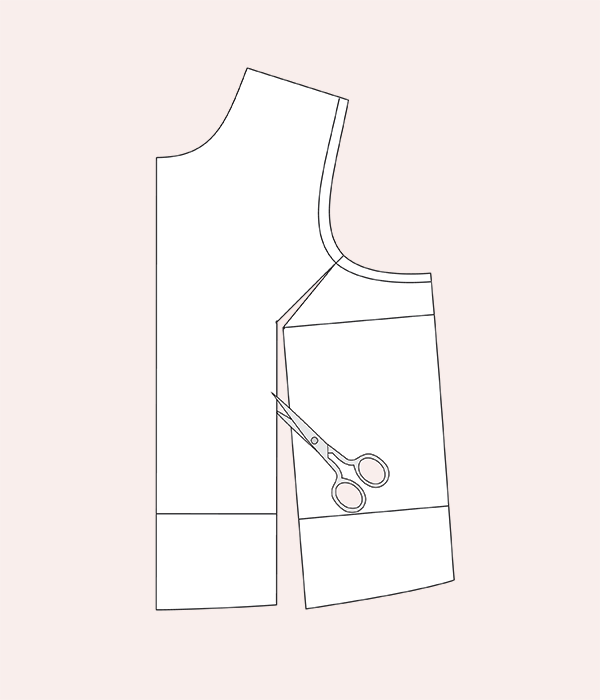
Using your paper shears, cut through line B, starting at the hem. Pivot at the bust point and continue cutting through line C, stopping at the armscye stitch line. Cut a small notch through the seam allowance at line C, leaving a small paper hinge at the stitch line.
Next, cut through line A, starting at the side seam, leaving a small paper hinge at the bust point.
Divide your bust differential by 2. This is the amount that you will reduce your pattern. Draw a line parallel to the center front portion of line B.
Maneuver your pattern, so that line B aligns with your reduction line.
You will notice that the waist of your pattern is now two different lengths. A small bust requires less length. To make the hemline even, cut along the center front lengthen/shorten line and shorten.
Trace the altered front bodice. Shorten the back bodice to reflect the changes made to the front bodice.
Small Bust Adjustments for Bodices with Bust Darts
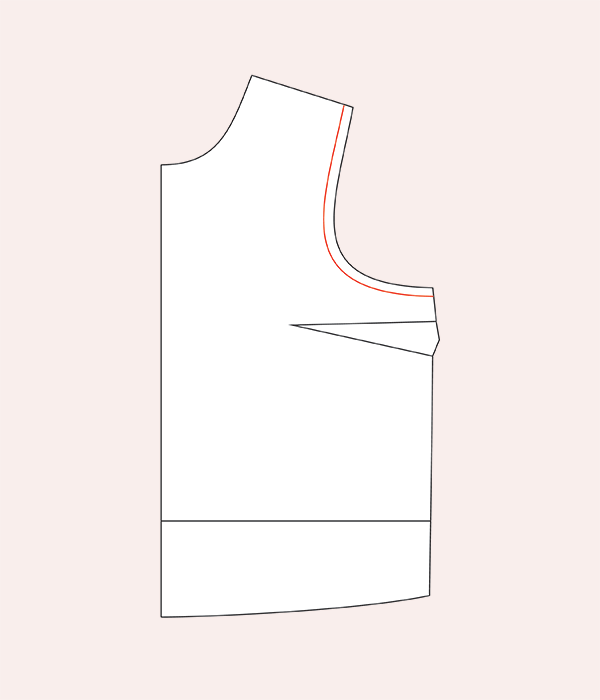
Prepare your pattern by tracing the front bodice, transferring the darts, notches, and markings. Also, mark the stitch line at the armscye.
Draw a line through the center of the side dart extending through the dart point to the bust point. This is line A.
Draw a line from the bust point to the hem, parallel to the grainline. This is line B.
Draw a third line from the bust point through the armscye. This is line C.
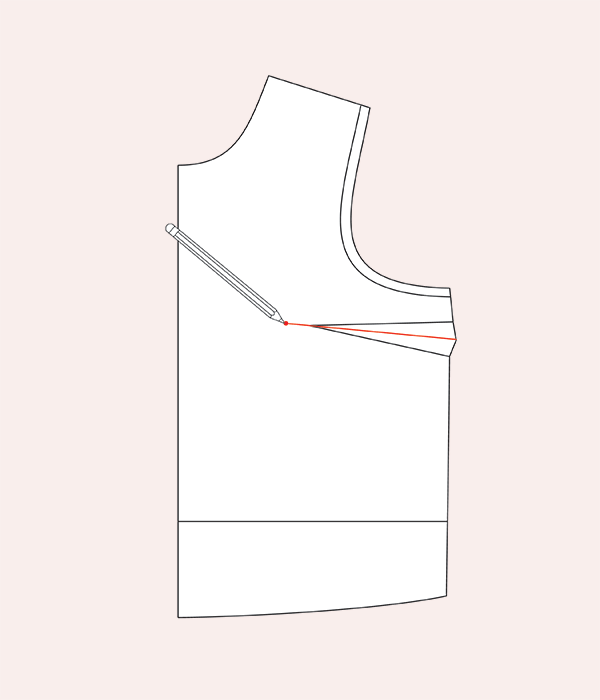
Using your paper shears, cut through line B, starting at the hem. Pivot at the bust point and continue cutting through line C, stopping at the armscye stitch line. Cut a notch through the seam allowance at line C, leaving a small paper hinge at the stitch line.
Next, cut through line A, starting at the side seam, leaving a small paper hinge at the bust point.
Divide your bust differential by 2. This is the amount that you will need to reduce. Draw a line this distance away from, and parallel to, the center front portion of line B.
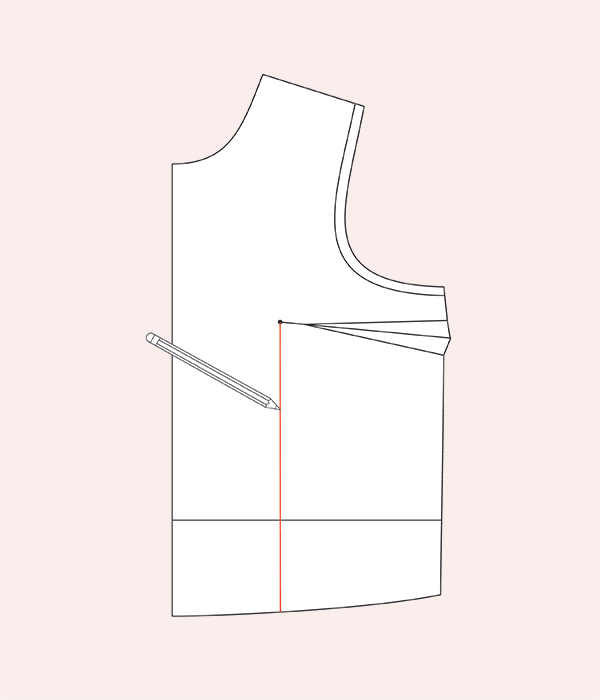
Maneuver your pattern so that line B is on your reduction line. Tape line B above the lengthen/shorten line.
You will notice that the waist of your pattern is now two different lengths. A small bust requires less length. To make the hem even, cut along the center front lengthen/shorten line and shorten.
Draw a line through the center of the dart to the bust apex.
Make a mark 2" away from the apex on the drawn line. This is your new dart point.
Connect the dart point to the dart ends.

Trace the altered front bodice.
No additional adjustments need to be made to the rest of the pattern, as only the dart uptake and the center front length have changed.
Small Bust Adjustments for Bodices with Bust and Waist Darts
Prepare your pattern by tracing the front bodice, transferring all darts, notches, and markings. Also, mark the stitch line at the armscye.
Draw a line through the center of the waist dart, extending through the dart point up toward the bust point. This is line A.
Draw a second line through the center of the bust dart, extending through the dart point towards the bust point. This is line B. The intersection of lines A and B is the bust apex.

Draw a third line from the armhole to the bust apex. This is line C.
Using your paper shears, cut through line A, starting at the waist. Pivot at the bust point and continue cutting through line C, stopping at the armscye stitch line. Cut a notch through the seam allowance at line C, leaving a small paper hinge at the stitch line.
Next, cut through line B, starting at the side seam, leaving a small paper hinge at the bust point.
Divide your bust differential by 2. This is the amount that will need to be subtracted from your pattern piece. Draw a line this distance away from, and parallel to, the center front portion of line A.
Maneuver your pattern so that line A is on your reduction line. Tape line A above the lengthen/shorten line.
You will notice that the waist of your pattern is now two different lengths. A small bust requires less length. Use the lengthen/shorten line on the center front to reduce the center front so that the waist aligns with the side front.
Draw a line through the center of each dart. Where they intersect is the bust apex.
Make a mark 2" away from the bust point on each drawn line. This is your new dart point.
Connect each dart point with its corresponding dart ends.

Trace the altered front bodice.
No additional adjustments need to be made to the rest of the pattern, as only the dart uptake and the center front length have changed.
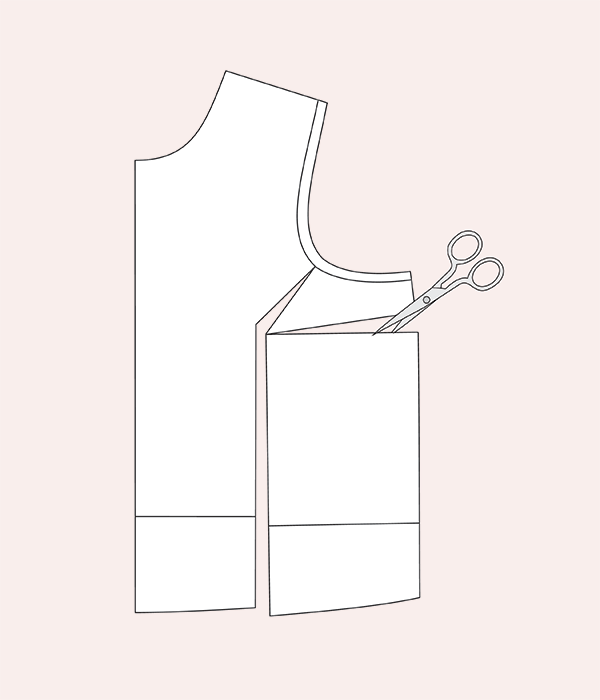
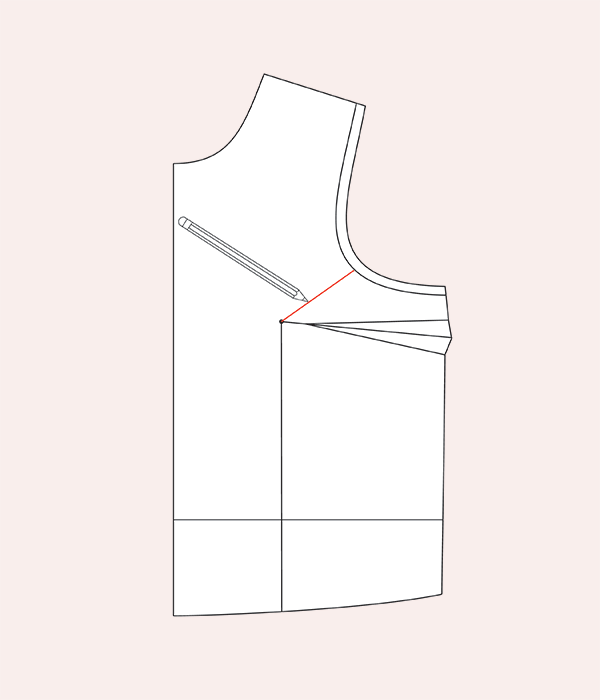
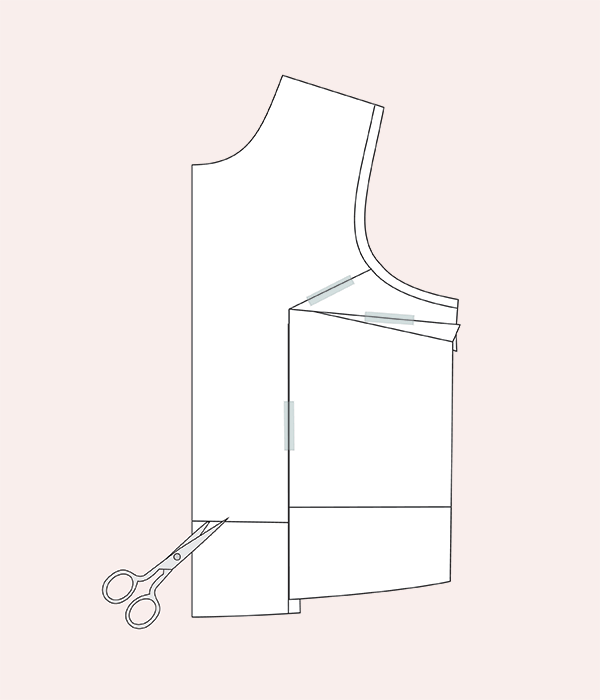
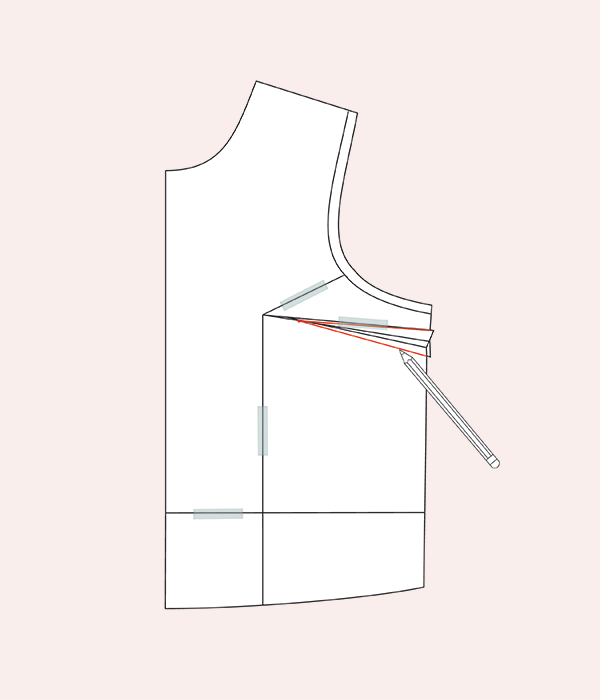
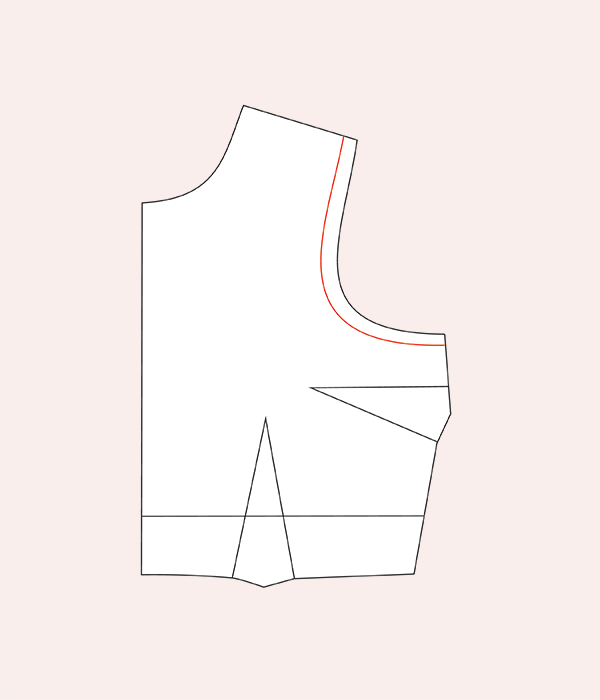
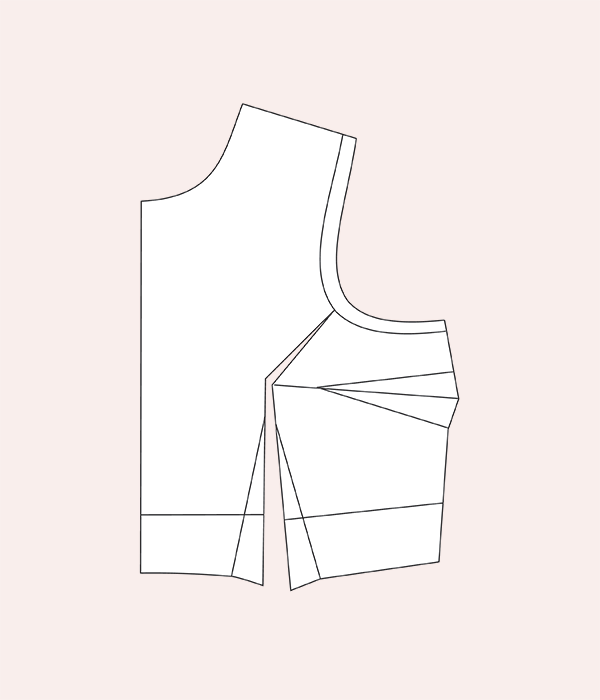
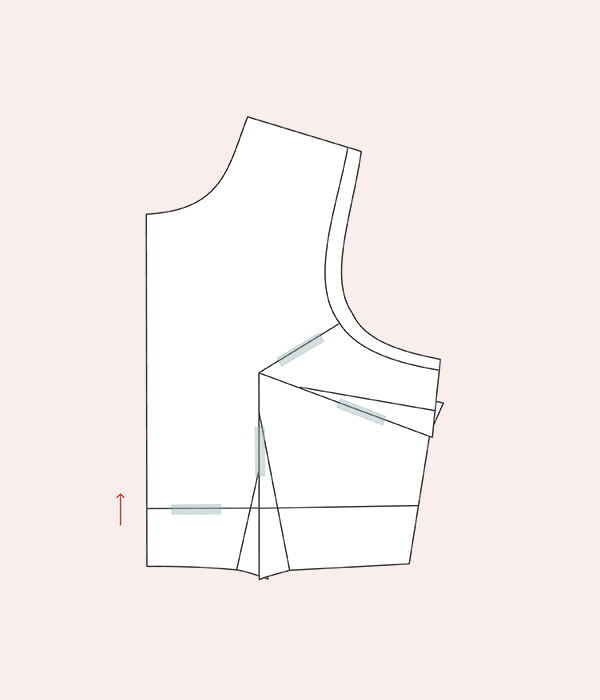
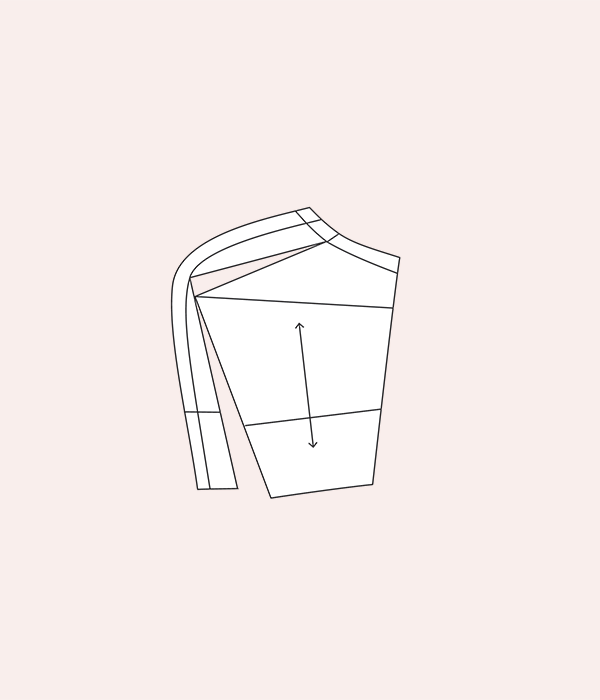
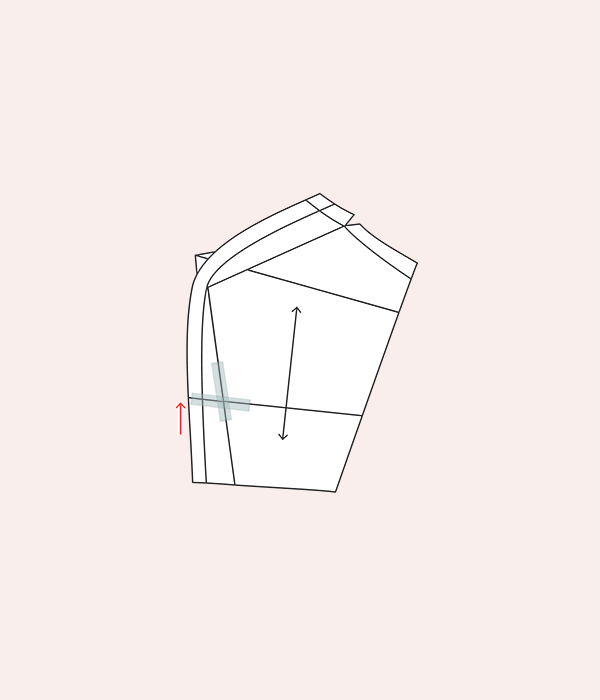
Small Bust Adjustments for Bodices with Princess Seams
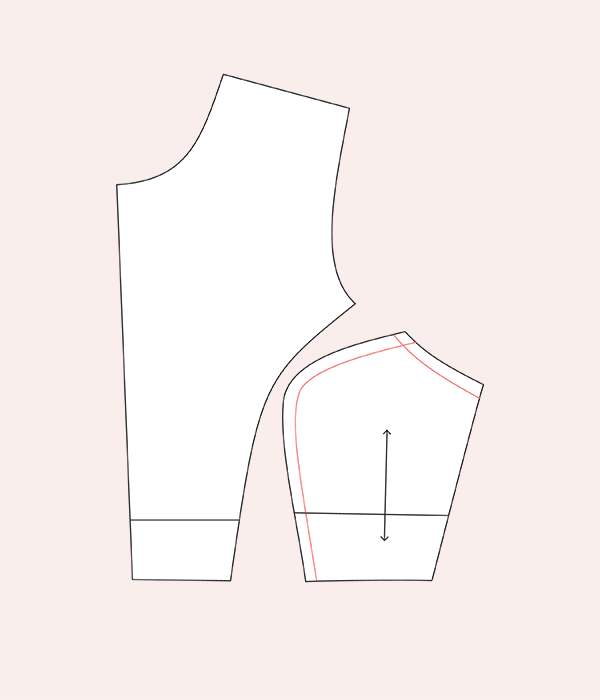
Prepare your pattern by tracing the front bodice, transferring all notches and markings. Also, on the side bodice piece, mark the stitch line at the armscye and the princess seam.
On front side bodice piece, draw a line from the bust apex to the waist. This is line A.
Draw a second line from the apex to the armhole. This is line B.
Draw a third line from the apex to the side seam. This is line C.
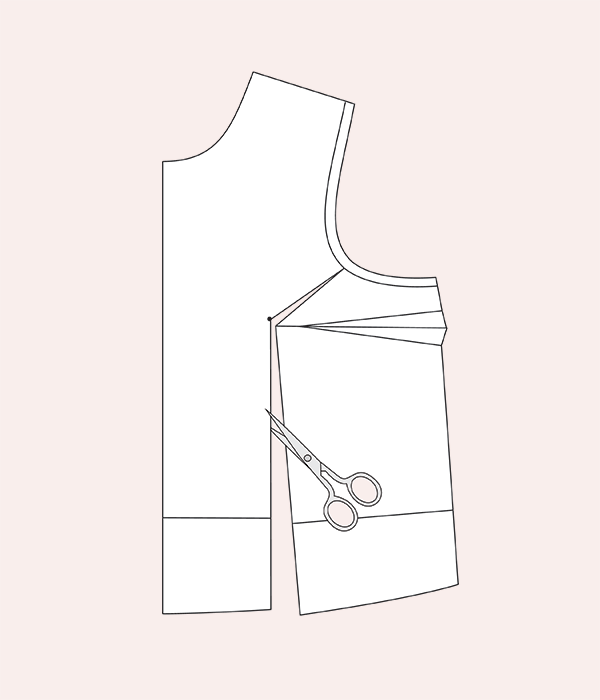
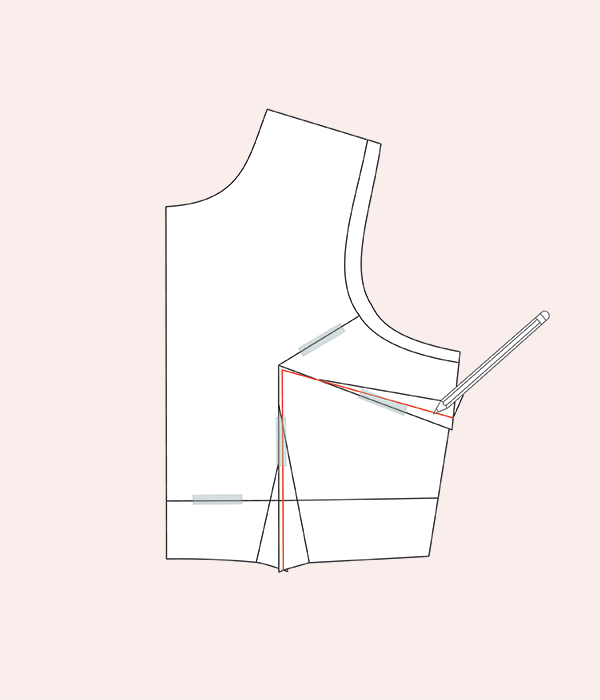
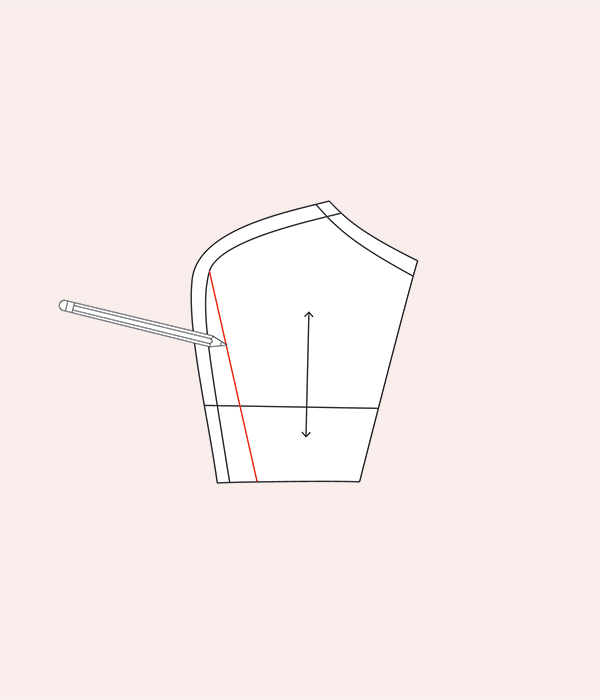
Using your paper shears, cut through line A, starting at the hem. Pivot at the bust point and continue cutting through line B, stopping at the armscye sewing line. Cut a small notch through the seam allowance at line B, leaving a small paper hinge at the sewing line.
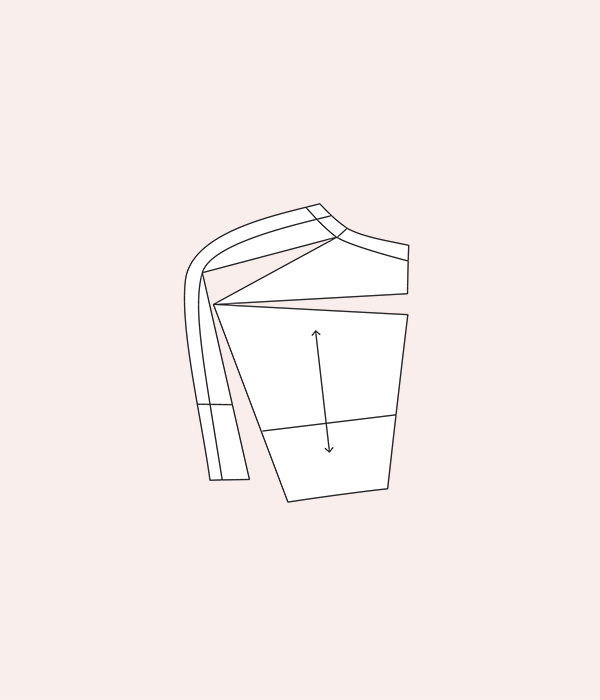
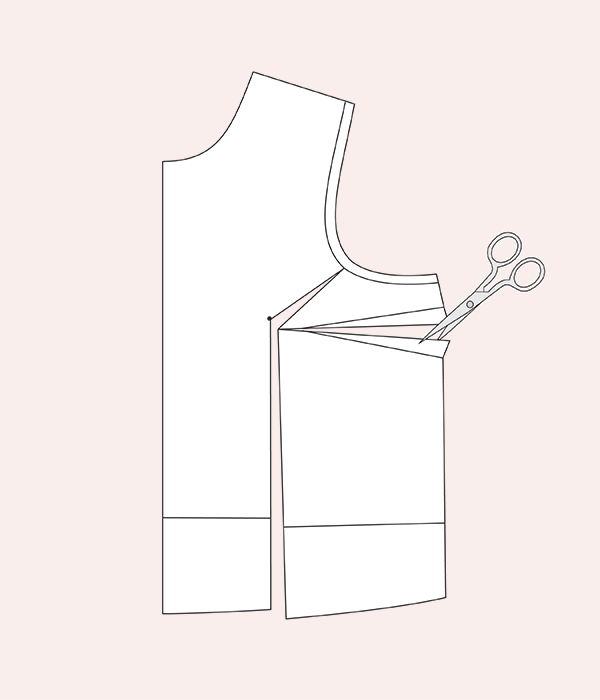
Next, cut through line C, starting at the side seam, leaving a small paper hinge at the bust point.
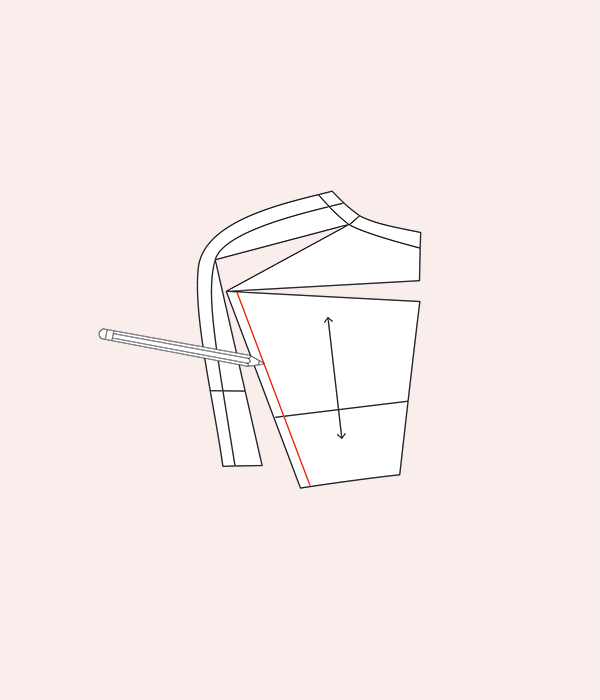
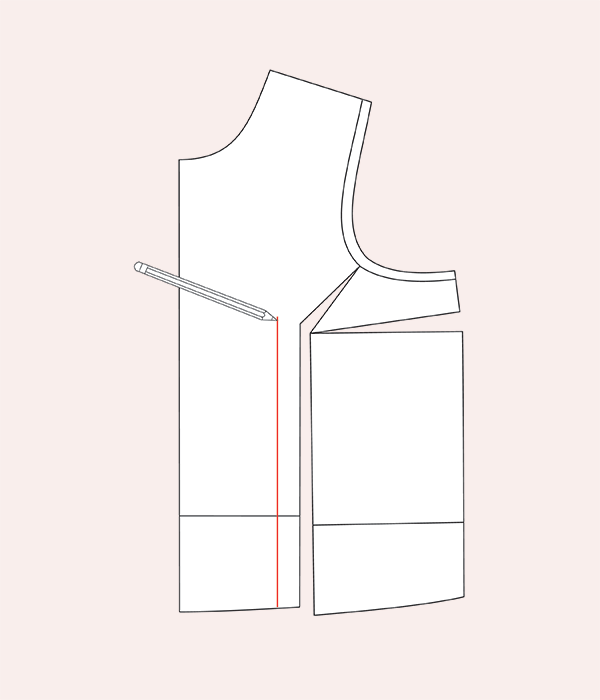
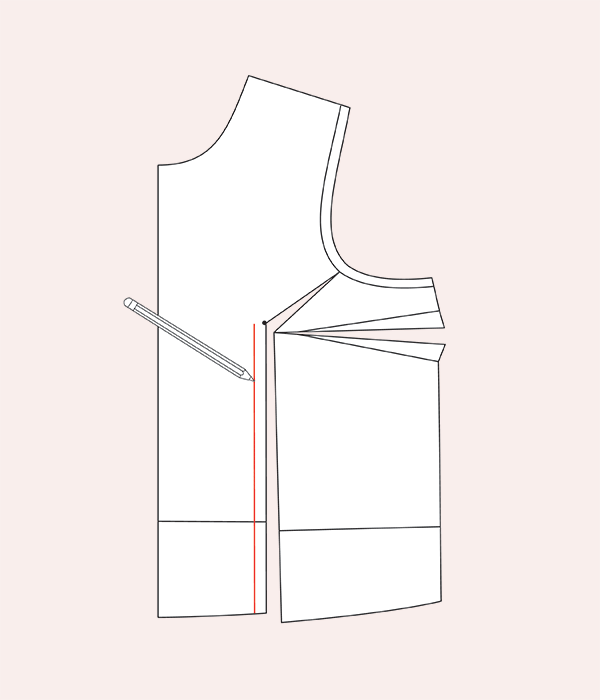
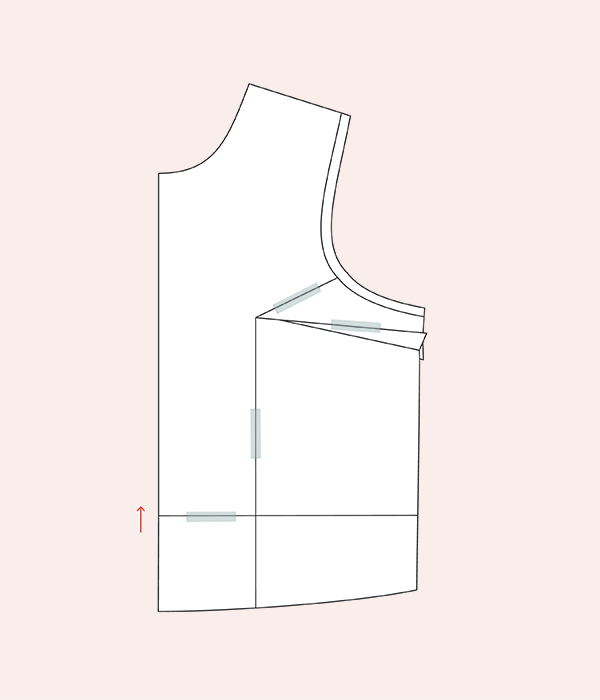
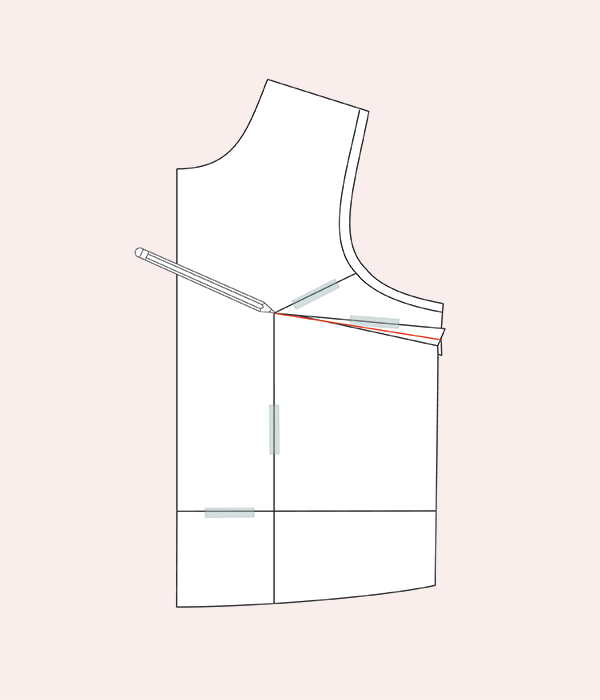
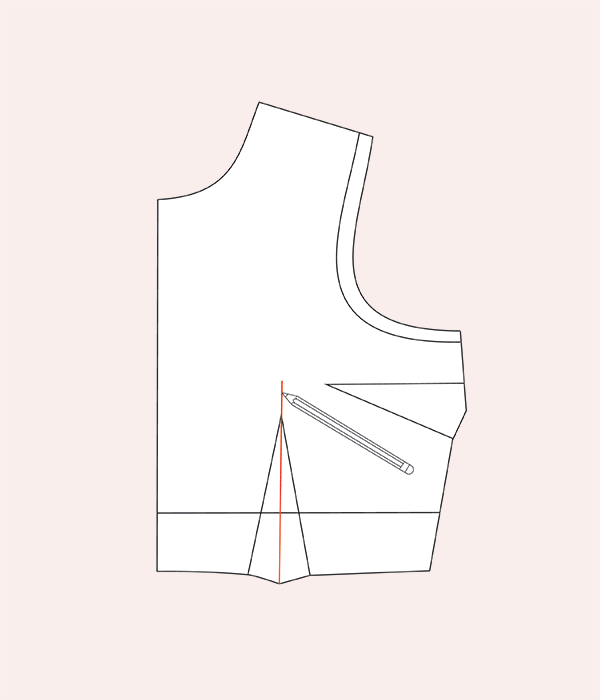
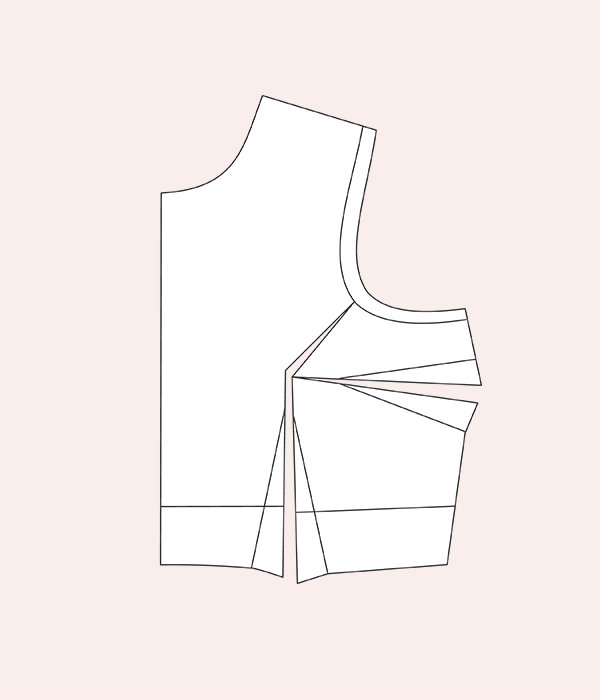
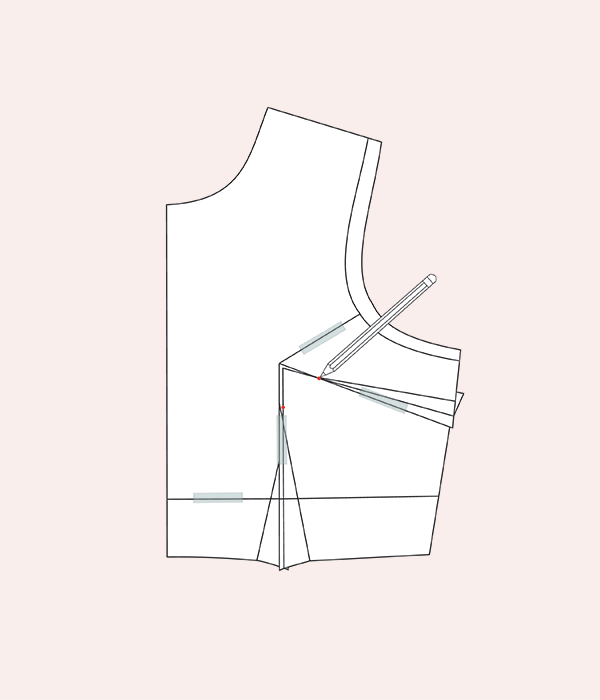
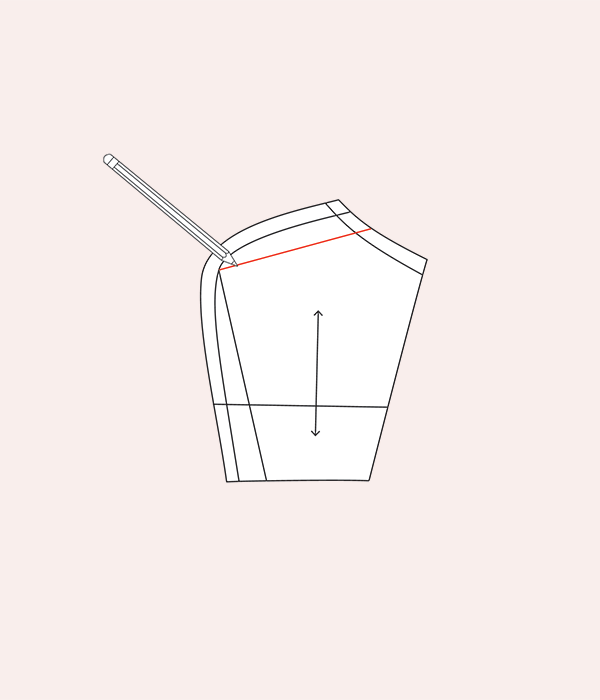
Divide your bust differential by 2. This is the amount that you will need to reduce. Draw a line this distance away from, and parallel to, the center front portion of line A.
Maneuver your pattern so that line A is on your reduction line. Tape.
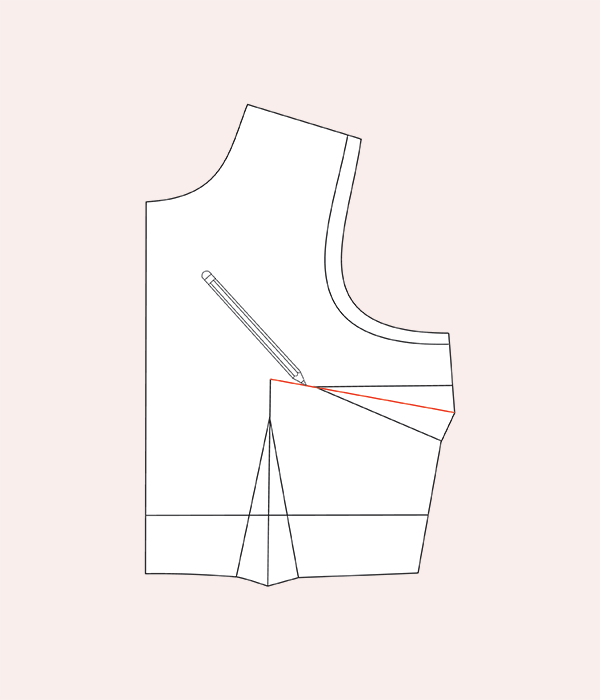
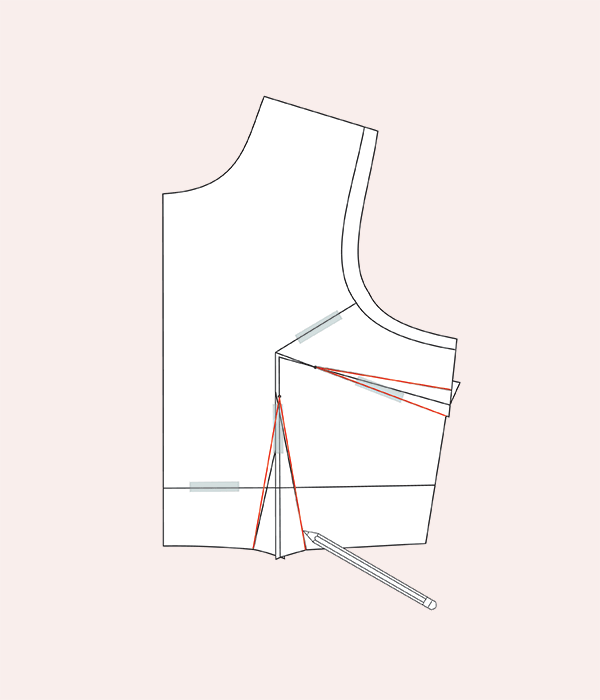
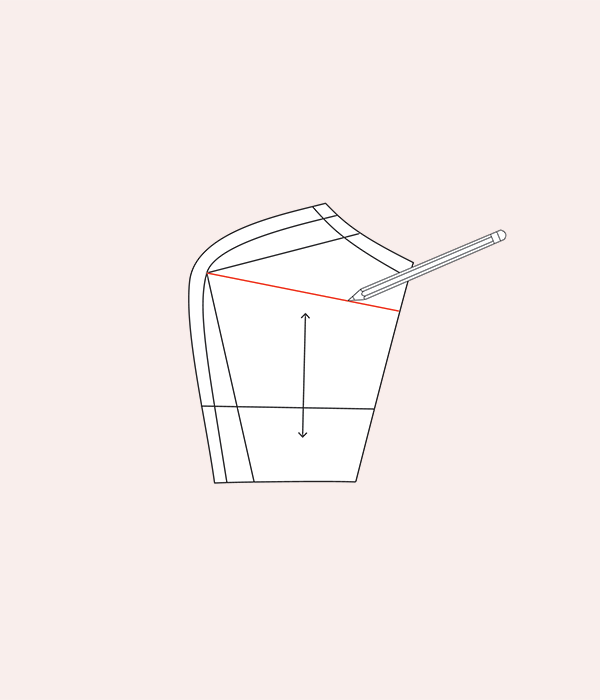
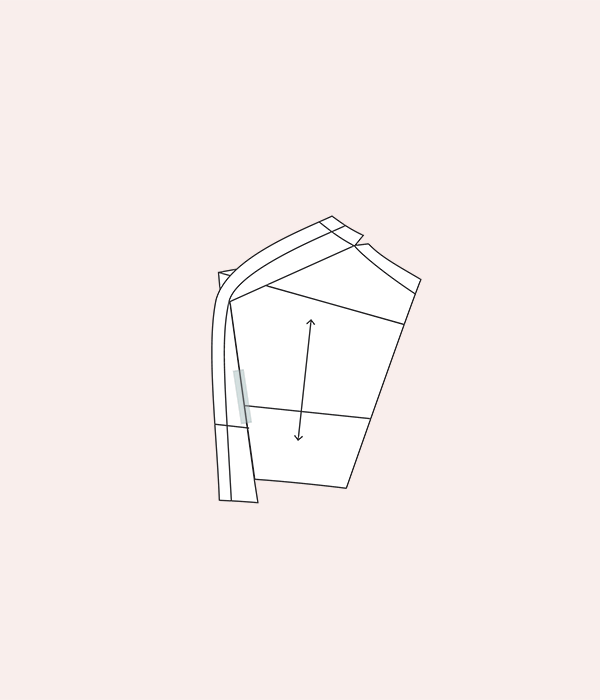
You will notice that the waist of your pattern is now two different lengths. A small bust requires less length. Use the lengthen/shorten line on the portion of the bodice that is nearest the princess seam so that the waist aligns with the side front.
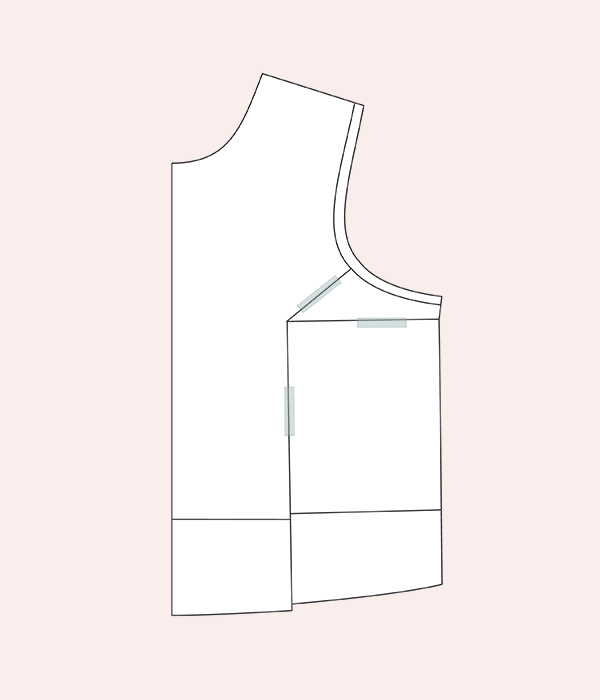
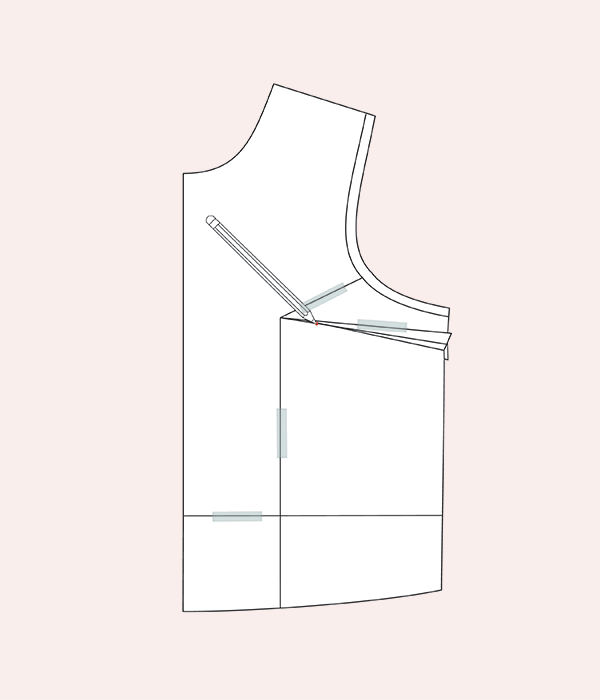
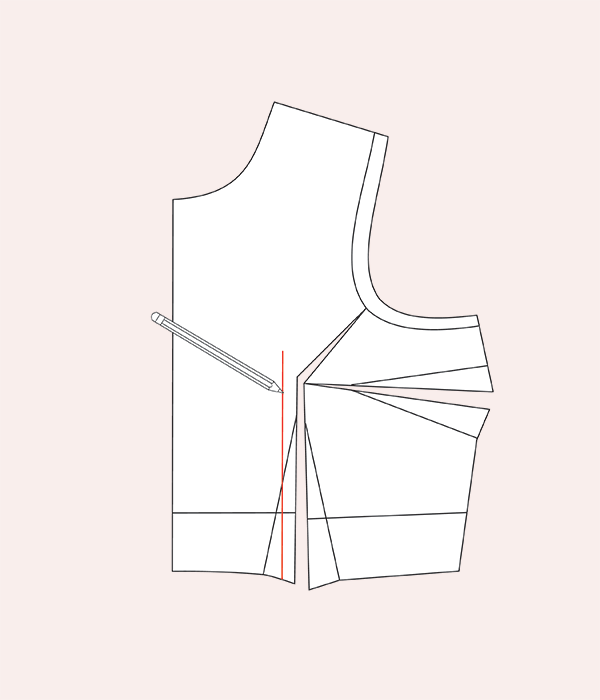
Trace the altered side front bodice.
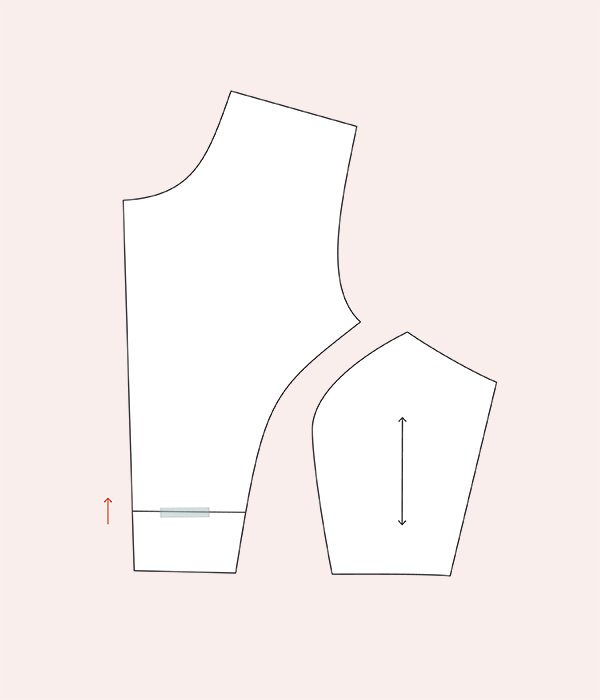
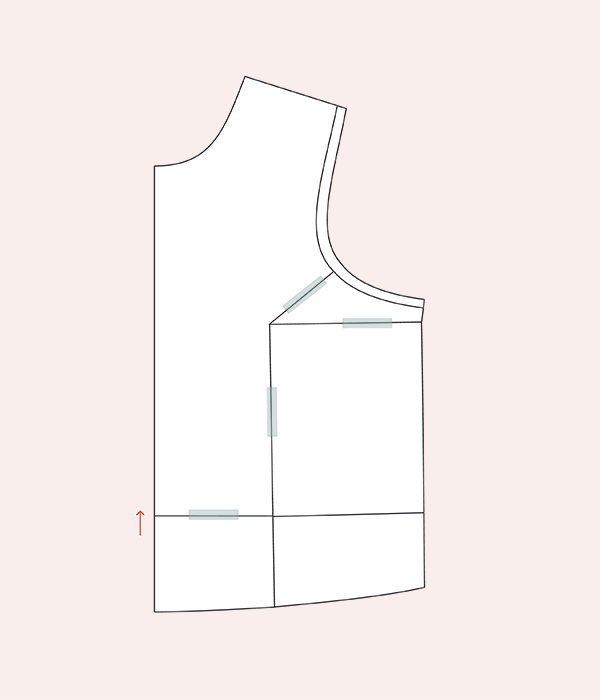
Reduce the length of the center front bodice to be consistent with what was subtracted from the side front bodice. Draw a line perpendicular to the grainline, at the same level that you subtracted length from your front side bodice. Cut along these lines and reduce the length as needed. Trace the altered pattern pieces.
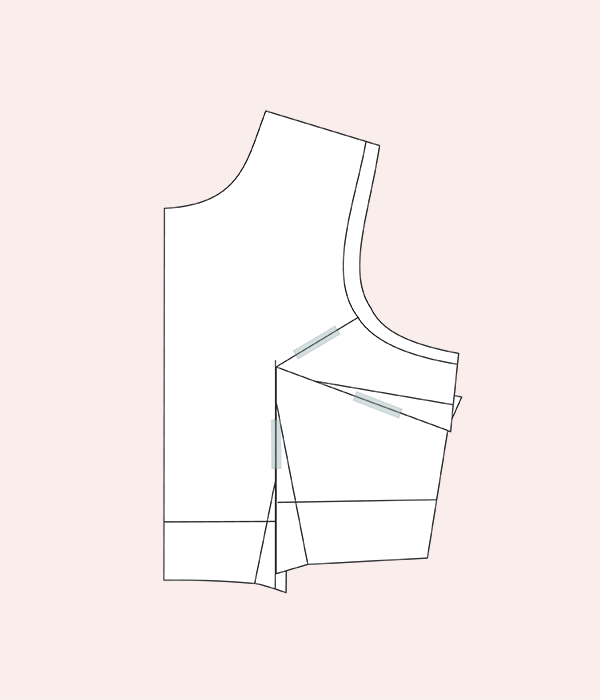
No additional adjustments need to be made to the rest of the pattern.

Haley Glenn
Designer
Haley doesn’t just want to design clothing you’ll love to wear, but clothing you’ll love to sew. With a background in both design and teaching, she combines her talents to imagine patterns with thoughtful details that build your skills as you sew.