
 Sign In
The Parker Sewalong is a step-by-step video series designed to guide you through sewing the Parker, from choosing your size to finishing the final details.
In this sewalong, we walk you through each stage of the process in short, focused lessons. You can move through the videos at your own pace, pause as needed, or skip ahead if you’re already comfortable with certain steps.
Parker is a chore coat designed for those who appreciate practicality and style. It has a gender-neutral fit, with a straight cut through the body and distinctive two-piece raglan sleeves. For unrestricted movement, it features subtle shoulder darts and a center back box pleat with a release at the mid-back.
To follow along, you’ll need the Parker Pattern. Seamwork members can download it as part of their membership, and non-members can purchase it individually in the shop.
Getting Started
Fabric recommendations: Look for medium-weight or heavyweight fabrics such as canvas, duck cloth, waxed canvas, flannel, denim, twill, and corduroy.
Fabric qualities to look for: When picking a fabric, prioritize what your machine can handle. This jacket is designed for sturdier fabrics, but there will be several places in the pattern where you must sew through multiple layers. If your machine doesn’t do well with heavyweight fabrics like duck or waxed canvas, opt for something medium-weight, like twill or an 8oz denim.
Seamwork members, take advantage of your member deals this month! You can save up to 20% off your order here.
Prepare to Sew
This lesson covers all the basic things you need to know to get started with this sewalong. If you’re a beginner, this will be really helpful to watch!
If you feel like you already know how to get your pattern and fabric ready for sewing, go ahead and skip to the next lesson and you'll learn to do some helpful fitting adjustments.
You're going to learn how to:
- Select a pattern and reference its skill level
- Select a size
- Prepare patterns and fabric
- Cut and mark fabric
Fitting Adjustments
You might be tempted to blend between sizes to create more shaping, but for garments with a straight cut, trying to blend can change the design and the overall fit. Instead, select the largest size you’ll need, make a muslin, and see if you need to pinch out any areas to improve the fit.
Parker features our gender-expansive fit, meaning it was developed and fit on both male and female bodies. It has generous ease, as it’s intended to be slightly oversized so you move comfortably. Pay attention to the sleeve and body length, and add or remove length as necessary.
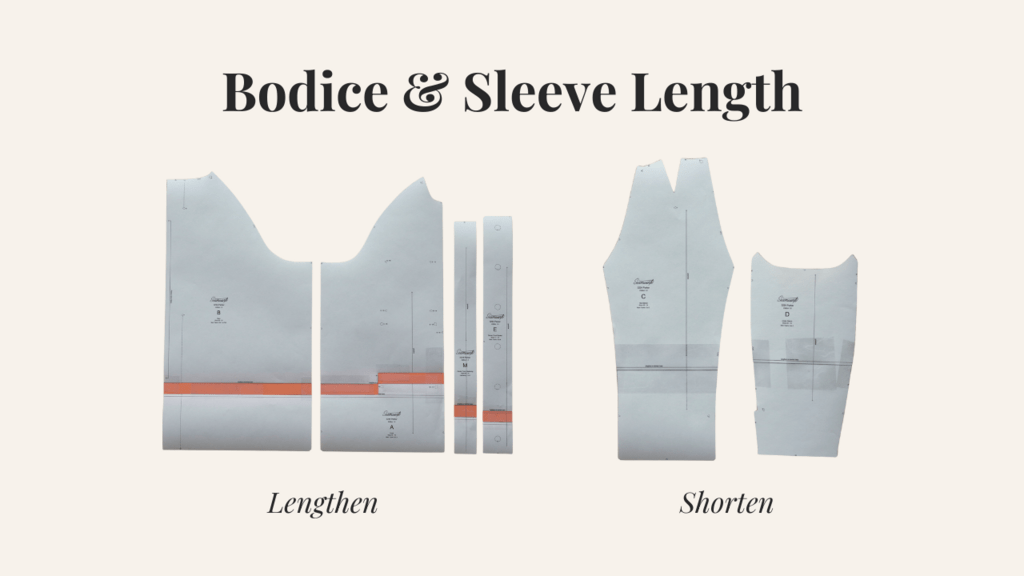
You can adjust the length of the sleeves and bodice to suit your preference.
Here are some additional fitting resources if you need them:
- Follow this tutorial to lengthen and shorten a sewing pattern
- If you need to blend between sizes, use this video tutorial.
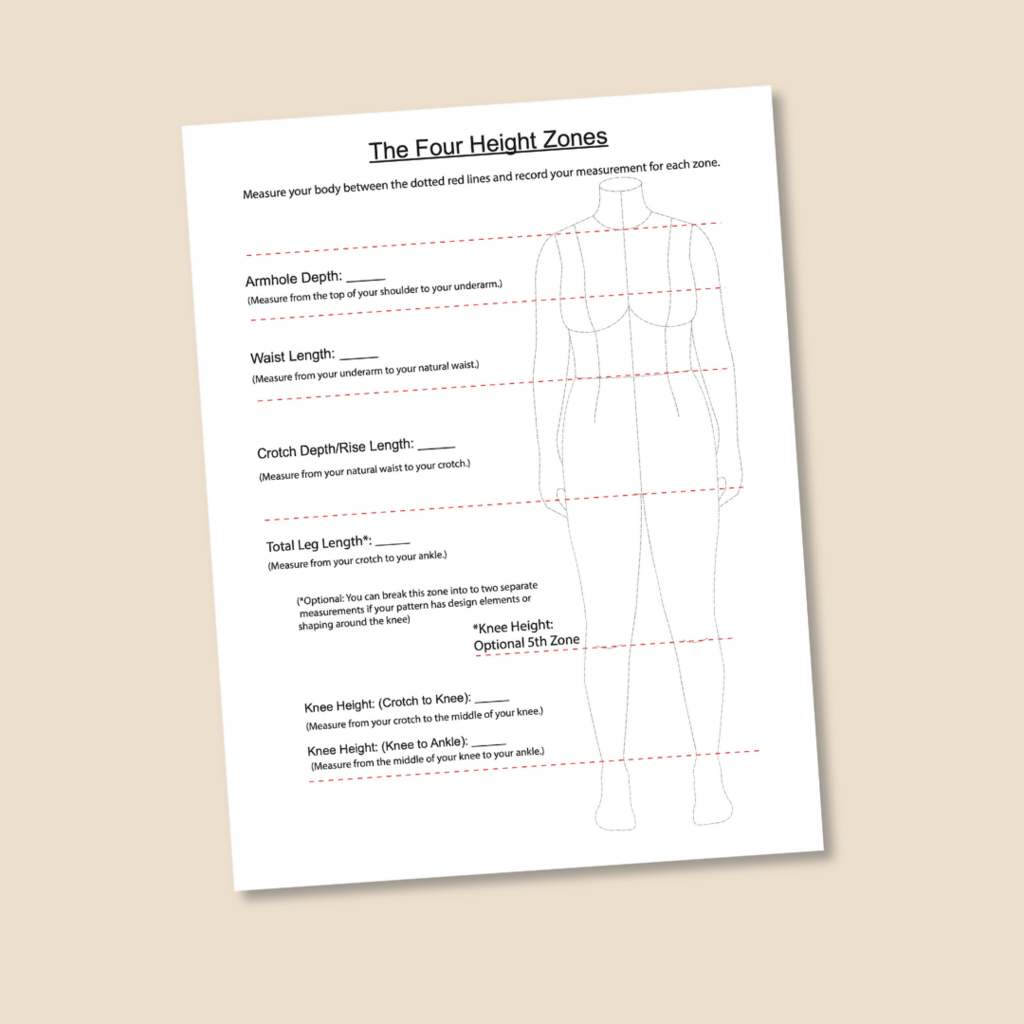
We created a free downloadable PDF called the Four Height Zones to help you gather the information you need to make adjustments to your pattern where you need it. We recommend printing it out and writing your height measurements on it to keep in your sewing journal.
Compare these measurements to the corresponding landmarks on your pattern pieces, and you'll know how much you need to shorten or lengthen that part of the pattern.
Sewing Instructions
The PDF instructions will be your main guide as you work through this pattern, but we've created this video to walk you through the trickiest steps in detail. If you need help on a step not shown in this video, check out the Community Group Sew, where other Seamworkers and staff are ready to help out!
If you're brand new to sewing, check out the Learn To Sew For Absolute Beginners course.
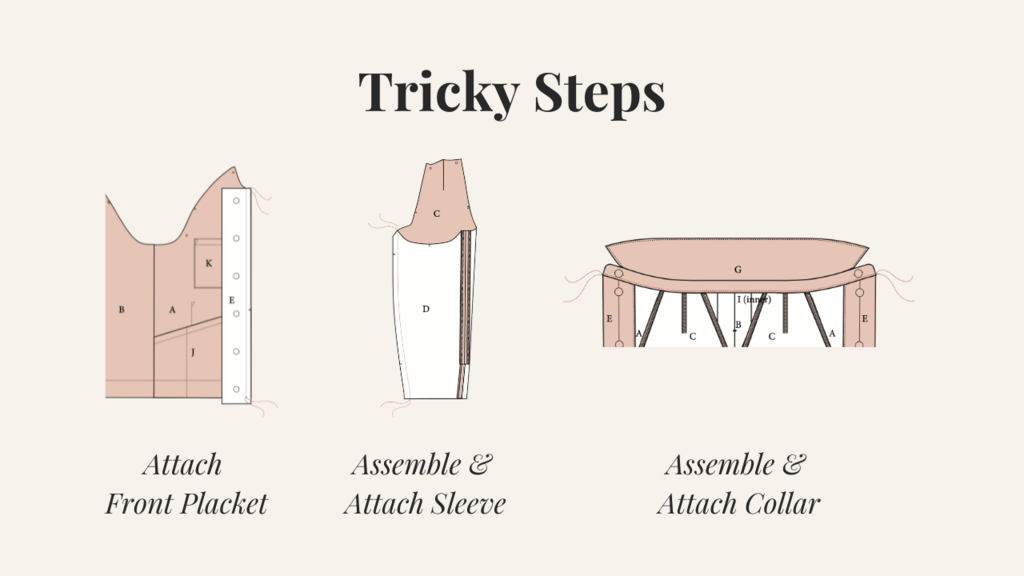
The trickiest steps for this pattern are:
- Attaching the front placket (02:08)
- Assembling and attaching the sleeve (10:20)
- Assembling and attaching the collar (24:09)

