
 Sign In
You've probably seen it on vintage lingerie, delicate blouses, or a beautifully finished wrap dress: that graceful scalloped edge that makes a garment look like it came straight out of a couture workroom. And you've probably thought, there's no way I could do that at home.
Here's the thing — you can. And you don't need any specialty tools, just your regular home sewing machine and a bit of patience.
The frustrating part is that most tutorials out there either skip critical steps or assume a level of skill you might not have yet. So you go searching, hit a wall, and give up before you've even started. I've been there too. I spent years admiring images of vintage scalloped hems on Pinterest before I finally found the resource that made it click for me. Once I did, I made the technique a centerpiece of an entire dress — and it completely transformed the look.
In this article, I'll walk you through everything you need to know to create a beautiful vintage scalloped hem on your home sewing machine, from materials and machine setup to the step-by-step technique itself.
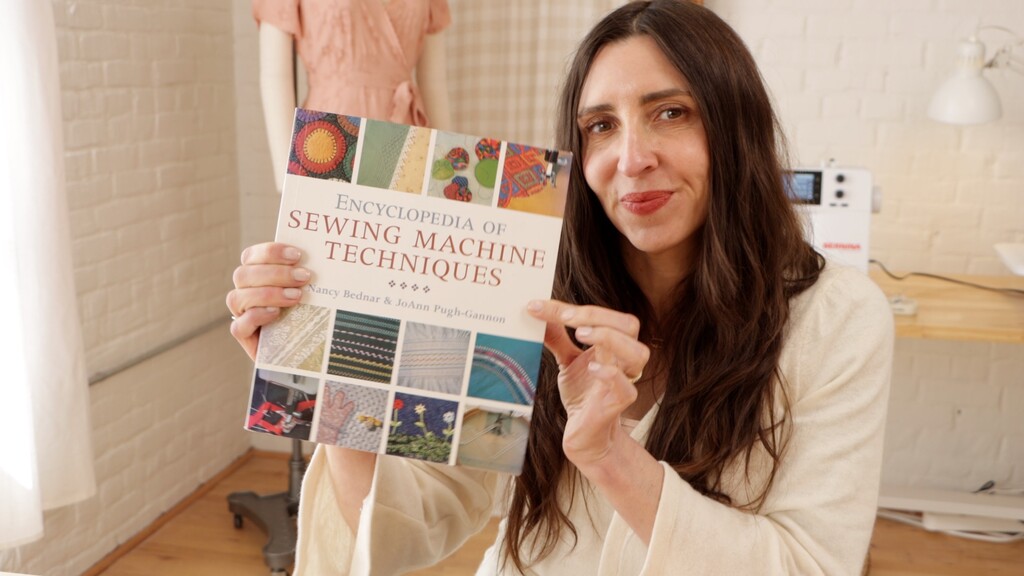
The Book That Changed Everything
My obsession with this technique started the same way most of my sewing rabbit holes do: Pinterest. I'd been collecting images of gorgeous vintage pieces — mostly old lingerie — that featured these delicate little scalloped edges, often stitched in contrasting thread colors. They looked so elegant and intentional. The kind of detail that makes a garment feel genuinely special.
I'd been telling myself "someday I'll figure that out" for years, until I came across the technique explained in a book called Encyclopedia of Sewing Machine Techniques. If you haven't heard of it, this is the kind of book you reach for again and again. It shows you exactly how to execute heirloom techniques on a regular home machine — which stitches to use, which feet, which settings. All of it, laid out clearly, without assuming skills you don't have yet.
Most online tutorials don't give you that level of detail. This one does.
How This Technique Works on a Sewing Pattern
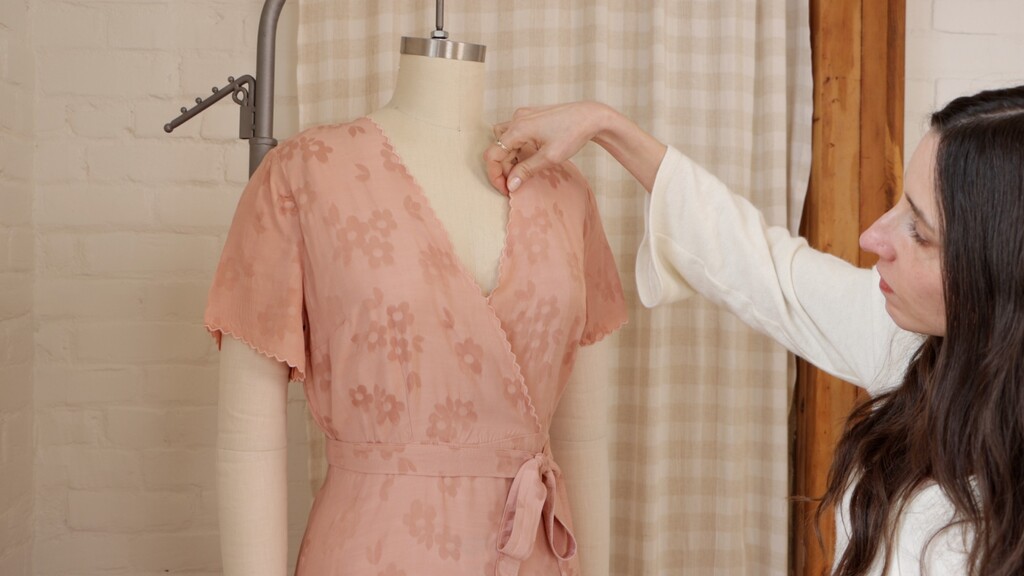
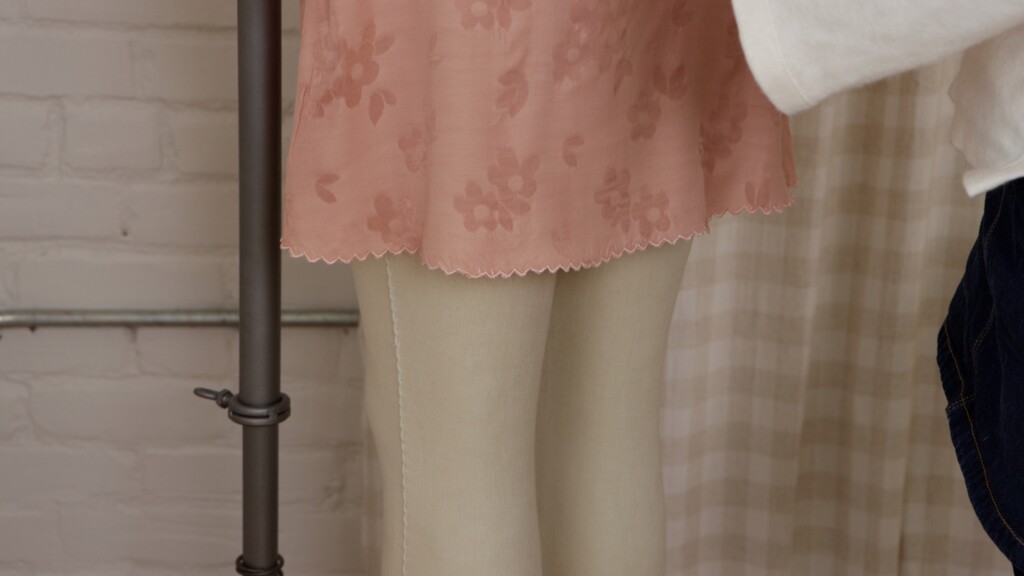
Once I had the technique down, I knew immediately where I wanted to use it: the Seamwork Posey dress. Wrap dresses are honestly perfect for this kind of detail, because those front edges are constantly on display — the hem crosses the entire front of the body, so it becomes a major design feature rather than something that gets tucked away.
I applied the scalloped hem to three key places on my Posey:
The front and back necklines — and here's a really satisfying bonus: because the scalloped stitching creates its own clean edge, you can skip the facings entirely. Both front and back. The stitched scallop completely replaces the facing, which actually simplifies construction quite a bit.
The sleeve hems — instead of the traditional turned hem, the scalloped edge does the finishing work. I also shortened the sleeves slightly, but that was purely a style choice for this particular look.
The entire skirt hem — this is where the technique really gets to shine. The flowing movement of a scalloped edge adds so much visual interest, and on a wrap dress, the effect is just beautiful.

What You'll Need
Preparation really is everything with this technique. The book is specific about materials for a reason — and I learned pretty quickly that following those recommendations closely is the key to getting clean, professional results.
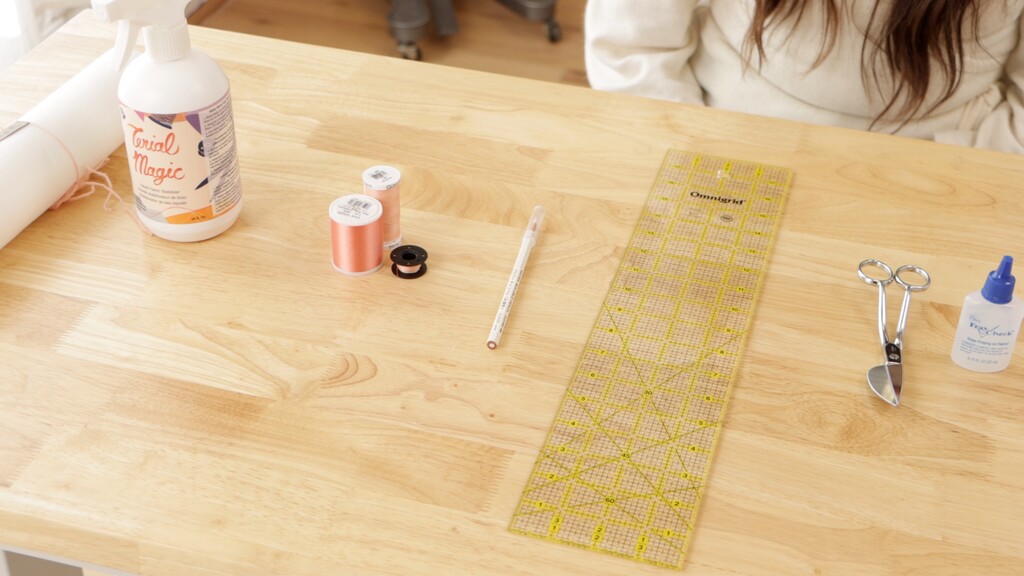
Fabric: The original instructions call for firm wovens like linen, batiste, or broadcloth — fabrics with enough body to support the decorative stitching without puckering. If you're trying this for the first time, start there. Once you've mastered the process, you can experiment with other fabric weights. I used a card-weave rayon for my Posey, which has a lot more drape than the book recommends. It absolutely worked, but I had to be more careful with stabilization and tension settings. Beginners, stick with the firm wovens first.
Lightweight tear-away stabilizer: This is non-negotiable. Depending on your fabric weight, you may need single or double layers. It's what keeps your stitching clean and prevents any puckering or distortion.
Spray starch: Another essential. You'll use this to prep your fabric edges before stitching, giving them extra body and stability. It makes a real difference in how crisp and even your scallops form.
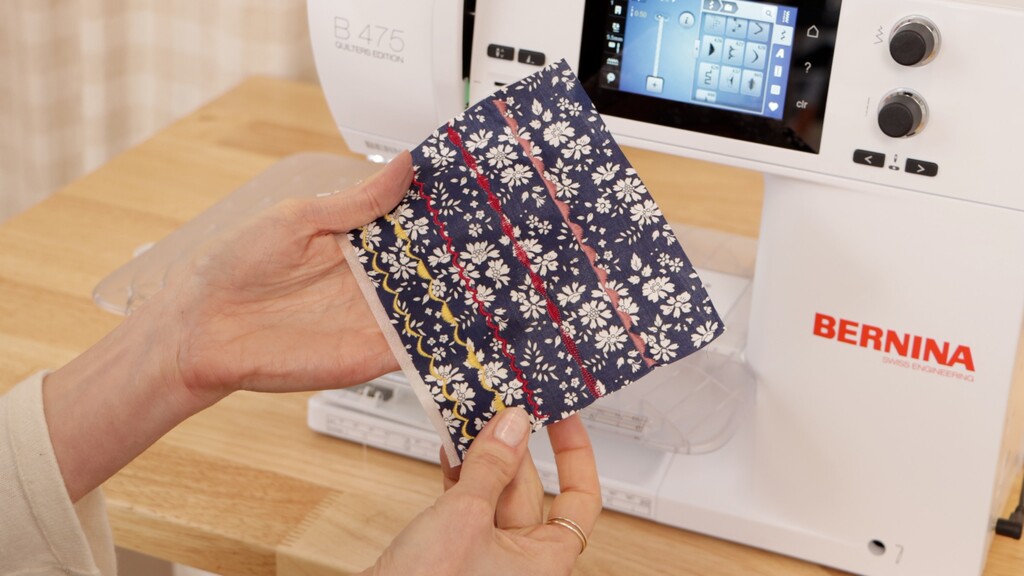
Thread: The book specifies rayon embroidery thread for the needle and polyester thread for the bobbin. The rayon gives you that beautiful sheen and covers smoothly; the polyester provides stable support underneath. I used Madeira 40 WT Rayon Embroidery Thread from Wawak — it has just a hint of sheen to it, and I think it genuinely enhances how the stitches look.
Heat-erasable or water-soluble fabric marker and a clear ruler: You'll use these to mark your stitching guideline — typically half an inch to one inch from your raw edge.
Seam sealant and fine-tipped embroidery scissors: These are essential for the trimming phase. You want precise, clean cuts right up against your stitching line, and the seam sealant prevents any fraying after you trim.
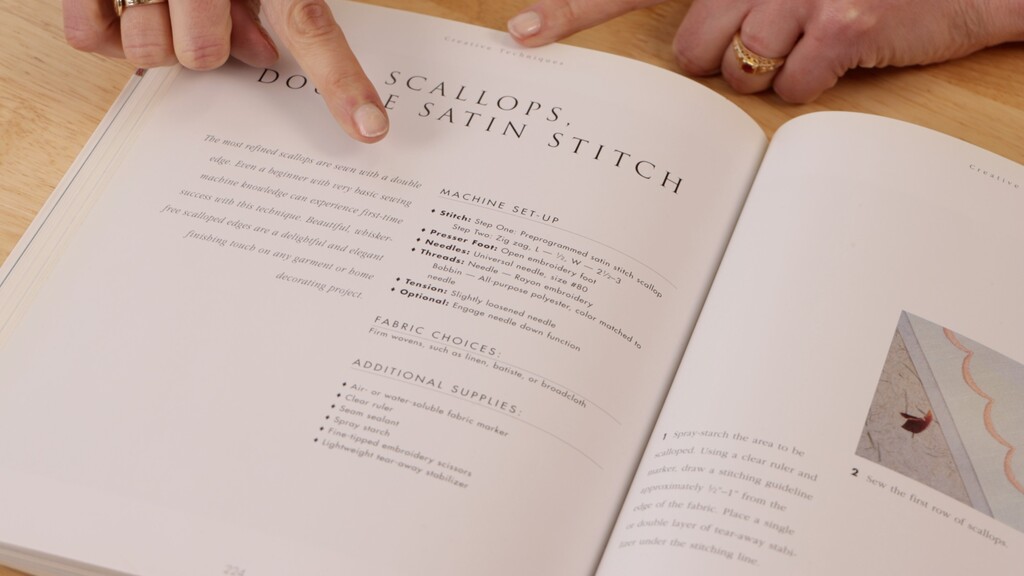
On your sewing machine, you'll need two stitches: a preprogrammed satin stitch scallop and a basic zigzag. Most modern machines have both. You'll also want an open embroidery foot — it lets you see exactly where your stitching is going, which matters a lot for keeping those scallops consistent — and a Universal 80 needle.
The Testing Phase (Don't Skip This)
The book makes a big deal about testing before you start on your actual garment, and I cannot second this enough. What you learn from a few test runs becomes your roadmap for the real thing. Skipping this step is the fastest way to end up frustrated.
For the machine setup, here's what the book recommends — and what worked well for me on my Bernina:
Start with your preprogrammed satin stitch scallop. On the Bernina, I like stitch 428 at length 10, width 6. For the second pass, switch to a zigzag at length 0.5, width 2.5 to 3. These settings aren't one-size-fits-all, though — use scrap fabric and adjust until you find a scallop shape you love.
The book also suggests loosening your needle tension slightly and engaging your needle-down function if you have it. This really does help maintain consistency, especially around curved sections.
During testing, pay attention to how your stabilizer performs. Some fabrics need double layers; others are fine with one. You also want to test both straight grain and bias sections of your fabric, especially if you're planning to use this technique on curved edges like necklines.
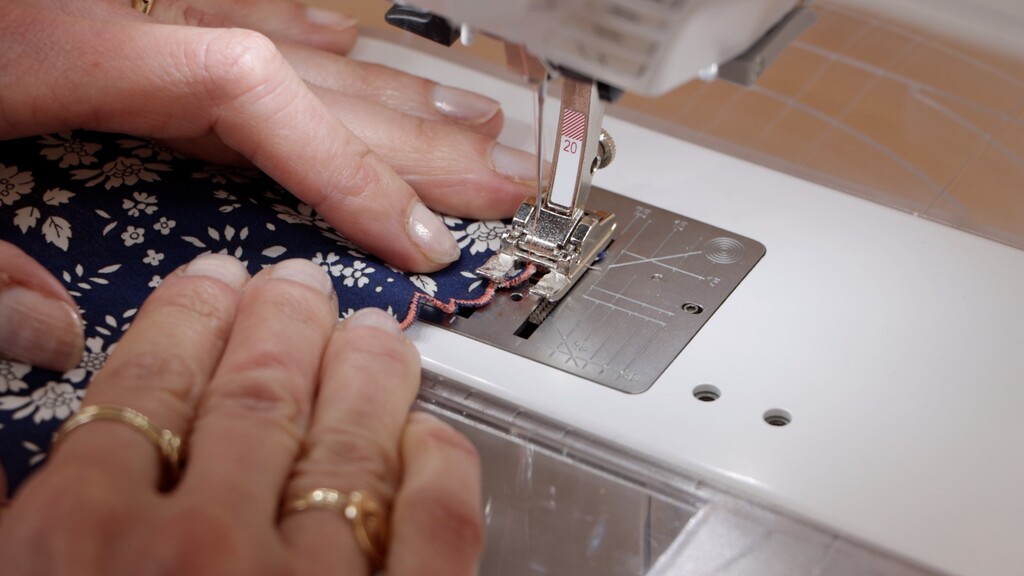
Step-by-Step: The Scalloped Hem Technique
Step 1: Prepare Your Fabric Edge
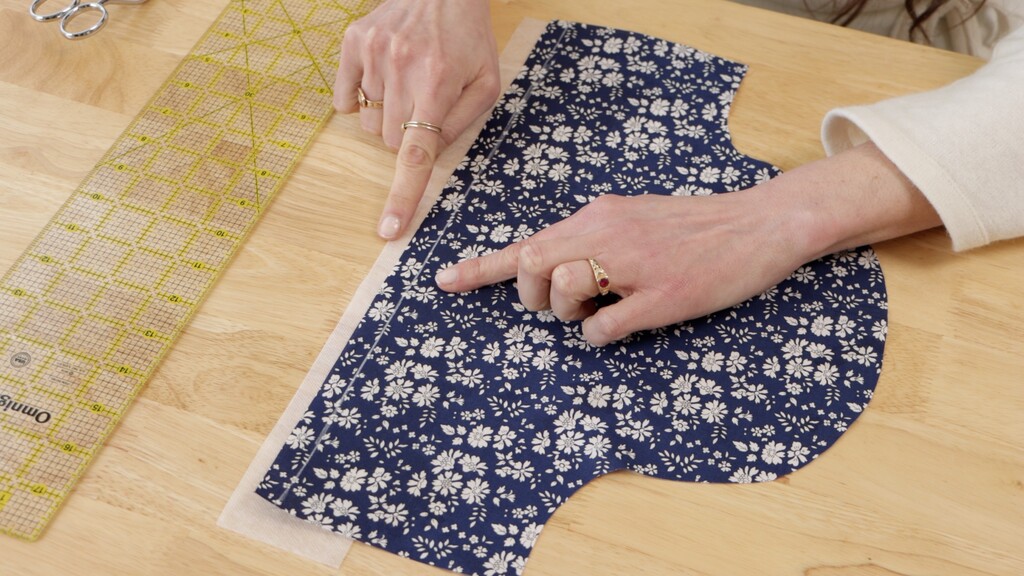
Spray starch your fabric edges and let them dry completely. This gives the fabric the body it needs to stitch without puckering. Then use your ruler and fabric marker to draw your stitching guideline — half an inch to one inch from the raw edge, depending on your fabric weight. Heavier fabrics get closer to an inch; more delicate ones stay closer to half an inch.
Next, position your tear-away stabilizer so it extends beyond that marked line. You want every bit of your stitching to be fully supported.
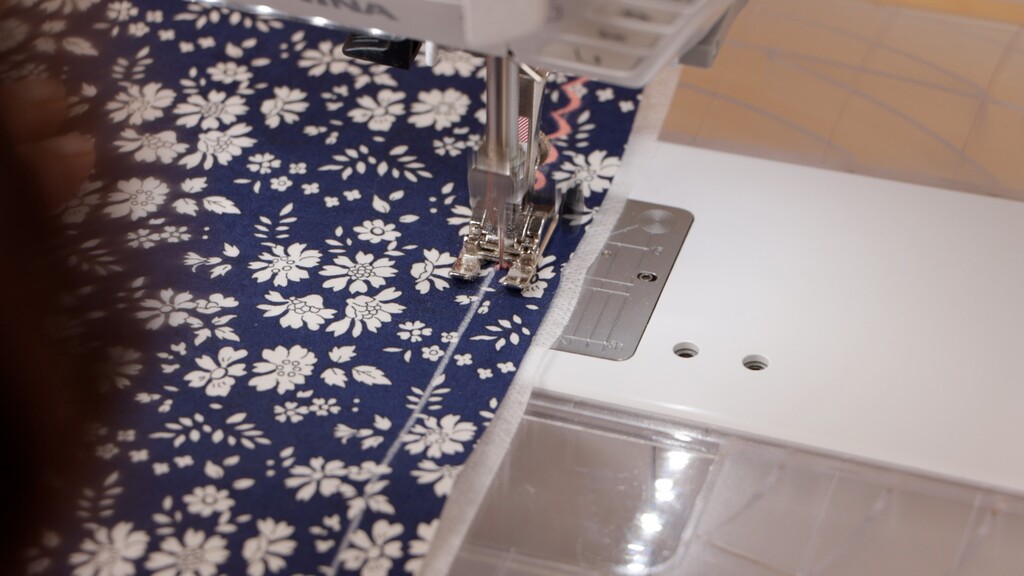
Step 2: First Scallop Pass
Stitch directly on your marked guideline, letting the scallops extend toward the raw edge of the fabric. Keep a steady, moderate speed and let the machine do the work. Watch how your scallops form as you go — if they're not coming out cleanly, stop and troubleshoot your tension or stabilizer before you continue. It's much easier to fix now than after you've stitched an entire neckline.
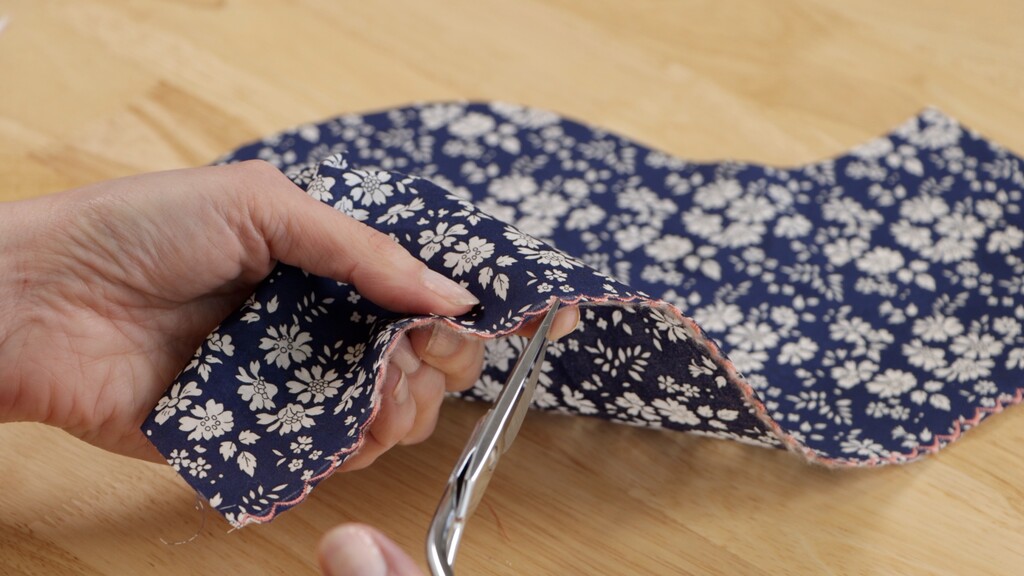
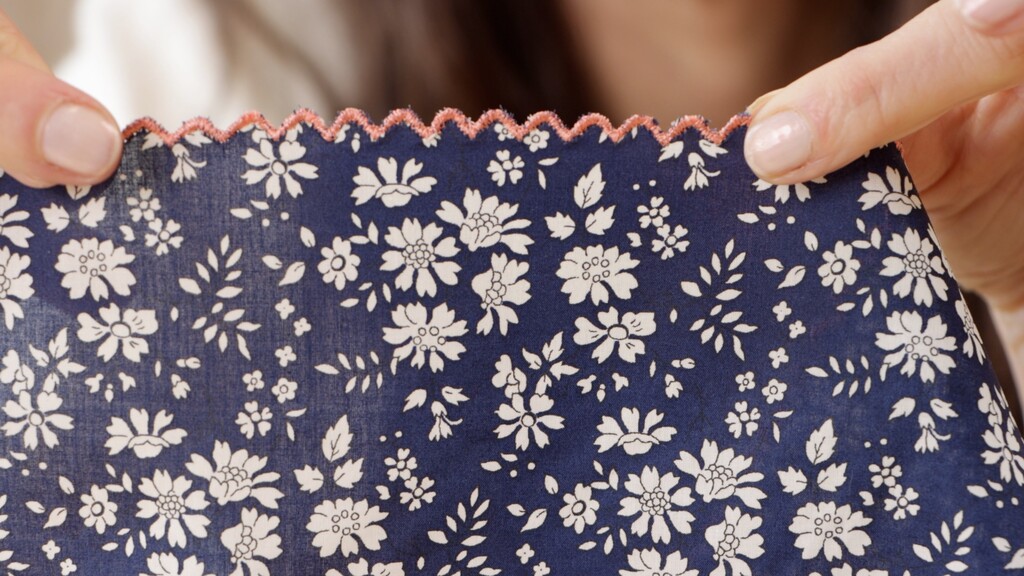
Step 3: Remove Stabilizer, Trim, and Seal
Carefully remove the tear-away stabilizer, then trim close to your scallop stitching using your fine-tipped embroidery scissors. You want to get as close as possible without cutting any threads. Once you've trimmed, apply seam sealant to the cut edges. This step is especially important if you're working with a loosely woven fabric.
Step 4: Final Zigzag Pass
This is the finishing pass that encases the raw edge completely, creating that clean, polished finish. Position your fabric so the left swing of the zigzag catches the fabric and the right swing goes off the edge entirely. Work at a consistent speed, manipulating the fabric gently with your hands to keep the edge feeding evenly.
This step requires a bit of rhythm to get right — but if you've done your preparation carefully, it should feel smooth and controlled. Each step really does set you up for the next one.
A Few Things to Know Going In
I want to be honest about what this technique actually involves, because I think it makes a difference to go in with the right expectations.
It is time-consuming — especially that second pass with the zigzag. You have to go slowly and guide the fabric carefully with your hands the entire time. When you're doing an entire dress, that's a lot of stitching. It took real patience. But the result was absolutely worth it.
If you're working with a drapey fabric like I was, the edges may want to curl a bit after stitching. Pressing fixes this completely. It doesn't look great straight out of the dryer, but once it's pressed, the scallops lie flat and look beautiful. A small trade-off for the overall effect.
And if you end up with a small section where the stitches aren't perfectly even — that happened to me too — take a breath. This technique is actually quite forgiving. The decorative quality of the stitching means minor variations blend right in. It adds to the handmade charm rather than detracting from it.
The Finished Result
What I love most about this technique is how it transforms construction steps you'd otherwise hide into actual design features. Instead of facings buried inside a neckline, you get a beautiful decorative edge. Instead of a plain turned hem, you get a detail that catches the eye.
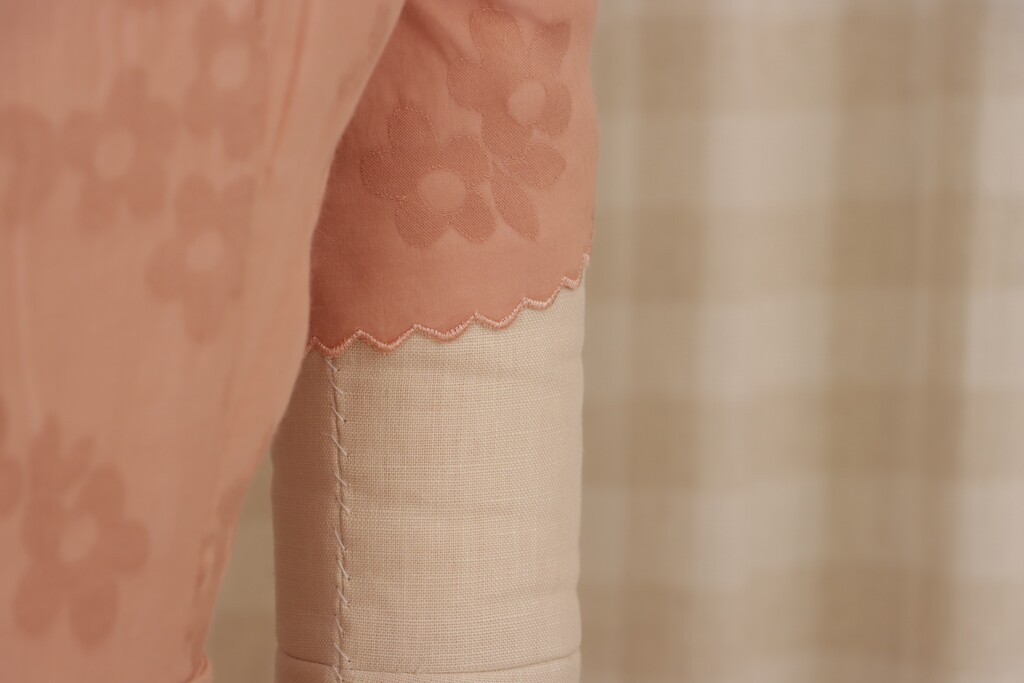
The scallops on the bias sections — like the curved neckline — came out especially well. No distortion, no puckering, just clean curves that follow the edge beautifully.
Next time I use this technique, I want to try it in contrasting thread colors. I've seen that on vintage garments and the effect is stunning — contrasting scallops at the hem with coordinating embroidery details elsewhere. That's definitely on my sewing to-do list.
If you want to explore more finishing options and figure out which hem technique is right for any project, my free hemming guide cheatsheet is a great place to start. You can grab it using the link below — it covers everything from blind hems to hand-rolled edges, so you always have the right tool for the job.
And speaking of hems that disappear entirely rather than becoming the star of the show — if you've ever struggled with visible stitching lines or an uneven blind hem, read this article on creating a perfectly invisible hem from the right side of your fabric.
Have you tried any heirloom or decorative stitching techniques on your home machine? I'd love to know what you've been experimenting with.

