
 Sign In
Have you ever examined an expensive coat or dress and wondered how they achieved that perfectly clean hemline with no visible stitching? That polished, professional finish isn't magic. It's a blind hem, and it's absolutely something you can master on your home sewing machine.
I used to think blind hems were this mysterious couture technique that required special skills or hand-sewing expertise. But after nearly 30 years of sewing, I can tell you that once you understand the setup, blind hems become one of your most valuable finishing techniques. They're perfect for creating that high-end look we all want in our handmade wardrobes.
Today I'm walking you through everything you need to know about sewing blind hems, including a simple folding trick that makes this technique foolproof even if you're just starting out.
Essential Tools for Success
Before we dive into the technique, let's talk tools. Having the right equipment truly makes the difference between a frustrating experience and a satisfying one.
Seam gauge or clear ruler: This isn't optional. Consistent hem width is what separates gorgeous results from wonky ones, and eyeballing it just doesn't work. I learned this the hard way on a wool skirt years ago!
Pressing cloth: Here's the thing about blind hems: they're supposed to be invisible, but if you press them wrong, you'll end up with a visible line on the right side of your fabric that defeats the entire purpose.
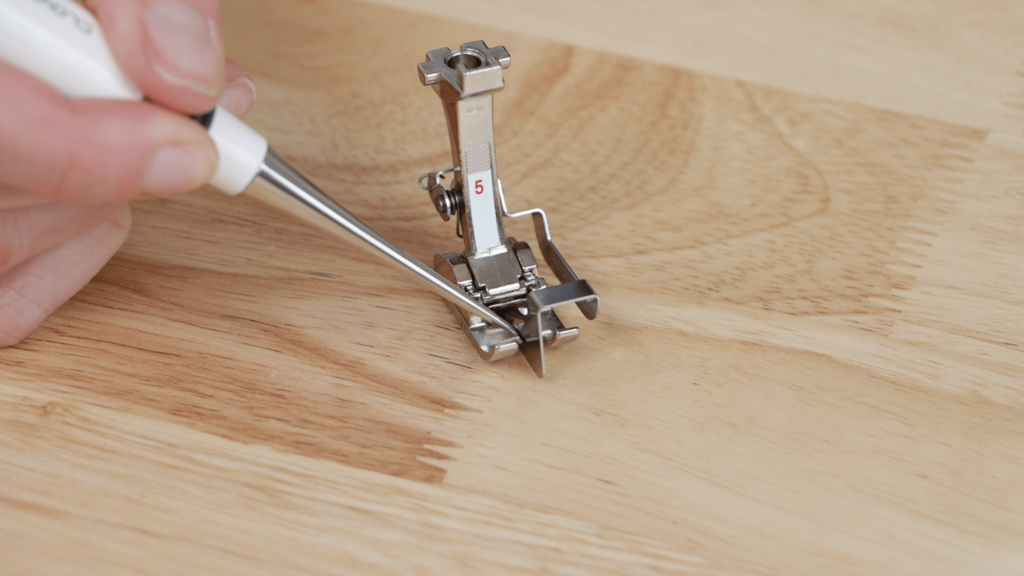
Blind hem foot: Now, you can absolutely sew a blind hem with a regular presser foot, but after many years of sewing blind hems both ways, I think the blind hem foot is one of the best presser feet you can invest in. It provides a handy guide that makes this technique so much more precise and consistent.
When to Choose a Blind Hem
Blind hems really shine on dresses, skirts, pants, and blouses where you want that hem to completely disappear. Think of it like the difference between a picture frame that draws attention to itself versus one that lets the artwork be the star. That's what a blind hem does for your garment.
They're absolutely perfect for tailored pieces like jackets, coats, and trousers. If you've ever looked at expensive ready-to-wear and wondered how they achieved that clean, polished hemline, chances are it's a blind hem.
Here's something many sewists don't realize: blind hems are actually less bulky than traditional hems, which makes them ideal for thick fabrics. When you're working with wool coating or heavy denim, a regular double-fold hem can create this thick, lumpy ridge that's anything but attractive. A blind hem solves that problem beautifully.
They're also your best friend for deep hems and shiny fabrics where every stitch would show like a spotlight.
When NOT to Use a Blind Hem
Understanding the limitations is just as important as knowing the technique. Sheer fabrics are a definite no. The whole point is that these stitches are hidden, but on sheer fabric, everything shows through anyway.
Also, if you're hemming something that's going to get a lot of wear and tear—think kids' play clothes or work pants—the wide stitches used in a blind hem just aren't as durable as a regular hem. They're designed for finesse, not heavy-duty use.
And anything that requires a narrow hem isn't a good candidate either. Blind hems need depth to work their magic.
Setting Up Your Hem
This is where most people rush and end up disappointed with their results. Proper preparation is everything.
Make sure your hem allowance is deep enough. You need at least one inch, but I prefer working with two inches when possible. It gives you more to work with and creates better results. If your pattern doesn't have a deep hem, you'll need to extend it when cutting unless you want your garment to end up shorter.
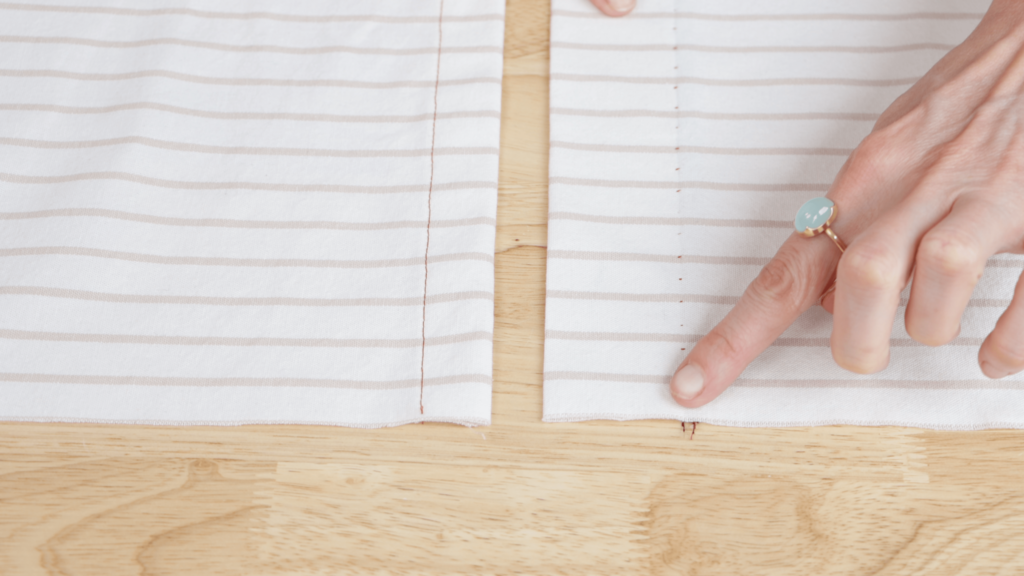
Next, finish that raw edge. You can use a serger if you have one, or a simple zigzag stitch on your regular machine. This edge will remain visible on the inside of your garment, so leaving it raw isn't just messy. It's asking for fraying problems down the line.
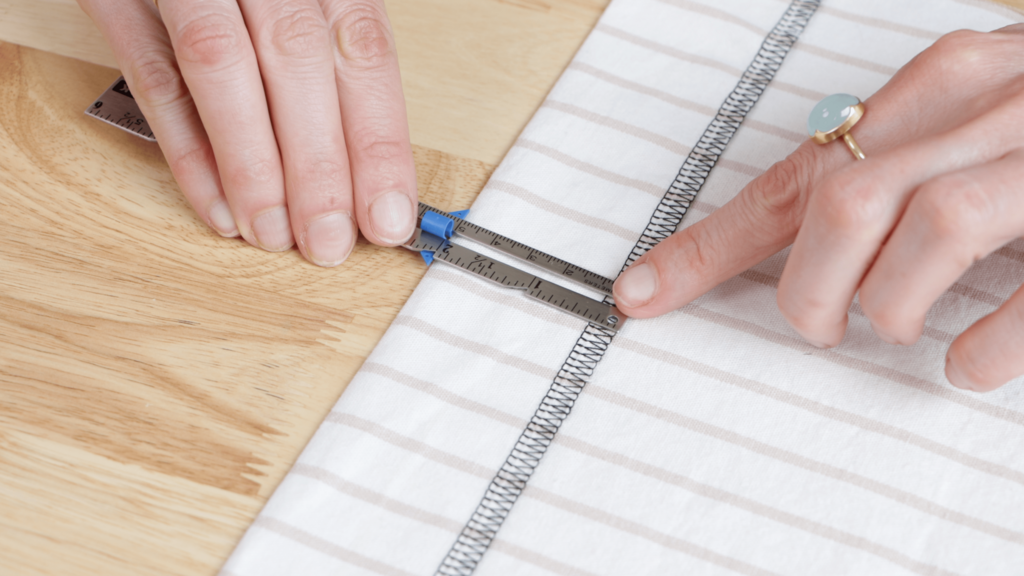
Now comes the folding and pressing. Measure all around your hemline to ensure consistent width. This is where that seam gauge really earns its keep. Fold your hem at the hemline and press it in place, but here's the crucial part: use that pressing cloth between the layers. Without it, you risk creating a visible press line on the right side of your fabric, which completely defeats the purpose of making an invisible hem.
Machine Setup and Stitch Selection
Attach your blind hem foot if you have one. If you don't, your regular presser foot will work. You'll just need to be more careful about your positioning.
Find the blind hem stitch on your machine. This looks like a series of zigzag stitches with straight stitches in between. Every machine's a little different, so check your manual if you're not sure which symbol to look for.

The Foolproof Folding Technique
Here's where the magic happens, and it might seem counterintuitive at first. This is the trick that makes blind hems foolproof once you get it.
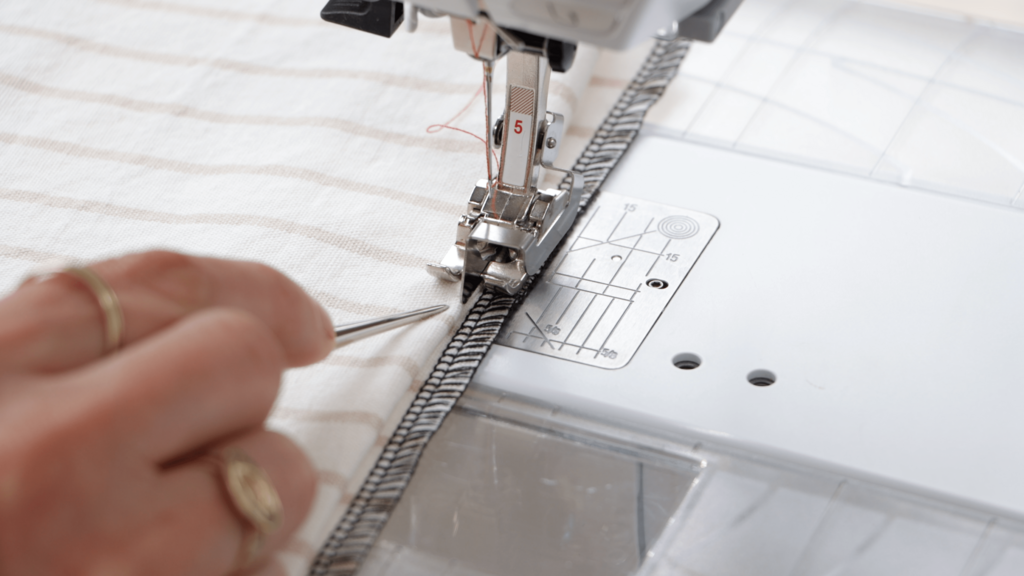
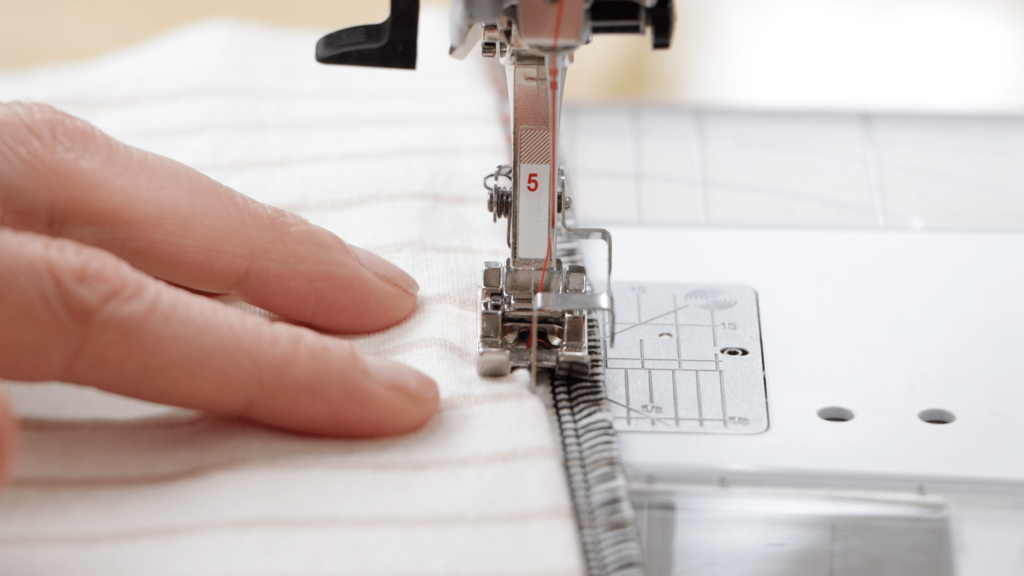
Set your fabric down with the hem allowance facing up. Now fold this hem allowance back on itself, so you have three layers of fabric with that finished edge sticking out just a bit.
Think of it like you're creating a little fabric sandwich. The main garment's on the bottom, the folded hem's in the middle, and you can see that finished edge peeking out on top.
Position this under your presser foot so the finished edge lines up with the right edge of your foot, and that fold's sitting snug against the guide on your blind hem foot.
Stitching Your Blind Hem
Here's where patience really pays off. As you stitch, the straight stitches will land near that finished edge, but when the needle swings out to create the zigzag stitches, it's going to bite just barely into that fold. This creates those tiny, almost invisible stitches that secure your hem in place.
That guide on the blind hem foot serves two functions. First, it helps you line up the fold of the fabric so you can stitch precisely. But the other really cool thing is that the needle swings over it when creating the zigzag part of the stitch. This creates a little bit of looseness in the stitches, so your hem can hang well without puckering.
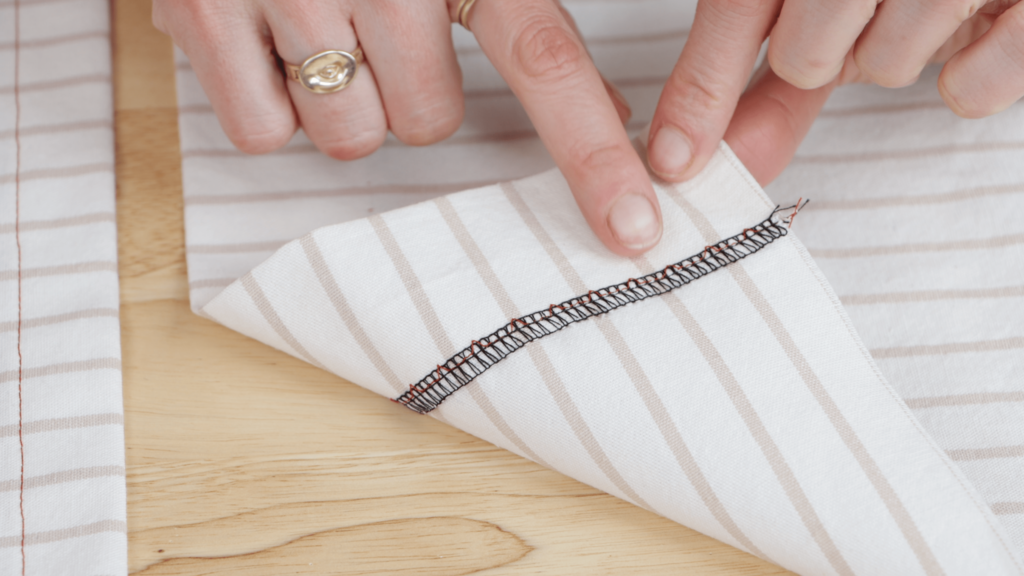
I always recommend sewing just a few inches, then stopping to check your work. Those stitches should be small and nearly invisible on the right side of your fabric. Also check that the zigzag's actually catching the fold—if it's not, you're just stitching in place and your hem won't be secured.
Troubleshooting Common Issues
If the zigzag isn't biting into the fold, increase the stitch width just a little at a time until it does. But be careful—too wide and you'll have visible stitches on the right side.
If the stitches are too visible from the right side, decrease the width and make sure that fold's staying aligned with your guide. Sometimes the fabric shifts as you sew, and that's what causes problems.
Here's something I've learned after years of sewing blind hems: the fabric you're working with makes a big difference in your settings. Lightweight fabrics need a narrower zigzag width, while heavier fabrics can handle a bit more. Always test on a scrap first.
Want to learn even more about perfecting your hems? Read this complete Hem Guide that covers which hem to use for every fabric and garment type, plus troubleshooting tips for common hemming issues.
Final Pressing and Quality Check
Once you've stitched your entire hem, give it a final press with that pressing cloth again. This sets the stitches and ensures everything lays smoothly.
Turn your garment to the right side and check your work. You should see a beautifully clean hemline with no visible stitches. If you do see stitches, don't panic—it usually means the zigzag width was set too wide or the fold shifted during sewing. It's all part of the learning process.
Perfect Projects for Blind Hems
Let me give you some specific examples of when I'd choose a blind hem, because understanding the context helps you make better decisions for your own projects.
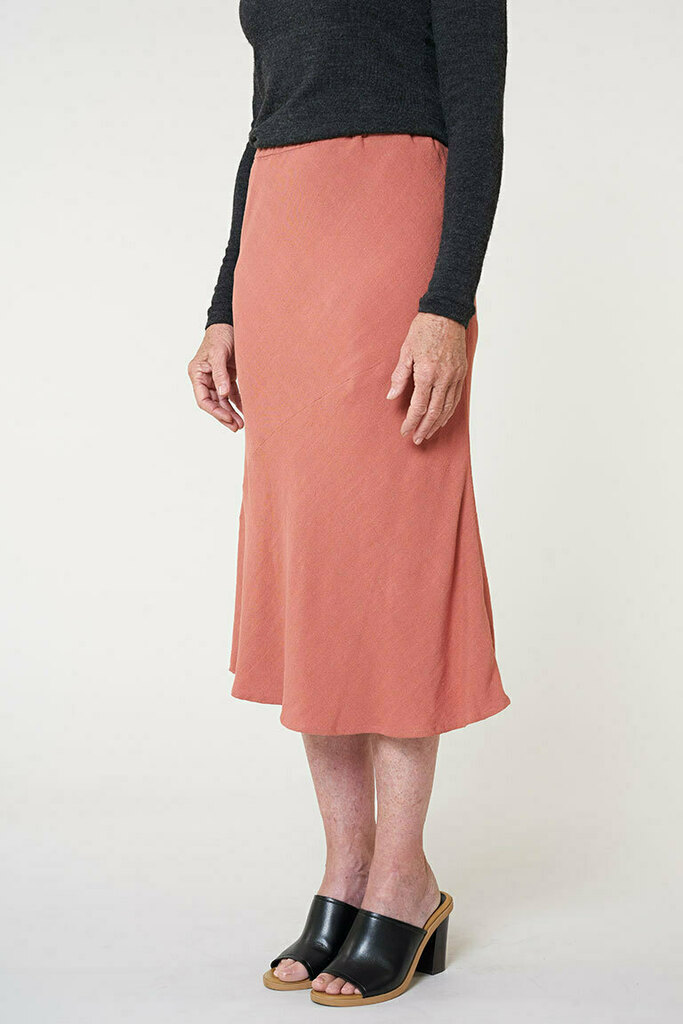
The Dezi skirt is a perfect candidate. With its light and flowy bias-cut shape, a blind hem gives the garment that chic, uninterrupted line that makes it look like it floated off a designer's sketching pad. Plus, using a deeper hem actually adds some nice body to the hemline, which improves the drape.

For something like the Mora dress—that fit-and-flare style with a full skirt—a blind hem looks absolutely stunning. And here's a bonus that many people don't think about: a deeper blind hem's easy to alter later if you want to lengthen the skirt. Try doing that with a narrow machine-stitched hem!
The Indigo coat is another place where blind hems really shine. Coats and jackets benefit from that polished finish, and I especially love using them on unlined jackets like the Indigo car coat. Since the interior's more visible on an unlined jacket, instead of just serging that raw edge, I'll often apply bias binding in a contrasting color or pattern. It creates this fun little detail that only you know about, but it makes the inside of your garment just as beautiful as the outside.
Tailored trousers like the Ani pattern also benefit enormously from blind hems. That professional finish elevates the entire garment and gives you that high-end look that's so hard to achieve with other hemming methods.
Taking Your Hemming Skills Further
Once you've mastered this technique, you might find yourself curious about even more delicate approaches for truly lightweight fabrics where this method might still feel too heavy-handed. For those situations, baby hems become your secret weapon for the most refined finishes possible.
Watch this video to discover how to sew baby hems for incredibly elegant results on delicate fabrics.
Blind hems really are one of those techniques that separate handmade garments from homemade ones. They take a little practice to perfect, but once you get comfortable with the setup and folding technique, you'll find yourself reaching for this method again and again.

